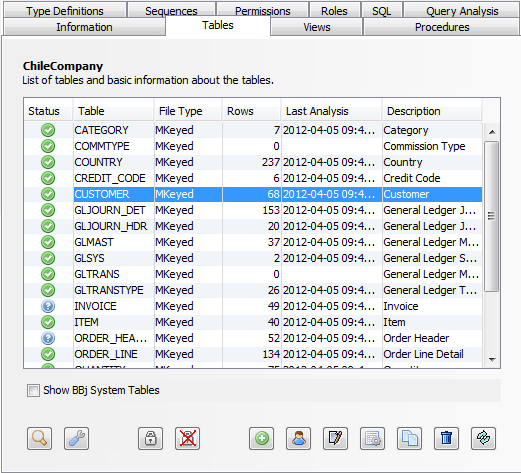
Enterprise Manager Java App: Database - Tables Tab
In BBj 13.0 and higher, the Enterprise Manager Java app has been superseded by a new browser Enterprise Manager and Eclipse plug-in. See Enterprise Manager - Database: Tables.
The Enterprise Manager provides the administrator with the ability to modify the definition of a database and its components, such as tables, columns, views, type definitions, and indices.
Tables, Columns, and Indices
To work with tables, select a database from the "Databases" list and then select the Tables tab:
|
Status |
In BBj 12.0 and higher, indicates the status of the table analysis and alerts for the table.
|
||||||||||||||||
|
Table |
Name of the table. By default, no system tables (those starting with DD_) are displayed. To display all system tables as well, put a check in the "Show System Tables" checkbox at the lower left corner of the Tables Tab. |
||||||||||||||||
|
File Type |
Type of the data file containing the table records. If there is a problem with accessing the file, it will indicate the reason. |
||||||||||||||||
|
Rows |
For record oriented files, indicates the number of records in the table. |
||||||||||||||||
|
Last Analysis |
Indicates the last time the table was analyzed. If there was a failure analyzing the table, it will display FAILURE highlighted in red. If additional features are available by analysis in the current version of BBj, it will display << New Features >>. |
||||||||||||||||
|
Description |
Description of the table. |


Duplicate a table
-
Select the database from the "Databases" list.
-
Click on the Tables tab.
-
Select the table to duplicate from the list of tables.
-
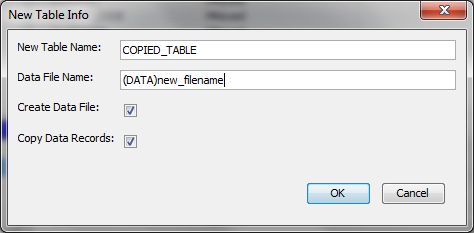
Click the [Duplicate Table] button located at the bottom of the list and the following dialog appears:
-
Enter a name for the new table created.
-
Specify the location and name of the data file created.
-
Check the “Create Data File” box to create an empty data file that matches the structure of the source table’s data file.
-
Check the “Copy Data Records” box to copy all of the records from the source table into the destination table. This copy operation creates an Online Copy Job that copies all of the records. Since an online copy job is used, the source table can be read from and/or written to during the copy process and all changes will also be included in the destination file. To see the progress of the copy operation, click on the “Online Copy Jobs” item in the Enterprise Manager navigator.
NOTE: Before using the destination table:
-
Select the “Online Copy Jobs” item to view the list of running jobs.
-
Once the job performing the table duplication reaches 100%, select it.
-
Click [Finish] to complete the copy job and release the file for use.
-
Modify definitions of tables within a database
1. Select the database from the "Databases" list.
2. Click on the Tables tab.
3. Select the desired table from the list of tables.
4. Click the Edit button located at the bottom of the list.
Create a new table within a database
1. Select the database from the "Databases" list.
2. Click on the Tables tab.
3. Click the create new table button located at the bottom of the list.
A table definition consists of the table information such as name, path to the data file, column definitions, and its index definitions. The following image show the Design Table dialog:

String Template Button
The [String Template] button opens a dialog with a string template created based on the definitions of the columns in the table. If this string template is modified, those modifications will be reflected in the column definitions for the table. This is a great way to create a table definition based on an existing string template, or to generate a string template based on a database table definition.
Save Button
The [Save] button saves the changes made to the table definition to the data dictionary. It does NOT make any changes to the underlying data file. This is useful if a table definition needs to be changed, but uses a data file that should not be modified.
Save & Update Button
The [Save & Update] button saves the changes to the data dictionary, but also updates the data file to match the new column definitions, indexes, record length, and file type. This option will recreate the data file and copy all of the existing records into the new file. Do not use this option if the data file is used by an application that expects a particular record layout or key structure to function properly.
Columns Tab
The Columns Tab provides an interface for defining the columns in the table. On MKEYED, XKEYED, VKEYED, etc. tables, specify the BBj data type for each column and then any special size information such as variable length, fixed length, variable length padded, etc.
For ESQL tables, specify the actual SQL data type for each column instead of a BBj type.
Indices Tab
Use the Indices Tab to set the indices used on the table. Indices make it possible for the SQL optimization engine to optimize queries in such a way as to make them perform quickly.
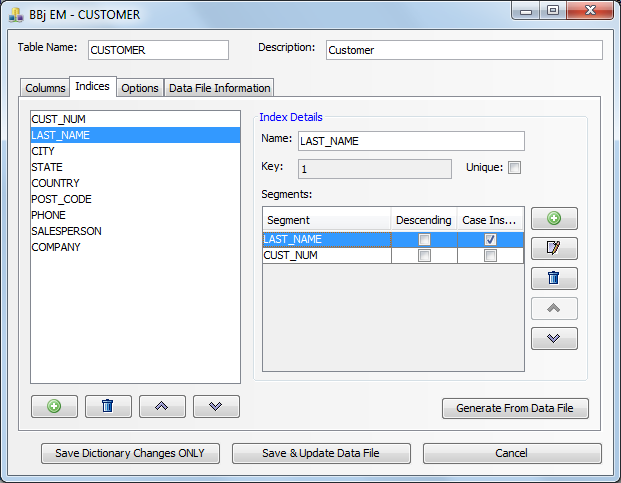
Create an Index
1. Click the [Add New Index] button.
2. Click the new index in the index list.
3. Give the index a name.
4. Put a check in the "Unique" checkbox if the index is to be unique.
5. Click the [Add New Segment] button to add each index segment/column.
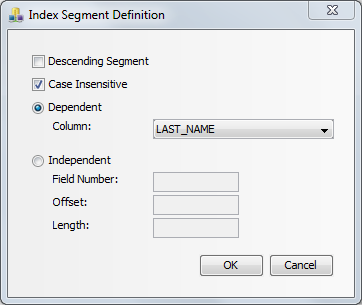
Define an Index Segment
Indices are made up of one or more segments. Each segment is bound to a particular column in most cases.
|
Option |
Description |
|
Descending Segment |
Specifies whether the index will be sorted ascending or descending. |
|
Case Insensitive |
In BBj 12.0 and higher, specifies that the character type segment will ignore case for optimization and comparisons. See Key/Index Case Sensitivity. |
|
Dependent Column |
Indicates the segment is bound to a particular column in the table (recommended). |
|
Independent |
Indicates the segment is bound to a particular location within the record at the byte level (not recommended but only present for legacy purposes). |
Edit an Index
To edit an index, simply select the index from the index list and make the necessary changes.
Drop an Index
To drop an index, select the index from the index list and click the [Drop Index] button.
Generate From Data File Button
When setting the index definitions, use the [Generate From Data File] button to bring in the index definitions directly from the keys defined on the data file instead of from those defined in the data dictionary. Those defined on the data file will be the indexes actually used by the SQL optimization engine during query execution.
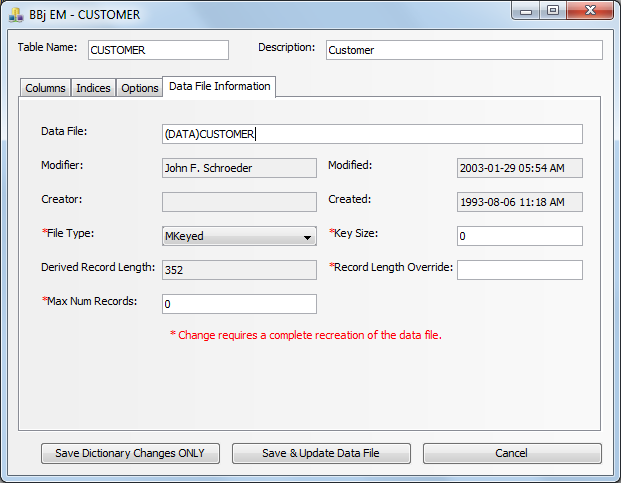
Data File Information Tab
Use the "Data File Information" tab to specify information about the data file used to store the records in the table such as file type, record size, key size, maximum number of records, etc.
|
Option |
Description |
|
Data File |
Location of the data for this table. Typically, this will NOT be an absolute path, but rather, a path relative to the DATA global variable (see image above). |
|
Modifier |
The last user to modify the data file. |
|
Modified |
The date and time the file was last modified. |
|
Creator |
The user who created the data file. |
|
Created |
When the data file was created. |
|
File Type |
The BBj file type for the data file. This can be any of the standard file types, or an ESQL (SQL only) file. |
|
Key Size |
The size of the key if this should be a single keyed file. |
|
Record Length |
The length of the record based on the column definitions. This setting is read only. |
|
Record Length Override |
Allows the administrator to specify a specific record length for the file that is different than the one automatically calculated by the column definitions. If this value is not zero, it will override the automatically generated value. |
|
Max Num Records |
The maximum number of records that the file will allow. |
Common Questions
Q. If the Length type is fixed does the Pad/Terminator field supply the pad character?
A. No. The pad character is only used if you choose Padded Variable Length.
Q. If the Length type is NOT fixed does the Pad/Terminator field supply the terminator character?
A. Yes
Q. For the system generated Record Length field is this calculated including terminator characters?
A. Yes. The size of the column is the size including the terminator.
Q. Does the Record Length Override allow the developer to manually set the Record length regardless of how large the sum of the individual columns plus terminators adds to?
A. The record length override is exactly that. It overrides the automatically generated size. You can make this number anything you want it to be which means it will allow you to cause yourself problems if you do it incorrectly. This is simply for backward compatibility.