
Enterprise Manager: Databases > Tables
To view this topic for the preceding Enterprise Manager, see EM Java App: Database - Tables Tab.
Description
The Enterprise Manager provides the administrator with the ability to modify the definition of a database and its table components Properties, Columns, Indexes.
Contents
Create Entirely New Table and Data File
Create Table Definition For Existing Data File
Getting Started
To work with database tables, complete the following steps:
-
Select a database from the "Databases" list.
-
Double-click the desired database.
-
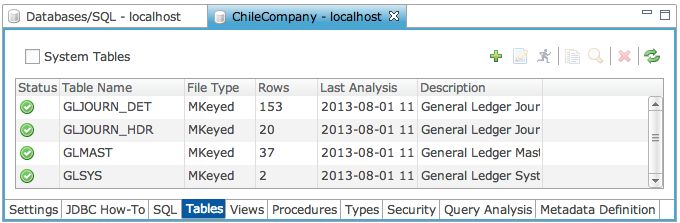
Click the “Tables” tab to view the list of defined tables as shown below.
NOTE:
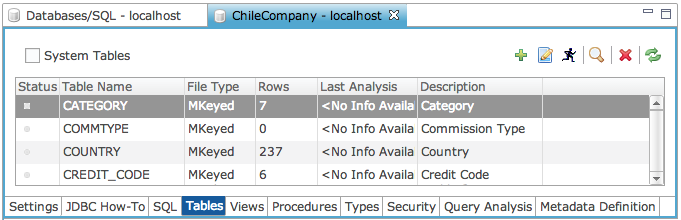
The Status column shown below displays icons representing the state of each table after the table has been analyzed.
If no table analysis was performed, the Status column is empty as follows:
|
System Tables |
Mark the System Tables checkbox if you want to see the BBj internal system tables as well (these are the DD_ tables), then click the refresh button to see the updated list. |
||||||||||||
|
Status |
|
||||||||||||
|
Table |
Name of the table. By default, no system tables (those starting with DD_) are displayed. To display all system tables as well, mark the "Show System Tables" checkbox at the lower left corner of the Tables Tab. |
||||||||||||
|
File Type |
Type of the data file containing the table records. If there is a problem with accessing the file, it will indicate the reason. |
||||||||||||
|
Rows |
For record-oriented files, indicates the number of records in the table. |
||||||||||||
|
Last Analysis |
Indicates the last time the table was analyzed. If there was a failure analyzing the table, it will display FAILURE highlighted in red. If additional features are available by analysis in the current version of BBj, it will display << New Features >>. |
||||||||||||
|
Description |
Description of the table. |


Duplicate a Table
The duplicate a table operation creates an Online Copy Job that copies all of the records, allowing read and/or write access to the source table during the copy process. All changes are also included in the destination file.
After completing the steps in Getting Started for a selected database, duplicate a table as follows:
-
Select the desired table from the "Databases" list to duplicate.
-
Click the [Duplicate Table] button located at the top of the window.

-
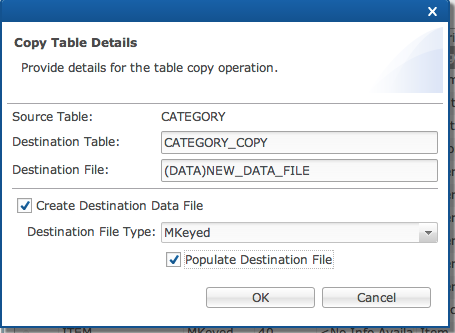
Complete the Copy Table Details dialog for the new table created as follows:
-
Enter a 'Destination Table' name.
-
Enter a 'Destination File' name.
-
Mark the 'Create Destination Data File' checkbox to create an empty data file that matches the structure of the source table’s data file.
-
Select the 'Destination File Type' from the dropdown.
-
Mark the 'Populate Destination File' checkbox to copy all of the records from the source table into the destination table.
-
Click [OK].
-
-
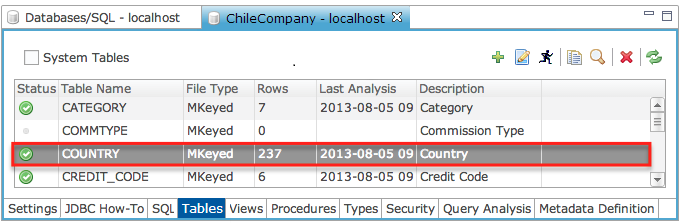
Click [Finish] to complete the copy job and release* the file for use.
*Once the copy is 100% complete, the destination table is available for use. To see the progress of the copy operation, click on the “Online Copy Jobs” item in the Enterprise Manager navigator.
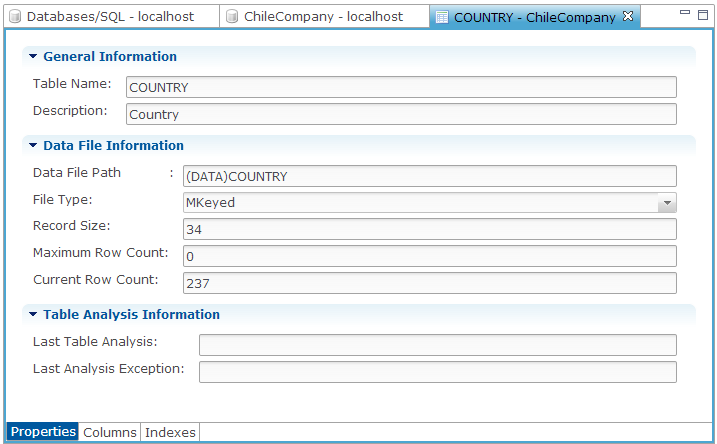
Properties
Modify Table Properties
After completing the steps in Getting Started for a selected database, modify the table definitions as follows:
-
Double click the desired table from the "Databases" list.
-
View or edit the table properties, as necessary.
| Property | Description |
|---|---|
|
Table Name |
Name of the table. In legacy format data dictionaries, this name is limited to 16 characters. In enhanced format dictionaries, the limit is 255. |
|
Description |
A short description for the table. |
|
Data File Path |
Path to the data file. It is strongly recommended to use relative paths including global references (typically the DATA global) instead of absolute paths. This ensures portability of the data dictionary across machines and operating systems. For example, instead of C:\mydata\CUSTOMER, define C:\mydata\ as the value for DATA in the database configuration, then specify (DATA)CUSTOMER for the data file path. |
|
File Type |
Type of the table’s data file. If the file already exists, changing this value and choosing the rewrite the data file at save time will convert the data file to the new file type. |
|
Record Size |
Size of each record (in bytes) in the data file. |
|
Maximum Row Count |
Maximum number of records that can be written to the data file Strongly recommended to set to 0 (zero) which indicates unlimited. |
|
Current Row Count |
Read only, current number of records in the table’s data file. |
|
Encryption String |
Encryption password used to encrypt the file if and only if it is an encrypted file. Usually this string will adhere to the following format: "CRYPTPASS=mypassword". See: MKEYED Verb - Create MKEYED File, XKEYED Verb - Create XKEYED File and VKEYED Verb - Create VKEYED File. |
|
Last Table Analysis |
Date and time of the last successful table analysis. |
|
Last Analysis Exception |
The exception if the last table analysis was unsuccessful. |
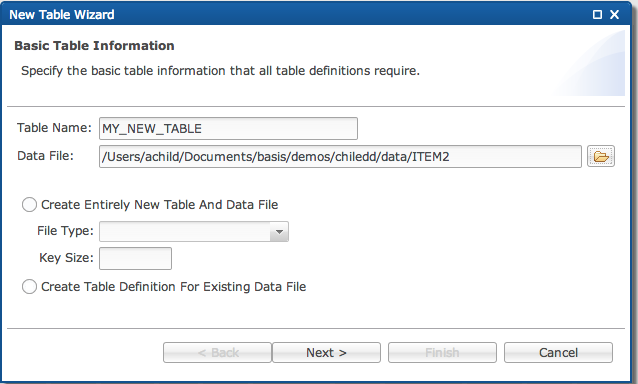
Create a New Table
After completing the steps in Getting Started for a selected database, modify the table definitions as follows:
-
Click the [+] located at the top of the window.

-
Complete the information in the New Table wizard.
-
Enter the 'Table Name'.
-
Enter the 'Data File'.
-
Select the creation option for the table and data file
-
Create Entirely New Table and Data File
Choose this option when creating a new table and data file.
-
Select the radio button [Create Entirely New Table And Data File].
-
Specify a key size greater than zero for single keyed files, or zero to give the option for multiple indexes.
Note:
Do not create single keyed files for new projects as they are significantly limited in functionality.
-
Choose a file type from the dropdown list.
-
Click [Next >].
Create Table Definition For Existing Data File
Choose this option to create a table definition for an existing data file.
-
Select the radio button [Create Table Definition for Existing Data File].
-
Choose the data file.
-
Click the [Folder Icon].
-
Select your data file.
-
Click [Next >].
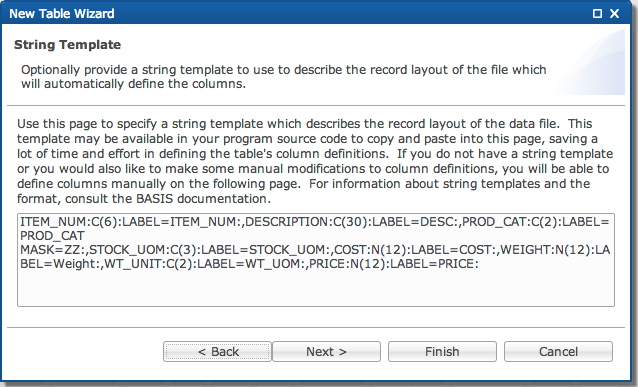
-
-
Enter your string template.
-
If you do not have a pre-defined string template click [Next >]. (If you do have a string template, paste the template into the box and click [Next >].)
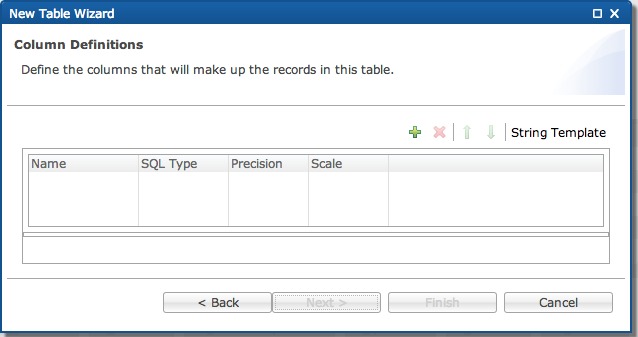
-
In this screen, add the columns for your data file if you did not enter a string template.
-
Click the “+” to add a new column for the data file.
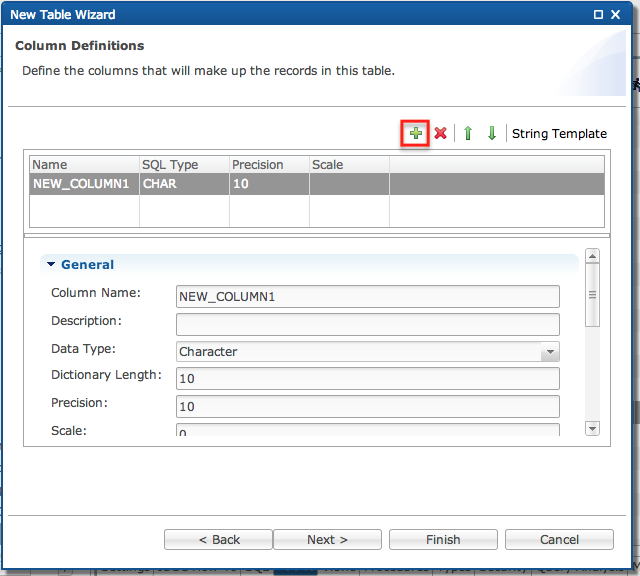
-
After entering the column(s) definition click [Next >] or [Finish].
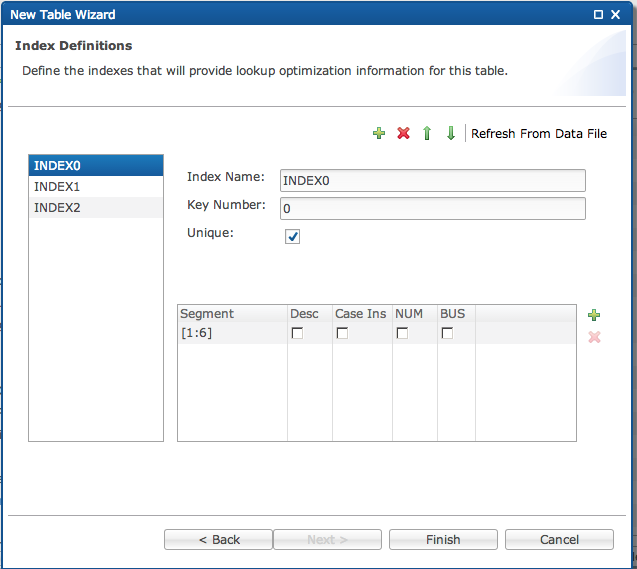
-
Next, enter the Index Definitions
-
The new table now appears in the tables tab.

A table definition consists of the table information such as name, path to the data file, column definitions, and its index definitions. The following image shows the Design Table dialog:
String Template
The
[String Template] button appears at the top of the Select a table >
Columns (from Databases > [Database] > Tables).

Clicking [String
Template] opens a dialog displaying a string template created based on
the definitions of the columns in the table.
You can modify this string template (or copy and paste an existing string template into the dialog) and the changes will be reflected in the list of columns for the table. It can also be useful to copy and paste this string template into a BBj program for use when accessing files with the OPEN, READ RECORD, and WRITE RECORD verbs.
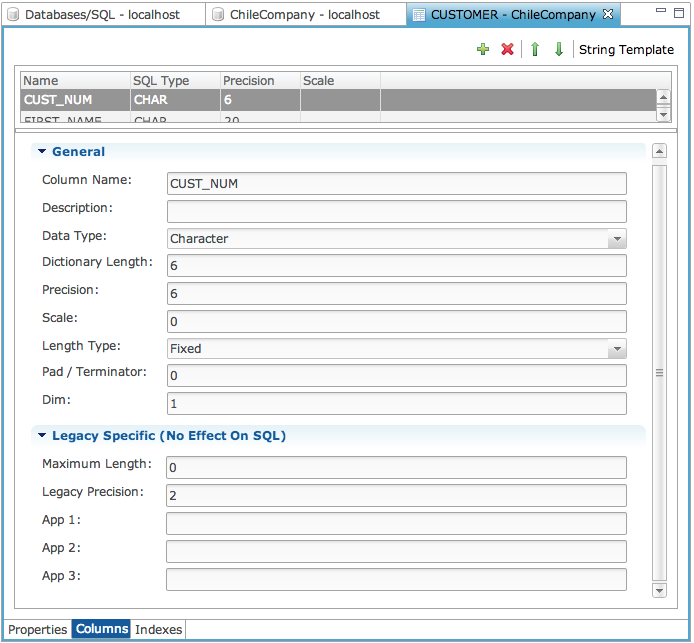
Columns
The “Columns” tab provides an interface for defining the columns in the table. Specify the BBj data type for each column in MKEYED, XKEYED, VKEYED, etc., tables and then any special size information such as variable length, fixed length, variable length padded, etc.
For ESQL tables, specify the actual SQL data type for each column instead of a BBj type.
| Property | Description |
|---|---|
|
Column Name |
Name of the column. |
|
Description |
A short description for the column . |
|
Data Type |
The BASIS-specific data type for the data in this specific portion of the record. SQL data types differ from BASIS data types so you cannot specify a specific SQL type (with the exception of ESQL tables). |
|
Dictionary Length |
Length of the raw data in this portion of the record. This may not be the same as precision. This value corresponds to the size value in string template definitions. For example, an integer defined in a string template of I(4) would have a dictionary length of 4 even though the integer values can be longer than 4 digits. |
|
Precision |
Defined according to the definition in SQL terminology as the total number of digits/characters allowed in this column. For character values this simply means the number of characters allowed. For type NUMERIC, this means the total number of digits before and after the decimal point. Scale (see below) refers to the number of those digits that appear after the decimal. For example, a precision of 5 and scale of 2 allows for the numbers 123.00, 15.54, 1.23. 1, etc, but not 12454 because 2 of the digits are required to appear after the decimal. The Precision and Scale are not editable in Legacy format data dictionaries, only Enhanced format dictionaries. |
|
Scale |
See description for Precision. |
|
Length Type |
Specify whether this is fixed length or one of the variable length types. These correspond to string template attributes For example, for a 10 character column, fixed length would be C(10), variable length terminated would be C(10*) and variable length padded would be C(10**). |
|
Pad/Terminator |
Pad or terminator character if the type defined requires a pad or terminator character defined. Variable length terminated and variable length padded require this value to be configured. |
|
Dim |
Not recommended. The preferred method is to define a new column for each field. This remains for backward compatibility for those using arrays in their string template definitions. |
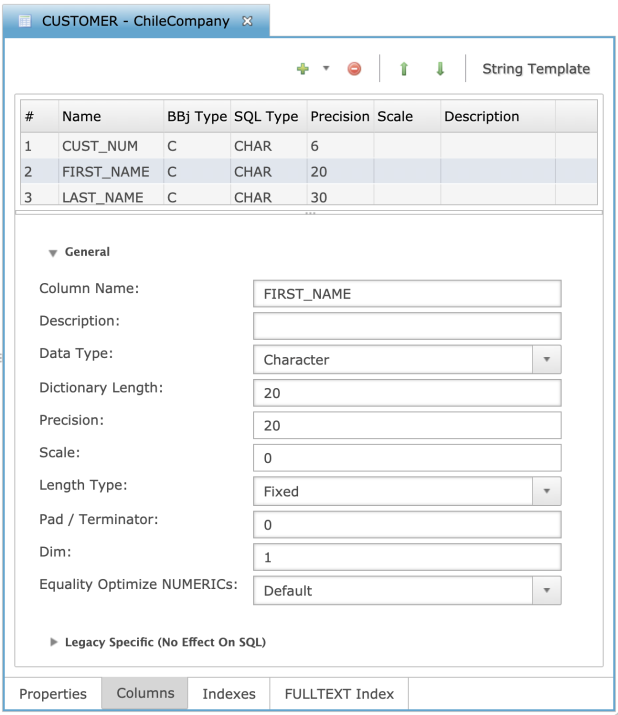
| Equality Optimize NUMERICs |
Available in BBj 20.20 and higher. BBj NUMERIC type columns are not normally ordered correctly in indices because they are stored and sorted in their string representations. To further complicate things, some BBx systems contain left-padding of spaces before the digits in these values. This means that even equality optimization is not possible. Therefore, the SQL engine does not include them for optimization by default. If the data is known to have no such left-padding (digits are left-aligned in the record field), equality optimization is possible. Enable this setting to override the global database setting for this individual column if its structure differs from other columns in other tables in the database. |
|
Legacy Specific |
The fields in this section are ignored by the SQL engine and only left in place for legacy purposes. Some applications have values stored in these fields and interpret those values on an application-specific basis. |
Indexes
Use the “Indexes” tab to set the indexes used on the table, which makes it possible for the SQL optimization engine to optimize queries and perform more quickly.
|
Index Name |
Name of the index when referencing it from SQL. |
|
Key Number |
Key number corresponding to the KNUM for the table’s underlying data file. This number is used when opening the file directly from BBj using the OPEN verb when specifying a KNUM=# option. |
|
Unique |
Whether this index forces all values in the columns included in the index segments to be unique. |
|
Segment |
A single column within the table that makes up a portion of the index. Indices can contain multiple segments to provide improved optimization support for filtering as well as ordering. |
|
Desc |
Whether the segment will be sorted in ascending or descending order. |
|
Case Ins |
Whether this index segment will perform lookups in a case insensitive manneor. If this is not checked, all lookups using KEY= from BBj require exact case match for the key value. |
|
NUM |
Whether this segment is known to contain type N numeric data. |
|
BUS |
Whether this segment is known to contain a business math, type B, value. |
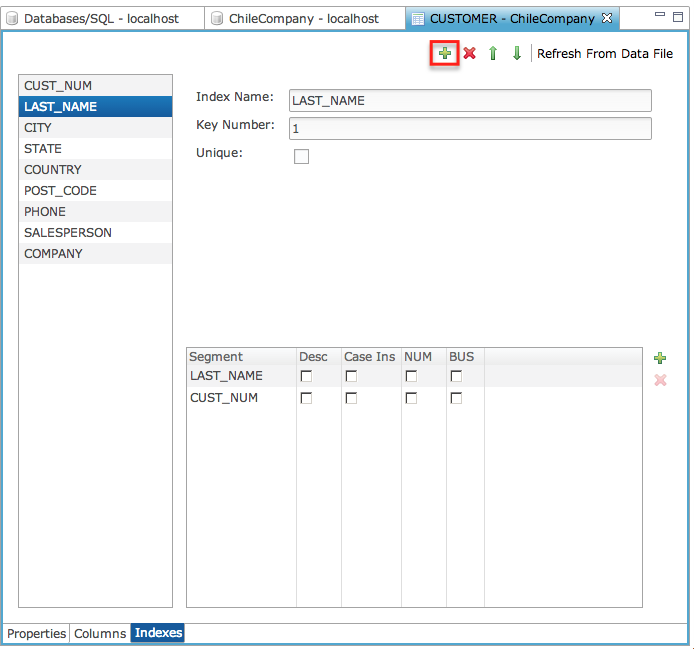
Create an Index
-
Click the [+] button.
-
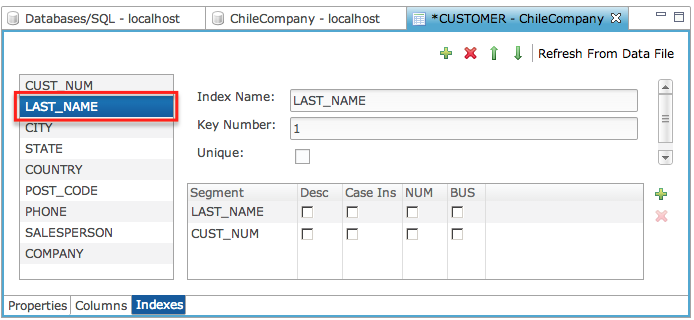
Click the new index in the index list.
-
Complete the dialog.
-
Enter the 'Index Name'.
-
Mark the 'Unique' checkbox, as necessary, if the index is to be unique.
-
-
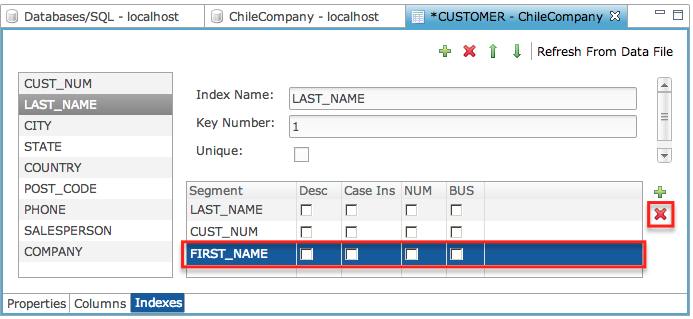
Click the [Add New Segment] button to add each index segment/column.

-
To remove a segment, highlight the segment and click the remove segment button.
Define an Index Segment
Indexes are made up of one or more segments. Each segment is bound to a particular column in most cases. Segments bound to a particular column are referred to as “dependent” segments. “Independent” segments may or may not correspond to a particular column. These are provided for legacy purposes since some BBx programs use segment definitions that reference a range of data in the record. However, it is important to understand that these types of segments may or may not be usable by SQL queries for optimization. Only those segment definitions that correspond exactly to a complete column definition are usable for optimization by the SQL engine. Therefore it is recommended to always used dependent segments when creating new tables.
-
To create a new segment on an index, click the new segment button (+ icon). This adds the segment to the list. To set the column referenced by the segment, click in the Segment field to bring up the segment definition dialog.
-
After clicking the [+], complete the dialog.
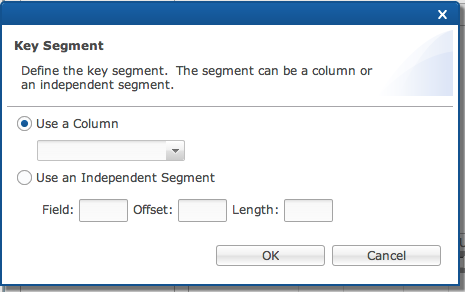
Use a Column
Indicates the segment is bound to a particular column in the table (recommended).
Use an Independent Segment
Indicates the segment is bound to a particular location within the record at the byte level (not recommended but only present for legacy purposes).
Field
Field number for the index segment definition.
Offset
Offset within the field.
Length
Length of the index segment.
-
Once the column reference is set, put a check in any of the cells in the segment table to indicate specific properties about the segment:
Desc
Indicates the segment will be sorted in descending order. This is important if you plan to leverage the sorting optimization in the SQL engine for this segment and plan to typically sort the values in the referenced column in descending order.
Case Ins
Indicates the segment will be a case insensitive segment so lookups can be done without regard to case. Legacy files will not have this set and so all lookups by key are case sensitive.
NUM
Indicates the column contains numeric (specifically type N) data. If this is not set, only equality optimizations can be performed using this index segment due to the way the filesystem stores type N values.
BUS
Indicates the column is specifically type B (Business Math). This is an important indication so that optimization works properly on this type of column.
Edit an Index
To edit an index,
-
Select the index from the index list
-
Make the necessary changes.
-
Click "X" to close the tab and save the edits.
Drop an Index
To drop an index,
-
Select the index from the index list.
-
Click the [Drop Index] button.
-
Click "X" to close the tab and save the edits.
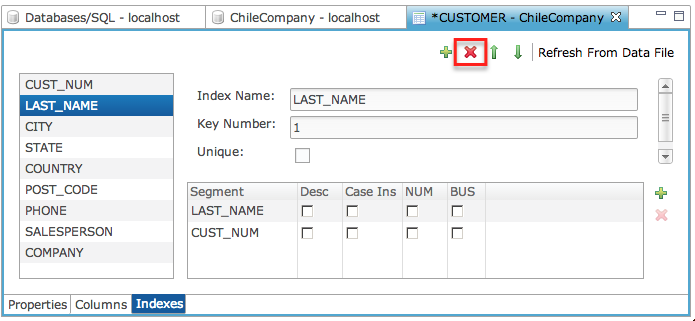
Refresh from Data File button
When setting the index definitions, use the [Refresh From Data File] button to bring in the index definitions directly from the keys defined on the data file instead of from those defined in the data dictionary. Those defined on the data file will be the indexes actually used by the SQL optimization engine during query execution.
Common Questions
Q. If the
Length type is fixed does the Pad/Terminator field supply the pad character?
A.
No. The pad character is only used if you choose Padded Variable Length.
Q.If the
Length type is NOT fixed does the Pad/Terminator field supply the terminator
character?
A.
Yes
Q.For the
system generated Record Length field is this calculated including terminator
characters?
A.
Yes. The size of the column is the size including the terminator.
Q.Does the
Record Length Override allow the developer to manually set the Record
length regardless of how large the sum of the individual columns plus
terminators adds to?
A. The record length override is exactly that. It overrides the automatically generated size. You can make this number anything you want it to be which means it will allow you to cause yourself problems if you do it incorrectly. This is simply for backward compatibility.
See Also
Metadata Definition