Shop Floor Control - Work Order Entry
Function
Work Order![]() A document or group of documents that describes a job. A work order can also be a computer file that retains all job information. Entry defines
the expected material, labor, and subcontract
requirements, thus setting the standard against which the actual material,
labor, and subcontract costs can be measured. The Work Order Entry
features appear in three tabs: Item, Additional
Information and Comments. Selections
can be made from the Work Order Entry Display
Additional Options menu to define new work orders, allow changes
or inquiry to requirements, schedule and release work orders, view transaction
history and cost summary, and produce a hard copy
of any work order.
A document or group of documents that describes a job. A work order can also be a computer file that retains all job information. Entry defines
the expected material, labor, and subcontract
requirements, thus setting the standard against which the actual material,
labor, and subcontract costs can be measured. The Work Order Entry
features appear in three tabs: Item, Additional
Information and Comments. Selections
can be made from the Work Order Entry Display
Additional Options menu to define new work orders, allow changes
or inquiry to requirements, schedule and release work orders, view transaction
history and cost summary, and produce a hard copy
of any work order.
To access this task...
Select Work Order Entry from the Shop Floor Control main menu.
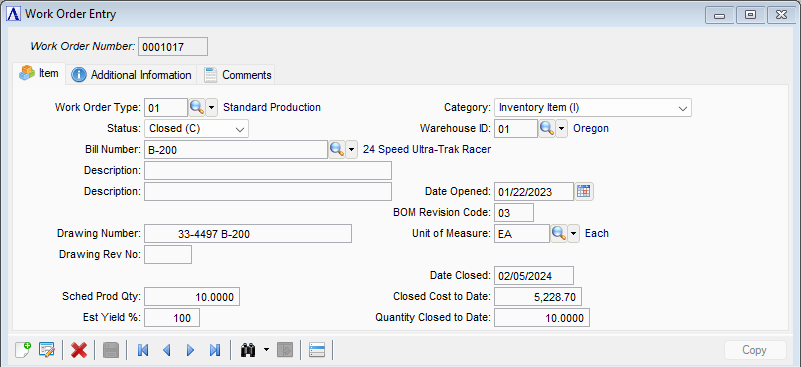
Work Order Entry – Item tab
About the Fields
The main Work Order Entry form is divided into two tabs. From the Item tab you can enter new work orders or look up existing work orders. When creating a non-stock work order, the Bill Number field is disabled and the Description fields are used to define the work order. Use the Additional Information tab to capture optional information such as a customer and sales order number, warehouse, and scheduling method and dates.
When creating a new non-stock work order, once the basic information has been entered – Sched Prod Qty, Est Yield %, Date Opened, Unit of Measure, and Warehouse – the Copy function allows you to finish creating the new work order by copying an existing work order. All materials, operations, and subcontracts are copied to the new work order and can be altered as needed.
To enable edits to the form select ") .
.
Item Tab
In the Work Order Number field...
-
Enter the number for the work order.
-
Press Tab to assign the next number in sequence.
-
Click
") to display the Work Order Entry table. Select a record and the fields are populated with the selection.
to display the Work Order Entry table. Select a record and the fields are populated with the selection. -
Click the record navigating buttons;
") to view the first record,
to view the first record, ") to view the previous record,
to view the previous record, ") to view the next record, and
to view the next record, and ") to view the last record.
to view the last record.
When selecting a number assigned to an existing work order, the header![]() The information that is unique to a work order as a whole. Header information includes dates, production quantities, customer information, and other data specific to the work order. fields display the current information.
The information that is unique to a work order as a whole. Header information includes dates, production quantities, customer information, and other data specific to the work order. fields display the current information.
Tabbing or mousing past the required Work Order Number text field causes the system to issue![]() To relieve on-hand inventories and charge those materials to a job. the following prompt:
To relieve on-hand inventories and charge those materials to a job. the following prompt:

Assign the next Work Order Number?
-
Select Yes to have the system assign the next work order number.
-
Select No to dismiss the prompt to make other selections.
The Copy button
is available for Custom Inventory![]() The components, items, and raw material purchased or produced for resale or used to support production.
type work orders. It facilitates faster entry of work order information
by using an existing work order data such as materials, operations, and/or
subcontracts.
The components, items, and raw material purchased or produced for resale or used to support production.
type work orders. It facilitates faster entry of work order information
by using an existing work order data such as materials, operations, and/or
subcontracts.
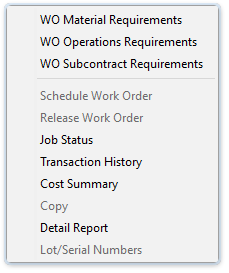
Display Additional Options
-
WO Material Requirements - opens the material requirements window for review/editing.
-
WO Operations Requirements - opens the operations requirements window for review/editing.
-
WO Subcontract Requirements - opens the subcontractor requirements window for review/editing.
-
Job Status - creates a job status report for the work order.
-
Transaction History - opens the transaction history window to create a report.
-
Cost Summary - creates a cost summary report for the work order.
-
Copy
-
Detail Report - opens the detail window for review/editing.
-
Lot/Serial Numbers - opens the lot/serial number window for review/editing.
Creating a Work Order
In the Work Order Type field...
The selection made in this field determines which category the work order will be placed in. To change the work order type, you must replace it with one within thesame category.
-
Enter a valid work order type code.
-
Click
") to select from a list of existing work order types.
to select from a list of existing work order types. -
Click
") to display the master record for the work order type code entered.
to display the master record for the work order type code entered.
NOTE:
The WO Category determines which grids are automatically presented after the initial save of a new work order. For example, if you assign a Work Order Type Code that has been defined with a Non-stock (N) WO Category once you make the initial save, the system will automatically bring up the WO Operations Requirements grid, the WO Material Requirements grid, and finally the WO Subcontract Requirements grid one after the other to speed operational flow.
From the Status dropdown...
When entering a new work order, the status defaults to Planned (P). This will automatically change to Open (O) when the work order is released. Additionally, the system will automatically display the WO Operations Requirements grid, the WO Material Requirements grid, and finally the WO Subcontract Requirements grid one after the other to speed operational flow.
-
Select one of the following Statuses:
-
Planned (P)
-
Open (O)
-
Quote (Q)
-
Closed (C)
-
In the Bill Number field...
-
Enter a valid bill number.
-
Select
to select from a list of existing bill numbers.
In the Description field...
Display only.
In the Drawing Number field...
Displays any drawing number associated with the bill number.
-
Enter a drawing number to associate with this work order.
In the Drawing Rev No field...
Displays any revision number associated with the bill number.
-
Enter a revision number to associate with this work order.
In the Sched Prod Qty field...
-
Enter the quantity to be produced.
-
Press Tab or Return to accept the default quantity of one.
In the Est Yield % field...
-
Enter the percentage amount of the estimated yield
 An estimate of the percentage of finished goods that are completed for a particular work order by the end of the manufacturing process. Estimated yields are calculated based on past performance and are used to increase the demand for components or raw materials to provide sufficient availability..
 -
Press Tab or Return to accept the default percentage of 100%.
From the Category dropdown...
Display only. Shows the category in which this bill was placed when a work order type was selected. If a new work order is being created, use the dropdown tool to select one of the following categories:
-
Inventory Item (I)
-
Non-Stock Item (N)
-
Recurring/Permanent (R)
In the Warehouse ID field...
Note:
In versions prior to 24.21, the Warehouse ID is on the Additional Information tab.
-
Enter a valid warehouse code.
-
Click
to select from a list of valid warehouse ID numbers.
In the Date Opened field...
-
Enter the date that the work order will be initiated.
-
Press Tab or Return to accept the default of today’s date.
-
Click
") to use the tool to select the date.
to use the tool to select the date.
In the BOM Revision Code field...
-
Enter a revision number to associate with this work order.
In the Unit of Measure field...
-
Enter the unit of measure.
In the Date Closed field...
Display only. Shows the date that an existing work order was closed.
In the Closed Cost to Date field...
Display only. Shows the value of the existing work order at closing.
In the Quantity Closed to Date field...
Display only. Shows the quantity of the closed work order.
Additional Information Tab
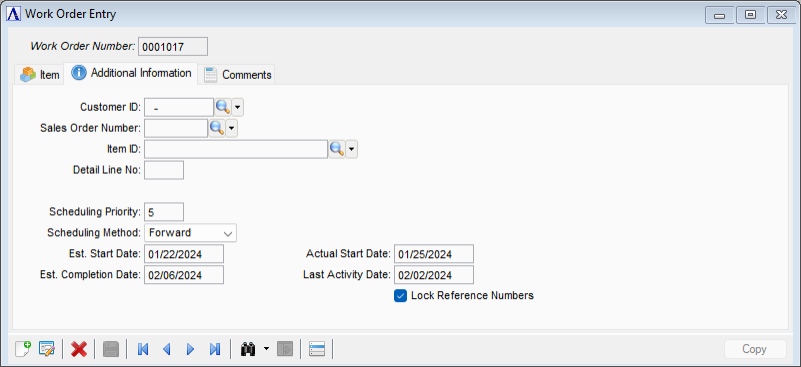
Work Order Entry – Additional Information tab
In the Customer ID field...
-
Enter a valid customer number. The customer name information displays to the right of the field.
-
Click
to select from a list of valid customer ID numbers. -
Press Tab or Return to skip this entry.
NOTE:
For category Non-Stock Item (N) work orders, entering the correct customer number, sales order number, and line number allows the total accumulated cost of the work order to be posted to the actual sales order by the Closed Work Order Summary Register update. For category Inventory Item (I) work orders, it is also useful to enter the proper customer number since this information will make it possible to find work orders by customer number with the lookup function.
In the Sales Order Number field...
This field is bypassed if a customer number is not entered.
-
Enter a valid sales order number that corresponds to the sales order in the Order/Invoice Processing module. This associates the word order with a sales order. This associates the work order with a sales order.
-
Press Tab or Return to key to skip this entry.
In the Item ID field...
This field will be bypassed if the sales order number is not selected.
- Enter the ID of the item in the selected sales order the work order is for, or use the Lookup to select the item. This action completes the association of the work order with a specific sales order item.
In the Detail Line No field...
Display only. Shows the line number of the selected item on the selected sales order.
In the Scheduling Priority field...
-
Enter a priority code from 1 (high) to 9 (low) for the scheduling operations which indicate the relative importance of this work order for shop floor control.
-
Press Tab or Return to accept the default priority of 5.
From the Scheduling Method dropdown...
Display only. Shows the method of scheduling selected for this work order in the Schedule Work Order option.
-
Use the dropdown tool to select one of the following scheduling methods:
-
Manual
-
Forward
-
Backward
-
In the Est. Start Date field...
Display only. Shows the date selected for this work order in the Schedule Work Order option.
In the Est. Completion Date field...
Display only. Shows the date selected for this work order in the Schedule Work Order option.
In the Actual Start Date field...
Display only.Shows the actual starting date of a work order that is determined by running the Materials Issues Register and Update.
In the Last Activity Date field...
Display only. Shows the date any activity was last associated with this work order.
Lock Reference Numbers checkbox...
When checked, the reference number fields in the Materials, Subcontracts and Operations grids cannot be altered. New work orders created from scratch will have the box unchecked by default, whereas new work orders that are copies of existing work orders will have the lock set. The "Lock Reference Numbers" flag is controlled by the user – it can be checked/unchecked at any time until a work order is closed. The user will need to confirm each time the flag is changed.
Comments Tab
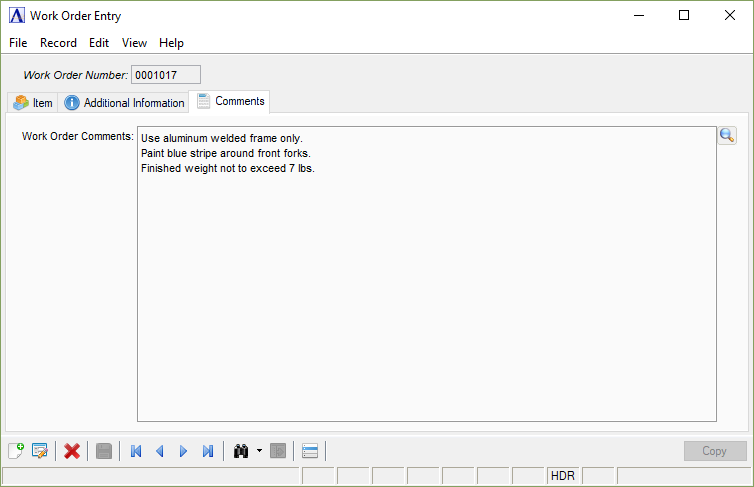
Work Order Entry - Comments tab
In the Work Order Comments field...
Enter free-form comments about the work order. Work Order comments are generally for engineering notes, special handling instructions, etc.
-
Enter or edit by typing directly into the form field, clicking
, or by pressing Ctrl + F to launch the comment editor.
When finished making entries to the fields...
-
Click
") to save the record.
to save the record. -
Click
") to clear the form and begin a new work order entry.
to clear the form and begin a new work order entry. -
Click
") to delete the entry.
to delete the entry.
After saving the work order, the WO Operations Requirements window is displayed as a visual confirmation of the work order entry and associations as a visual confirmation of the Work Order Entry and associations.