FormBuilder/AppBuilder: Dialogs
This page describes the dialogs that FormBuilder and AppBuilder display. Each dialog is opened from an action or from a prompt in the BBjGui Inspector.
- Create GBF Dialog
- Form Gen Wizard Dialog
- Fill RecordSet Dialog
- RecordSet Editor Dialog
- Design Time User Dialog
- Add Order Editor Dialog
- Adjust Control ID Dialog
Create GBF Dialog
Description
The Create GBF Dialog allows configuration of filenames and paths relevant to the GBF file.

Location
The Create GBF Dialog displays when selecting the Create GBF Action.
Fields
| Field | Description |
|---|---|
|
GBF file name |
Fully qualified path to new .gbf file |
|
ARC file name |
Non-qualified name of .arc file |
|
Program file name |
Fully qualified path to new .bbj file |
|
Development prefix |
Directory of .arc file for compilation (see also the NetBean prefix in set .arc File Action) |
Form Gen Wizard Dialog
Description
In BBj 7.00 and higher, the Form Generator Wizard Dialog helps to generate an AppBuilder project file based on a RecordSet in a FormBuilder .arc resource. To use SQL RecordSets, BBjServices must be running.
Location
The Form Gen Wizard Action on the RecordSet Node within the BBjGui Inspector displays the Form Gen Wizard Dialog.

Example

Steps
Use this wizard to generate a form with any combination of individual BBj GUI controls and/or a databound grid mapped to the selected fields.
To generate a databound grid, specify the grid width and height and select fields in the 'Grid' column.
To generate individual BBj GUI controls, select the control width, height and columnar layout, and select fields in the 'Control' column. For each field, specify the type of BBj GUI control to be generated and optionally select the 'Search' option to generate a button beside the control. By default, text fields will generate BBjInputE controls and numeric fields will generate BBjInputN controls, but these defaults can be adjusted by clicking in "BBj GUI Control".
To rearrange the sequence of controls or grid columns, select the field to be moved and click on the appropriate buttons to move the field up or down in the list.
When you have finished configuring your form layout, click OK to generate the form. Based on the configuration specified in this example, the following form is generated:

The final step is to generate an AppBuilder program from this form (See: Create GBF Action). The final program looks like this:

Fill RecordSet Dialog
Description
In BBj 7.00 and higher, the Fill RecordSet Dialog prompts for an optional recordset and field to populate a list control selected in the Form Generator Wizard.
Location
The Fill RecordSet dialog comes up when a field in the Form Generator Wizard is mapped to a list control (BBjListButton, BBjListEdit, BBjListBox).
Example

Generated Program

RecordSet Editor Dialog
Description
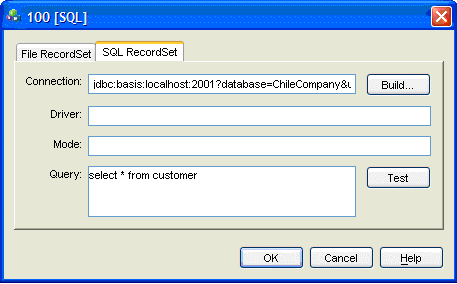
The RecordSet Editor Dialog configures a RecordSet within a FormBuilder .arc resource.
Location
The Edit RecordSet Action on the RecordSet Node within the BBjGui Inspector displays the RecordSet Editor Dialog.
Remarks
Using SQL RecordSets requires that BBjServices is running.
The Driver field should only be filled in when configuring a JDBC RecordSet which does not use the built-in BASIS JDBC driver.
The Modes field can typically be left blank, see SQLOPEN VERB for more information about mode strings.
To configure a File Recordset, a File RecordSet requires a template. This is easily retrieved from BBjServices, provided it is running, by following these steps:
-
Fill out the file location.
-
Click [Select] to the right of the Template field.
-
Fill in the user information in the new "Get Template from Server" dialog.
-
Click [Get Template from Server].
-
Press [OK].
Design Time User Dialog
Description
Specifying Design Time User Dialog while using SQL RecordSets allows the developer to connect to a local BBjServices using a user/password that differs from the deployed user/password.
Location
FormBuilder prompts for a Design Timer User when making the first connection to BBjServices.

Selecting Yes results in the Design Time User Dialog.

Add Order Editor Dialog
Description
The Add Order Editor Dialog adjusts the order in which the controls are added to the window, thereby adjusting the paint or 'Z' order.

Actions
The Add Order Editor Dialog appears via the Adjust Add Order Action.
Adjust Control ID Dialog
Description
The Adjust Control ID Dialog allows you to adjust the control IDs.

Actions
The Adjust Control ID Dialog displays via the Adjust Control ID Action.
Remarks
The tab order is dependent on control ID's.