BBj Unit Test
Welcome to the starting point for your journey to discover what the BBj Unit Test is, and how and why to use it. This journey is split into the following topics:
To accelerate learning about the BBj Unit Test, please work through these topics in the order in which they are listed.
Overview
The BBj Unit Test provides developers using the BDT Studio with a framework to create, run, and view the results from unit tests. A unit test:
-
Is a public method of a public BBj custom object or class.
-
Is part of a BBj custom object or class that is defined in a BBj source file with a .bbjt file extension (a unit test file).
-
Takes no arguments.
-
Returns nothing (the return type is void).
-
Announces its success or failure through the special Assert methods it calls (more on the Assert methods below).
-
Is marked by a @Test annotation (more on Annotations below).
Each .bbjt unit test file must hold exactly one BBj custom object class, and that class must contain one or more unit test methods. Unit test methods are often grouped together in a single BBj custom object class to test related areas of code, or to test a single BBj custom object class.
The BBj Unit Test offers you the ability to:
-
Create a unit test file to hold a BBj custom object class with unit test methods
-
Add methods that each define one unit test (unit test methods)
-
Group unit test methods and unit test classes into Categories
-
Group unit test classes into unit test Suites
-
Execute one or more unit test methods
-
Execute a unit test suite
-
View summary results from executing one or more unit tests
For BBj 26.00 and higher, accessing the BDT plug-ins in the BDT Studio, a standalone application, supersedes using the Eclipse IDE.
Annotations
The BBj Unit Test uses annotations to identify unit test classes and methods, to group them in categories and suites, and to determine their execution order. Annotations are special comment lines that begin with "REM @" (upper or lower case). The BBj Unit Test annotations shown in Table 1 below are supported, where each annotation appears in a remark line, immediately preceding the Scope object, of the form:
REM <annotation>
| Annotation | Scope | Purpose |
|---|---|---|
| @Before | Method | Run this setup method immediately before running each @Test method (useful for method setup) |
| @BeforeClass | Method | Run this method once before running any @Before or @Test methods (useful for class setup) |
| @Test | Method | Run this method as a unit test |
| @After | Method | Run this cleanup method immediately after running each @Test method |
| @AfterClass | Method | Run this cleanup method once after running all @Test and @After methods |
| @Ignore | Method | Do not run this method as a unit test (it shows as ignored in the test results) |
| @Category(“Cat1”, ...) | Class or Method |
Mark this class or method as part of category Cat1, and also as part of any other categories specified Syntax Example: @Category(“Cat1”, “Cat2”, “Cat3”) |
| @SuiteClasses(“Class1”, ...) | Suite |
Mark this class as representing a unit test suite that includes the Class1 unit test class and any other unit test classes specified Syntax Example: @SuiteClasses(“Class1”, “Class2”) |
| @IncludeCategory(“Cat1”, ...) | Suite |
Mark this unit test suite as including the unit test methods in category Cat1 and those in any other categories specified Syntax Example: @IncludeCategory(“Cat1”) |
| @ExcludeCategory(“Cat2”, ...) | Suite |
Mark this unit test suite as excluding the unit test methods in category Cat2 and those in any other categories specified Syntax Example: @ExcludeCategory(“Cat2”, “Cat1”) |
Table 1. BBj Unit Test Annotations
Notes About the Annotations in Table 1:
-
When double quotes (“) surround text in the Annotation column, they are required to delimit that text. Single quotes are not valid.
-
When an ellipsis, “...”, appears inside parentheses in the Annotation column, the ellipsis can be replaced by zero or more arguments of the same form as the argument preceding it.
Conflict Between Annotations
If multiple annotations are present, and their various effects conflict with each other (for instance if a category is included and also excluded), then the affected entity (unit test method, class, or suite) will be ignored. The following rules apply:
-
Unit test methods and classes can be part of 0 or more categories.
-
If a unit test method is not part of any category, then it will automatically be added to every category set on the containing class (if there are any).
-
If a unit test method is part of a category, it will not be added to any category set on the containing class.
-
The @IncludeCategory annotation includes all of the unit test methods in the specified categories in the list of unit tests to run. Units without any category, or with a different category than the one specified in the annotation, will be ignored.
-
The @ExcludeCategory annotation removes all of the unit test methods in the specified categories from the list of unit tests to run. Unit tests that are part of other categories will be run.
-
If both the @IncludeCategory and the @ExcludeCategory annotation are set for the same category, and conflict on a specific method, then that method will be ignored because it cannot be included and excluded at the same time.
Assert Class
The BBj Unit Test defines a class named Assert which has several static methods to use in testing your code. When each method is executed, it reports its failure or success to the BBj Unit Test for inclusion in the results summary in BDT Studio’s BBj Unit Test View. If any Assert method in a unit test method fails, then the result for that unit test method will be reported as failure. Only if every Assert method called in a unit test method succeeds will the result for that unit test method be reported as success.
The Assert class can be used inside of any unit test method, and does not require a BBj USE statement. The Assert class currently has the static methods shown in Table 2 below:
| Assert Class Static Method | Explanation |
|---|---|
| Equals(BBjNumber A, BBjNumber B) | Successful if the number A equals the number B; fails otherwise |
| Equals(BBjNumber A, BBjNumber B, BBjNumber Delta) | Successful if the number A equals the number B within +/- Delta; fails otherwise |
| Equals(BBjString A$, BBjString B$)* | Successful if the string A$ equals the string B$; fails otherwise |
| Equals(Object A!, Object B!) | Successful if the reference to object A! equals the reference to object B!; fails otherwise |
| Expect(BBjNumber exceptionA, BBjNumber exceptionB) | Successful if the exception number exceptionA thrown equals the exception number exceptionB; fails otherwise |
| Fail() | Always fails |
| IsNotNull(Object Obj!) | Successful if the object Obj! is not null; fails otherwise |
| IsNull(Object Obj!) | Successful if the object Obj! is null; fails otherwise |
| NotEquals(BBjNumber A, BBjNumber B) | Successful if the number A does not equal the number B; fails otherwise |
| NotEquals(BBjNumber A, BBjNumber B, BBjNumber Delta) | Successful if the number A does not equal the number B within +/- Delta; fails otherwise |
| NotEquals(BBjString A$, BBjString B$)* | Successful if the string A$ does not equal the string B$; fails otherwise |
Table 2. Assert Class Static Methods
Note: With the exception of the Expect() method, the Assert class also offers a second version of each of the methods listed above. Each additional version is identical to the one shown, but takes a BBjString ErrorMessage$ as the first argument. This ErrorMessage$ allows you to specify a particular failure message to report if the invocation fails.
Note: In the case of the Assert methods that compare two strings (Equals and NotEquals), the comparison is based on a case sensitive exact match. Only strings that match exactly (including having the same case) will be “equal.”
Installing the BBj Unit Test
For BBj 26.00 and higher, access the BBj Unit Test by installing the BDT Studio, a standalone application that supersedes using the Eclipse IDE. Then, you can proceed to the next section, Using the BBj Unit Test.
For versions prior to BBj 26.00, you must install Java, Eclipse, and several necessary plug-ins. Follow the steps below to set up your environment. The Eclipse plug-ins page can be found at basis.cloud/eclipseplug-ins. Be sure you have a compatible version of Java installed on your computer before you install Eclipse, BBj, or any of the plug-ins.
-
Follow the instructions at the top of the Eclipse plug-ins page to download and install the correct version of Java and then Eclipse. Notice that the instructions are different depending on the version of BBj that you will be using. If you do not have BBj already installed, you should probably install the latest combination of BBj and Eclipse available (usually listed first on that page).
-
Next, on the Eclipse plug-ins page, find the BASIS PLUG-INS section. Follow the steps there to identify and install first the BDT and then the BBjUtils plug-ins. Unless you have a reason to do otherwise, use the URLs in the LATEST OFFICIAL <version> RELEASE column. If, however, you prefer to install a version of the plug-ins that is older than the current one (one for which there is no column in that table), follow the same installation instructions but use URLs from the corresponding table in the HISTORICAL PLUG-INS section further down in that document.
Notice that the BBj Unit Test is installed as part of the BBjUtils plug-in.
Using the BBj Unit Test
Now that BBj Unit Test is installed, you are ready to create unit tests. Because there are a number of ways to use the plug-in, this article will focus on the steps to perform some of the most important tasks.
The Code to Be Tested
To use the BBj Unit Test, you will need a BBj project (ours is named MyProj) in your IDE that contains any BBj custom object class (or BBj sequential code) that you will test. In this document you will test the class StockItem, which has a name, an ID, and a quantity. Define the StockItem class in the BBj Source File named StockItem.bbj in BBj project MyProj:
rem /**
rem * StockItem.bbj
rem */
class public StockItem
field private BBjString name$
field private BBjNumber id
field private BBjNumber quantity
rem Standard constructor of the StockItem class
method public StockItem(BBjNumber id, BBjString name$)
#id = id
#name$= name$
methodend
rem Returns the item's ID
method public BBjNumber getID()
methodret #id
methodend
rem Returns the item's name
method public BBjString getName()
methodret #name$
methodend
rem Set the item's available quantity
method public void setQuantity(BBjNumber newQuantity)
if newQuantity < 0 then
throw "A negative item quantity is not allowed", 300
endif
#quantity = newQuantity
methodend
rem Returns the item's total quantity
method public BBjNumber getQuantity()
methodret #quantity
methodend
classend
Code Block 1. StockItem.bbj Code
The BBj Unit Test Class
To test the StockItem class, create a separate unit test file that is also in MyProj. For this example, use a unit test class named TestStockItem that is defined in TestStockItem.bbjt. Remember that the TestStockItem class must be alone in TestStockItem.bbjt, and that file must end with the .bbjt file extension.
To ensure the file is created with the correct type and is recognized by the BBj project, use the BDT Studio’s main menu File > New > BBj Unit Test File menu item. Alternatively, you can right-click the MyProj BBj project and, in the context menu, select New > Other… and then choose BDT > BBj Unit Test File. In either case, finish the wizard.
Your IDE should automatically open TestStockItem.bbjt in a BDT CodeEditor. If it does not, then open the file manually. Notice that TestStockItem.bbjt was populated with the TestStockItem unit test class and methods shown below:
rem /**
rem * TestStockItem.bbjt
rem */
class public TestStockItem
rem @BeforeClass
method public void setUp()
methodend
rem @Test
method public void testMethod()
methodend
rem @AfterClass
method public void tearDown()
methodend
classend
Code Block 2. Generated TestStockItem.bbjt Code
The class definition and the three test methods are offered to help you get started writing your tests. For this example, delete the setUp(), testMethod(), and tearDown() methods. You can always add them back in later if you decide you need them.
Customize the Unit Test Methods
Now that you have an empty BBj custom object class, it’s time to fill it with unit test methods. In this case, you will create a unit test for the StockItem::setQuantity(BBjNumber) and StockItem::getQuantity() methods. Why might you choose to test these two methods together? Because it is difficult, if not impossible, to verify that you can set a quantity unless you can retrieve the quantity, and thus verify that the desired value was indeed set.
In order to reference a StockItem object, BBj needs a USE statement, so add one of those above the class definition and put in a new testQuantity() method with the code below. This gives us the following unit test file contents:
rem /**
rem * TestStockItem.bbjt
rem */
use ::StockItem.bbj::StockItem
class public TestStockItem
rem @Test
method public void testQuantity()
declare StockItem item!
item! = new StockItem(1)
item!.setName("Monitor")
item!.setQuantity(10)
rem Checking if the quantity matches the quantity set
Assert.Equals(item!.getQuantity(), 10)
item!.setQuantity(20)
Assert.Equals(item!.getQuantity(), 20)
rem Expecting to throw an Exception with the code 300
Assert.Expect(item!.setQuantity(-15), 300)
Assert.Equals(item!.getQuantity(), 20)
methodend
classend
Code Block 3. TestStockItem::testQuantity() Code - First Attempt
Notice that the testQuantity() method uses several methods on the Assert class. For details on any Assert method, see Table 2 in the Assert Class section.
As you can see, our unit test method needs a StockItem object. In fact, as you write more unit test methods you will find that each of them needs a StockItem object to test. It would be easier to write these unit test methods if you had:
-
One StockItem object as a field in the TestStockItem class, where every unit test method could use that single instance.
-
Some way to tell the BBj Unit Test to get us a new StockItem object just before each unit test method runs (to ensure that the tests remain independent, and avoid any possible cumulative interactions over time).
The BBj Unit Test gives us a way to do just that. There are annotations to define setup code at either the class or method level: the @Before and @BeforeClass annotations (see Table 1 for details of what each does). In your case, you want to instantiate a new StockItem object before each unit test method runs, so you need an @Before annotated method. Once the object initialization code moves into an @Before method, and we change our testQuantity() method to use the new #item! field, the class will look something like this:
rem /**
rem * TestStockItem.bbjt
rem */
use ::StockItem.bbj::StockItem
class public TestStockItem
field private StockItem item!
rem @Before
method public void setupForATest()
REM Start each test with a new StockItem object
#item! = new StockItem(1, "One")
methodend
rem @Test
method public void testQuantity()
#item!.setQuantity(10)
rem Checking if the quantity matches the quantity set
Assert.Equals(#item!.getQuantity(), 10)
#item!.setQuantity(20)
Assert.Equals(#item!.getQuantity(), 20)
rem Expecting to throw an Exception with the code 300
Assert.Expect(#item!.setQuantity(-15), 300)
Assert.Equals(#item!.getQuantity(), 20)
methodend
classend
Code Block 4. TestStockItem Code - with @Before, Using item! Field
Once you’ve implemented this unit test method, you are ready to run BBj Unit Test and see if your code behaves as expected. But this demonstration will be more informative if you first add at least one unit test method that fails. In this case, create two different kinds of “failure” test methods:
-
failAssertQuantity() where an Assert method fails
-
failExecutionQuantity() where BBj execution fails
Insert the two unit test methods shown in Code Block 5 immediately after the methodend for testQuantity() (and immediately before classend) and save TestStockItem.bbjt:
rem @Test
method public void failAssertQuantity()
#item!.setQuantity(10)
rem Checking if the quantity matches the quantity set
Assert.Equals(#item!.getQuantity(), 100)
methodend
rem @Test
method public void failExecutionQuantity()
item!.setQuantity(10)
rem Checking if the quantity matches the quantity set
Assert.Equals(item!.getQuantity(), 10)
methodend
Code Block 5. TestStockItem Code - Adding Tests That Will Fail
Running the Tests on One Unit Test Class
There are several ways you can run this BBj Unit Test class. You can right-click on the TestStockItem.bbjt file in the BDT Explorer and select Run As… > BBj Unit Test as shown in Figure 1 below:
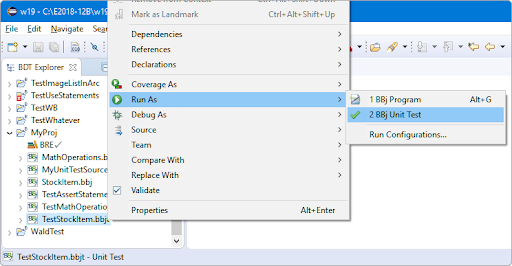
Figure 1. Running the TestStockItem Class from the BDT Explorer
You can also run the BBj Unit Test class by right-clicking in the BBj editor where TestStockItem.bbjt is open, and selecting Run As > BBj Unit Test as shown in Figure 2 below:
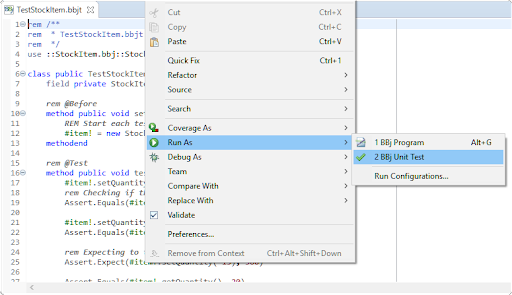
Figure 2. Running the TestStockItem Class from an Open BBj Editor
Lastly, you can run a BBj Unit Test class that is open in the currently active editor from BDT Studio’s toolbar. The toolbar contains a Run As… button as shown in Figure 3:
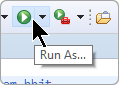
Figure 3. BDT Studio’s Run As… Toolbar Button
There are two ways to run from this toolbar button. You can click on the small black downward-pointing arrow on the right side of the button and then select Run As > BBj Unit Test as shown in Figure 4 below:
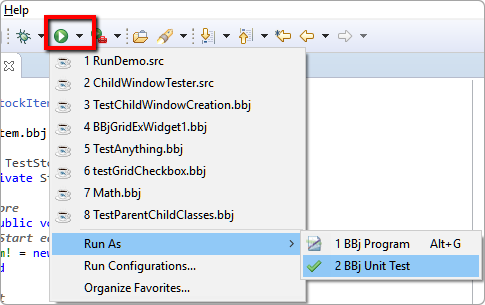
Figure 4. Running the TestStockItem Class from the Run Toolbar Dropdown
Or you can click on the main portion of the toolbar button itself (with the green circle icon), which will bring up the Run As window shown in Figure 5 below:
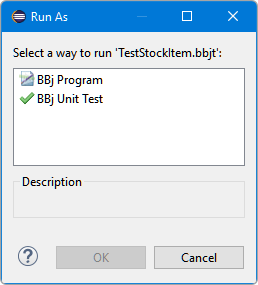
Figure 5. Running the TestStockItem Class from the Run Toolbar Button
Notice that this window confirms that you will be running "TestStockItem.bbjt." Select BBj Unit Test and hit the [OK] button.
Note: No matter which option you use, the BBj Unit Test will generate custom BBj test code for your class’ test methods and then execute that code. This will start a BBj interpreter session, and depending on your computer that might take a while if no other BBj program is running. Having a BBj SysConsole open while iteratively executing your unit tests can improve the overall execution speed. When test execution is finished, the BBj Unit Test will open its BBj Unit Test view and display the results.
Examining the Test Results
All of our test methods did not pass! What do you do now? Since you have several failures, look at what the BBj Unit Test view shows you (see Figure 6) for clues:

Figure 6. Results from Running the TestStockItem Class
But which portions of that view tell you what? What probably catches your eye first is the large red rectangle on the far right.
-
The red background indicates that one or more of the methods defined on the TestStockItem class failed. If they were all successful, it would be green instead.
-
That rectangle also includes the date and timestamp when the tests were last executed. As you make changes to correct problems, you can check this timestamp to remind yourself when you last ran your tests.
Scanning to the left from the red rectangle, you see two fields that tell you how many of your tests failed for each error type: ExecutionErrors and AssertionErrors. To fix either type of error, examine the corresponding entry line in the table below (we’ll look at that in a moment) and correct it.
-
There was one ExecutionError. An ExecutionError occurs when BBj encounters an error in your unit test code. ExecutionErrors do not mean that the class being tested has a problem — instead, it means that the unit test method itself has a code error.
-
There was one AssertionError. An AssertionError occurs when an Assert class method encounters a value or condition that is not expected. AssertionErrors mean that the class being tested exhibits behavior that is not what your unit test method was written to verify. In this case, either the unit test method itself has an error OR the class being tested has an error — only the author of the unit test (you) will know.
To see which unit test methods ran, look at the bottom left side of the view. There you will see the name of the unit test class and below it a list of each of the @Test unit test methods that were run:
-
Any methods that resulted in an ExecutionError are listed first, with a red circle.
-
Any methods that resulted in an AssertionError are listed next, with a blue circle.
-
Any methods that were successful are listed last, with a green circle.
-
Within each of those groups, the methods will be listed in the order in which they ran. This order should correspond to their physical order in the unit test class.
-
Other methods of the unit test class (such as the @Before method) only appear in this list if they contain an ExecutionError.
-
Following the unit test class name and each of the methods listed is blue text in parentheses indicating how much time (in seconds) the BBj Unit Test spent executing each test, and a summary for the entire class.
To find out where the errors originated, look at the result table across the bottom of the view. Notice that there are two entries in that table, one with “ExecutionError” in the Error Type column, and one with “AssertionError” there. The various columns in that table tell us about each error:
-
Error Type - whether it was an AssertionError or an ExecutionError.
-
Class Name - which unit test class was being run when the error occurred. This is not too helpful in this case, since you were only executing one unit test class, but you’ll see later cases where you can execute more than one class’ tests at a time.
-
Method Name - which method on the unit test class was being run when the error occurred. This tells us which code to examine. In our demonstration, you can see that:
-
The failExecutionQuantity() method failed with an ExecutionError (that sounds right).
-
The failAssertQuantity() method failed with an AssertionError (that also sounds right!).
-
-
Line Number - which line in the TestStockItem.bbjt file was being run when the error occurred. This narrows down the problem to one line of code.
-
Error Message - any helpful text available to identify the cause of the error.
-
For an AssertionError, this indicates which Assert class method actually reported the error; this can be helpful if you have more than one Assert method being called on the same line of code.
-
For an ExecutionError, this will display any error message text provided by BBj when execution failed; this can be helpful to identify the actual problem.
-
Investigating and Correcting an Error
Choose one error in the table to investigate first. After you have examined it using the information in the previous section of this article, you are ready to investigate and (hopefully) fix that problem.
Your first step is to locate the code associated with that error. Of course, you could manually switch to the appropriate BBj editor (based on the Class Name column). And once you are in the correct file editor, you could scroll to find the line number (based on the Method Name and Line Number columns). But there is a faster way to find the source of your problem. Simply double-click the table’s error entry, and the BBj Unit Test will take you to the source code location. It will automatically open the appropriate file in a BBj editor (if it is not already open) and scroll to select the appropriate line.
Note: If you double-click the text in the Method Name column, then BDT Studio will scroll to the method declaration and select the method name (which should match the name you double-clicked). If instead you double-click any other column in that row, BDT Studio will scroll to the line of code identified in the Line Number column, and will select the entire problem line.
In our example, when you double-click the ExecutionError the BBj Unit Test moves focus to the TestStockItem.bbj file editor, and then scrolls and selects line 39 as shown in Figure 7 below:
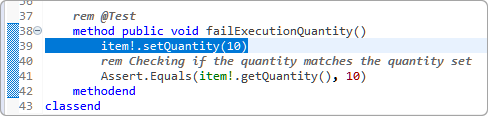
Figure 7. Line 39 in the TestStockItem Class - the ExecutionError Source
When you examine this line, the problem may be immediately obvious. If it is not, then look back at the BBj Unit Test view and read the text in the Error Message column: “Attempt to invoke method ‘setQuantity’ on null object.” Knowing that “item!” is null when you did not expect it to be points to the problem — someone left off the “#” prefix!
Edit line 39 to add the missing “#” prefix, save your changes, and run the tests again.
WARNING: Be sure to save your changes before running. BBj Unit Test works on the code in the file on disk, not what is shown in the editor. If you forget to save, you will get exactly the same results as before which could cause some confusion.
Examine the new results in the BBj Unit Test view. They look a lot like the previous set (see Figure 6 above), with one exception: the Line Number column for our ExecutionError entry no longer shows “39” but instead shows “41.” Well, that is some progress. Repeat the process laid out before, and you will discover that line 41 has the same type of error: it is also missing the “#” prefix. Edit line 41 to add the missing “#” prefix, save your changes, and run the tests again.
Finally, examine the results in the BBj Unit Test view again (see Figure 8 below).
1.png)
Figure 8. Results After Correcting the ExecutionError(s)
Notice that now there is only one AssertionError shown. Congratulations! You have successfully fixed the problems with your failExecutionQuantity() unit test method. So now do the same thing for the AssertionError (line 34 in the failAssertQuantity() method). Double click on the entry to go to line 34 and see the source of the problem (Figure 9):
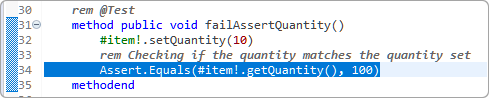
Figure 9. Line 34 in the TestStockItem Class - the AssertionError Source
When you examine this line, the problem should be immediately obvious: #item!.getQuantity() should be returning 100, but it is not. Examining the BBj Unit Test view text in the Error Message column: “Assert.Equals(10, 100)” provides the final clue — your method returned “10” but you wrote failAssertQuantity() to expect 100. One of those two values is incorrect — it is up to you to decide which one. Does the StockItem class have a bug, or does the failAssertQuantitiy() unit test method?
As with the ExecutionError, decide how you will fix the problem, correct whatever code is wrong, and run the tests again. In this case, modify line 34 to read:
Assert.Equals(#item!.getQuantity(), 10)
Code Block 6. Fixing an Incorrect Unit Test Method
Which gets rid of that extra 0 (it really should be expecting “10”, not “100”). Save your change. Now, when you run the tests again, you see a successful run (Figure 10):
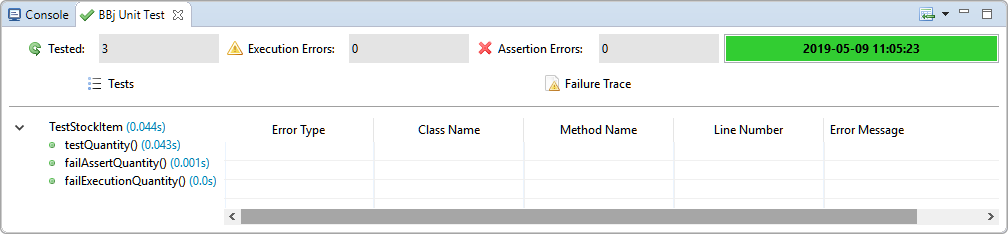
Figure 10. A Successful Result
Congratulations! You have now successfully tested your StockItem class — for today, at least. As you enhance the StockItem class, don’t forget to:
-
Add more unit test methods for any new functionality
-
Update the methods that are already there to reflect any changes in functionality
Advanced Unit Testing Topics
Now it is time to move on to more advanced topics in unit testing. As your project grows, you will need more and more unit tests for different features of your applications. As you add new features, you will also need to add BBj Unit Test classes. Once you have multiple unit test classes, you may not want to run your tests “one unit test class” at a time. Or you may not want to run an entire unit test class at one time. Instead, you may want to define groups of tests that can easily be run together.
One logical need is to run multiple unit test files as a set. To demonstrate this, you need to give MyProj multiple unit test classes. Add a Warehouse class (in Warehouse.bbj) to the MyProj BBj project with the following code:
REM /**
REM * Warehouse.bbj
REM */
use ::StockItem.bbj::StockItem
class public Warehouse
field private BBjVector stockItems! = new BBjVector()
method public Warehouse()
methodend
method public void addItem(StockItem item!)
if item! = null() then
throw "StockItem is null", 300
endif
if #stockItems!.isEmpty() then
#stockItems!.add(item!)
methodret
endif
declare StockItem currentStockItem!
for i=0 to #stockItems!.size() -1
currentStockItem! = cast(StockItem, #stockItems!.get(i))
if currentStockItem!.getID() = item!.getID() then
throw "Duplicate item id: " + str(item!.getID()), 300
endif
next i
#stockItems!.add(item!)
methodend
method public void deleteItem(BBjNumber itemID)
if #stockItems!.isEmpty() then
throw "Missing item id: " + str(itemID), 300
endif
declare StockItem currentStockItem!
for i=#stockItems!.size() -1 to 0 step -1
currentStockItem! = cast(StockItem ,#stockItems!.get(i))
if currentStockItem!.getID() = itemID then
#stockItems!.remove(arg0)
methodret
endif
next i
throw "Missing item id: " + str(itemID), 300
methodend
method public BBjNumber getTotalItemCount()
methodret #stockItems!.size()
methodend
method public void clearItems()
#stockItems!.clear()
methodend
classend
Code Block 7. Warehouse Code - A Warehouse of StockItems
And a TestWarehouse class (in the BBj Unit Test file TestWarehouse.bbjt) with the following code:
rem /**
rem * TestWarehouse.bbjt
rem */
use ::Warehouse.bbj::Warehouse
use ::StockItem.bbj::StockItem
class public TestWarehouse
field private Warehouse warehouse!
rem @BeforeClass
method public void classSetUp()
#warehouse! = new Warehouse()
methodend
rem @Before
method public void methodSetUp()
declare StockItem item!
item! = new StockItem(1, "Keyboard")
item!.setQuantity(10)
#warehouse!.addItem(item!)
item! = new StockItem(2, "Mouse")
item!.setQuantity(100)
#warehouse!.addItem(item!)
item! = new StockItem(3, "Monitor")
item!.setQuantity(2)
#warehouse!.addItem(item!)
methodend
rem @Test
method public void testAddItem()
Assert.Expect(#warehouse!.addItem(null()), 300)
declare StockItem item!
item! = new StockItem(4, "Headset")
item!.setQuantity(35)
#warehouse!.addItem(item!)
Assert.Equals(#warehouse!.getTotalItemCount(), 4)
rem Adding an item with an already used id should fail
Assert.Expect(#warehouse!.addItem(item!), 300)
methodend
rem @Test
method public void testDeleteItem()
#warehouse!.deleteItem(1)
Assert.Equals(#warehouse!.getTotalItemCount(), 2)
rem Expect the method to throw an exception
rem when trying to delete an item using an unknown id
Assert.Expect(#warehouse!.deleteItem(1), 300)
methodend
rem @After
method public void tearDown()
#warehouse!.clearItems()
methodend
classend
Code Block 8. TestWarehouse Code - The BBj Unit Tests for the Warehouse class
Select Multiple Unit Test Files and Run
To run multiple unit test files as a set, you have several options.
Running Multiple BBj Unit Test Files Selected in the BDT Explorer
Once you have multiple .bbjt unit test files in one BBj project, select them in the BDT Explorer.
Note: The BBj Unit Test currently requires that all of the selected .bbjt files be in a single BBj project (you cannot run a set of files that span multiple BBj projects). This limitation may be removed in the future.
To select multiple files, use any of the standard multi-selection key combinations:
-
Hold down the CTRL key and click a file; this will toggle an individual file’s selection state (on or off).
-
Click to select one file, then hold down the SHIFT key while clicking a second file; this will select all of the files (inclusive) between those two.
-
Click to select one file, then hold down the SHIFT key while pressing the up or down arrow keys; the end result will be the same as SHIFT-clicking a second file.
-
Combine these actions (SHIFT-click and then CTRL-click to toggle individual files on or off).
Once you have selected the BBj Unit Test class files to execute, you can either:
-
Right-click one of the selected files and select Run As… > BBj Unit Test from the context menu.
-
Select Run > Run As > BBj Unit Test from BDT Studio’s main menu (see Figure 11 below).
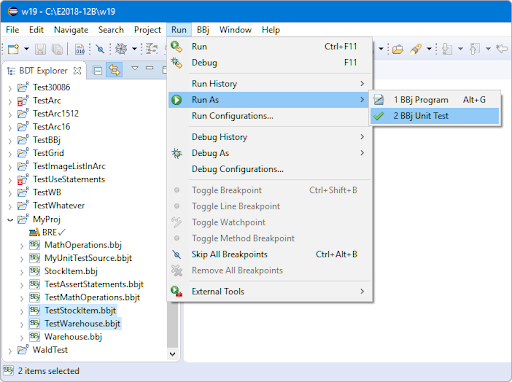
Figure 11. Running the BBj Unit Tests in Multiple Files
Note: If your selected files accidentally include one or more files that do not have the .bbjt file extension, BDT Studio will not offer any Run As > BBj Unit Test menu option.
Once all of the BBj Unit Test methods in the selected files are executed, their results are displayed together in the BBj Unit Test view (as shown in Figure 12 below):

Figure 12. Results from Running the BBj Unit Tests in Multiple Files
In this example, all of our test methods have passed (note the green field on the right). On the left, the BBj Unit Test methods executed are shown in a hierarchical tree, grouped by their BBj Unit Test class. As you examine your results you can choose to collapse or expand each of those classes as a way to show or hide methods of interest to you.
Running Multiple BBj Unit Test Files Using a BDT Studio Run Configuration
Once you have multiple .bbjt unit test files in your BBj project, a second way of running them is by creating and using a BBj Unit Test run configuration. To create a run configuration, first select Run > Run Configurations... from BDT Studio’s main menu (see Figure 13 below):
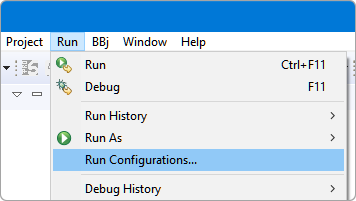
Figure 13. Managing Run Configurations - Menu Item
In the Run Configurations window that appears (Figure 14), select BBj Unit Test in the left pane as the run configuration type.
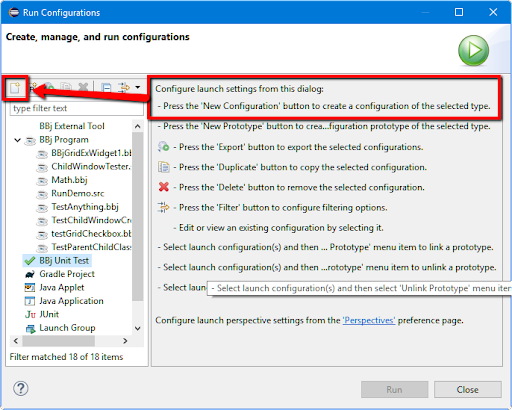
Figure 14. Creating a New Run Configuration
Then click the [New launch configuration] button on the far left end of the toolbar as shown in Figure 14 to create a new BBj Unit Test run configuration named “New_configuration” as shown in Figure 15.
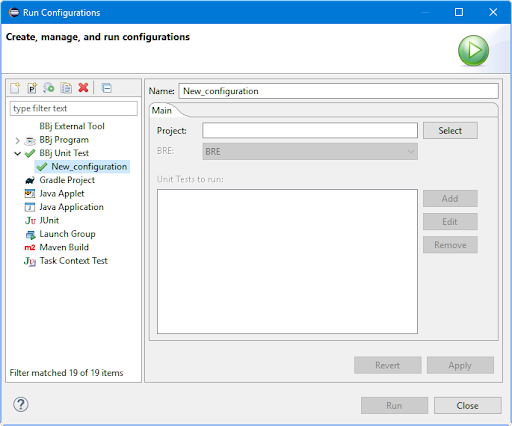
Figure 15. The New Run Configuration
Notice the new selected entry under BBj Unit Test in the left side tree with the name “New_configuration,” matching the text in the “Name” field on the right side. The new run configuration exists and, if you exit and return here later it will still be present. Of course, it is not yet usable because you have not defined what to run. On the right side of the window in Figure 15, you can now configure the run configuration by following these steps:
-
In the “Name” field, change the text from “New_configuration” to "My Configuration."
-
Click the [Select] button to the right of the “Project” field to open the Project Selection window.
-
Navigate and select the BBj project MyProj (see Figure 16).
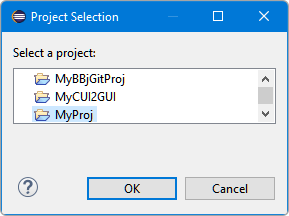
Figure 16. Selecting MyProj
Click the [OK] button to use MyProj. Now that you have chosen the BBj project, the “BRE” field is editable.
-
In the “BRE” dropdown, select MyProj’s BBj Runtime Environment (BRE) to run with. If you are unsure, leave this at the default set for you.
-
Click the [Add] button to the right of the “Unit Tests to run” list box to open the File Selection Dialog (see Figure 17).
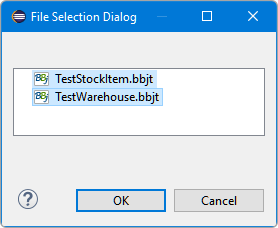
Figure 17. Selecting the BBj Unit Test Files to Run
-
Select the two BBj Unit Test files, TestWarehouse.bbjt and TestStockItem.bbjt, and click [OK].
-
Click the [Apply] button to save the run configuration with your new values (Figure 18).
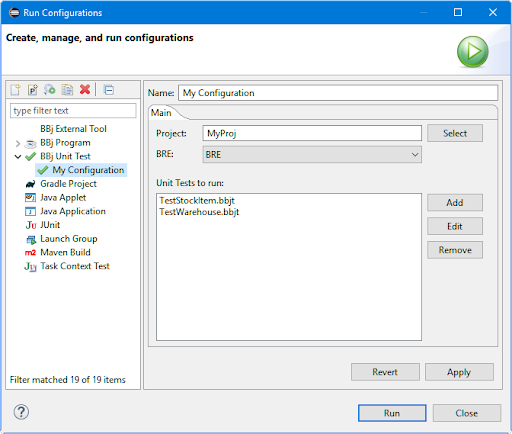
Figure 18. My Configuration Properties
At this point you are ready to test-run your new BBj Unit Test run configuration by clicking the [Run] button. BBj Unit Test will run all of the tests in the two files specified. The result will be the same as in Figure 12.
Is there an advantage to this approach? Now that you have created your run configuration, you can run it at any time without having to first find and select the individual files. From BDT Studio's run configuration menu dropdown, click the small downward-pointing black triangle as shown in Figure 19, and then click “My Configuration”:
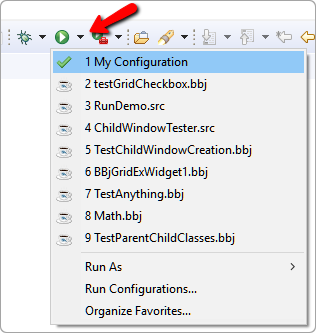
Figure 19. Running My Configuration from BDT Studio’s Menu
Running Multiple BBj Unit Test Classes Using a BBj Unit Test Suite
But what if you do not want to run your unit tests based on the file they are in? What if, instead, you wish to run a group of tests based on their BBj unit test class, regardless of what file they are in? You can organize multiple BBj Unit Test classes into something called a BBj unit test suite. A unit test suite is nothing more than an empty BBj Unit Test class with a special class annotation that lists other BBj Unit Test classes to run when it is executed. So how might that work?
To demonstrate this approach, create a BBj Unit Test suite called DemoSuite. Add a new DemoSuite.bbjt unit test file to your MyProj BBj project, and replace its default content with the following code. Remember to save the modified file.
use ::TestWarehouse.bbjt::TestWarehouse
use ::TestStockItem.bbjt::TestStockItem
rem @SuiteClasses("TestStockItem", "TestWarehouse")
class public DemoSuite
classend
Code Block 9. The DemoSuite Code - A Unit Test Suite
The @SuiteClasses annotation is a BBj Unit Test suite reserved annotation used to list which BBj Unit Test classes will run. Notice that the BBj Unit Test class names, and not the file names are required in the annotation, and must be in double quotes. The BBj USE statements, however, require both the file names (.bbjt files) and the unit test class names as shown.
To execute the unit test suite, the same rules apply as for the unit test classes. You can execute it from the context menu in the BBj editor, from the context menu in the BDT Explorer, or by creating a launch configuration and running it.
Running the BBj Unit Test suite displays the same results as shown in Figure 12 with one exception — the unit test tree on the left now shows the DemoSuite at the highest level (Figure 20):
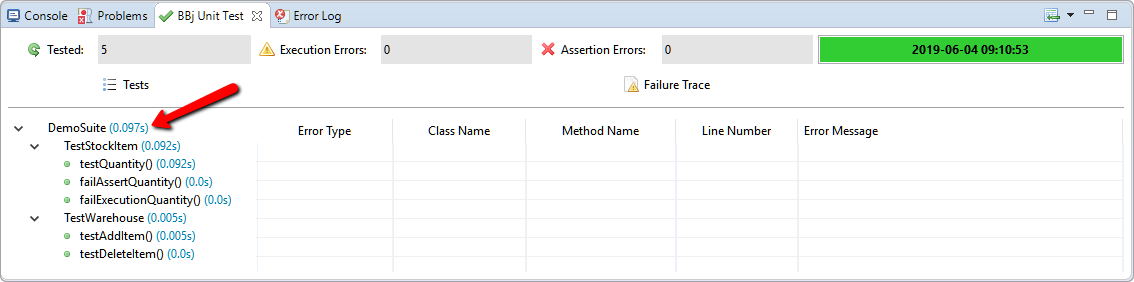
Figure 20. The DemoSuite Results
This approach is similar to using a run configuration — you can run this collection of unit test classes as a single launch action from a single .bbjt file.
Running Multiple BBj Unit Test Methods Using BBj Unit Test Categories
BBj unit tests can also be configured to run in pre-defined category groups. A BBj unit test category, identified with the special annotation @Category("Cat1", ...), permits you to mark arbitrary unit test methods or classes to be part of one or more such groups. In other words, by using this approach you do not have to run every method in a unit test class. Instead, you can group test methods and test classes as you wish.
You can assign unit test methods and classes to one or more categories, and you can then execute one or more of those categories in a BBj unit test suite. To demonstrate this, let us create a category for an incoming goods process in our demo warehouse. We’ll name the category "IncomingGoods," and add the TestWarehouse::testAddItem() and TestStockItem::testQuantity() to that category, along with the supporting methods needed. Insert the following lines (the magenta text) into the method declarations as shown below (remember to save the modified file):
rem @Test
rem @Category("IncomingGoods")
method public void testQuantity()
…
rem @Before
rem @Category("IncomingGoods")
method public void setupForATest()
Code Block 10. TestStockItem Code - Adding the testQuantity Method to the IncomingGoods Category
rem @Test
rem @Category("IncomingGoods")
method public void testAddItem()
…
rem @BeforeClass
rem @Category("IncomingGoods")
method public void classSetUp()
…
rem @Category("IncomingGoods")
method public void methodSetUp()
Code Block 11. TestWarehouse Code - Adding the testAddItem Method to the IncomingGoods Category
Alternatively, you could mark an entire unit test class as part of the “IncomingGoods” category using the syntax shown below:
rem @Category("IncomingGoods")
class public TestStockItem
...
rem @Category("IncomingGoods")
class public TestWarehouse
Code Block 12. Example of Adding an Entire Unit Test Class to the IncomingGoods Category
With the annotations in Code Block 12 in place, every unit test method in TestStockItem and TestWarehouse would be part of the “IncomingGoods” category without marking each method individually, including the @Before and @BeforeClass methods.
For now, let us see how the annotations in Code Blocks 10 and 11 work. Modify the DemoSuite declaration (insert the magenta text) to execute only the methods that are part of that category by adding an @IncludeCategory annotation as shown below (remember to save the modified file):
rem @IncludeCategory("IncomingGoods")
rem @SuiteClasses("TestStockItem", "TestWarehouse")
class public DemoSuite
classend
Code Block 13. DemoSuite Code - Include the IncomingGoods Category
With those annotations in place when you run DemoSuite, only methods that are in the "IncomingGoods" category will be executed. Any methods that are not in that category will be ignored.
Note: This applies not only to the unit test methods, but also to the @Before, @BeforeClass, @After, and @AfterClass setup/teardown methods — if they are not in the "IncomingGoods" category in this example, then they will not be included or executed. That is why Code Blocks 10 and 11 also placed @Category annotations on TestStockItem::setUpForATest() and TestWarehouse::classSetUp().
The results from running with this new version of DemoSuite are shown in Figure 21:
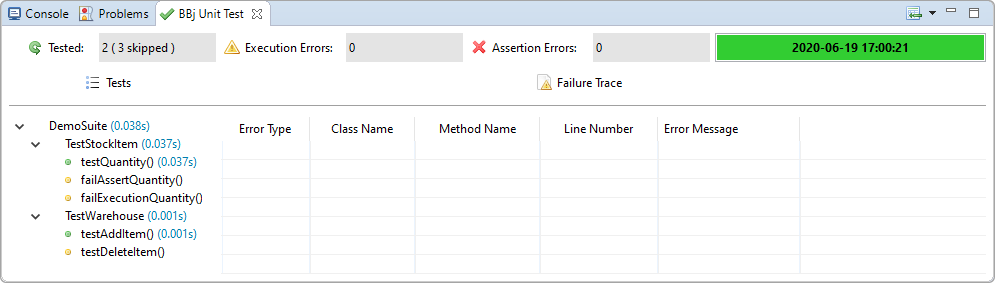
Figure 21. DemoSuite Results Including the "IncomingGoods" Category
Notice that the tree on the left looks different this time. Each unit test method that was not run has a yellow circle icon in front of it to indicate it was skipped or ignored. They also do not have times in parentheses following them because they were not run. Additionally, in the top left of the view, the “Tested” field reports that only 2 tests were run while 3 were skipped.
Optionally, you can exclude (or ignore) a specific category. Excluding a category tells the BBj Unit Test to skip every method in that category when the suite runs. To demonstrate this, modify the DemoSuite declaration by replacing the @IncludeCategory annotation with an @ExcludeCategory annotation (the magenta text) as shown below (remember to save the modified file):
rem @ExcludeCategory("IncomingGoods")
rem @SuiteClasses("TestStockItem", "TestWarehouse")
class public DemoSuite
classend
Code Block 14. DemoSuite Code - Exclude the IncomingGoods Category
Running DemoSuite again now runs all of the unit test methods that are not part of the "IncomingGoods" category, ignoring all of the unit test methods that are part of it. However, a number of those methods now fail:
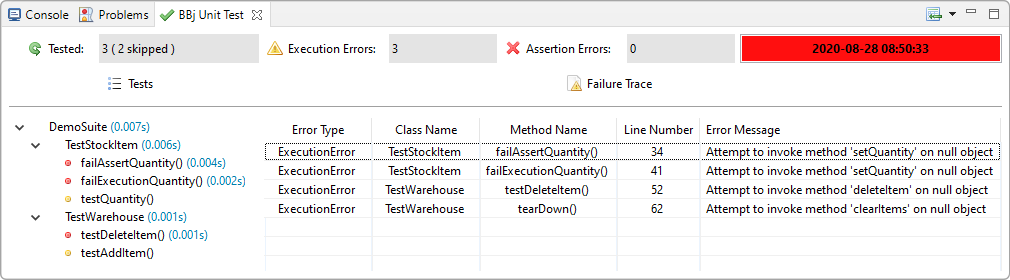
Figure 22. DemoSuite Results Excluding the "IncomingGoods" Category
Why the failures? Because Code Blocks 10 and 11 placed @Category annotations on TestStockItem::setUpForATest() and TestWarehouse::classSetUp(). When we exclude one of those categories, those classes are no longer “set up correctly,” and any unit test methods that rely upon those setups will fail (as we see here).
The bottom line: use caution when excluding methods, particularly setup or teardown methods. The solution to this problem is to be very careful how you place your methods in categories, so that the methods work well together as a “set."
Category Conflicts and Limitations
Category annotations can conflict with each other. As one example, notice that TestStockItem.testQuantity() is in the category “IncomingGoods.” What happens if a unit test Suite has both an @IncludeCategory("IncomingGoods") annotation and an @ExcludeCategory("IncomingGoods") annotation? In that case, all unit test methods in the category “Incoming Goods” would be ignored.
Below are some limitations on categories and guidelines on how other types of category conflicts would be handled internally:
-
Unit test methods and classes can be part of 0, 1 or more categories.
-
If a unit test method is assigned one or more categories, then that method will only be considered to be part of those categories; it will not be part of any category assigned to the unit test class.
-
If a unit test method isn't assigned any category, but belongs to a unit test class that is assigned one or more categories, then that method will automatically be added to the class’ categories.
-
The @IncludeCategory annotation on a unit test suite causes it to include only the unit test methods in that category to the list of unit tests to run; unit test methods with no category, or that belong only to categories other than the one specified, will be ignored.
-
The @ExcludeCategory annotation on a unit test suite causes it to exclude or skip all unit test methods in that category from the list of units to run; unit test methods with no category, or that belong only to categories other than the one specified, will still be executed.
-
If both the @IncludeCategory and the @ExcludeCategory annotation are set and conflict on a specific method, then that method will be ignored as it cannot be both included and excluded at the same time.
Command Line Execution
So far, we have only discussed using the BDT Studio BBj Unit Test. But you have another option to execute BBj unit tests — you can use the command line version of BBj Unit Test, and run outside of the BDT Studio. Details are covered in the Command Line BBj Unit Test document.
See Also
For an early Advantage article on using BBj Unit Test as an Eclipse plug-in, see: Test for Success With BBj Unit Test.