Inventory Control - Inventory Items
Function
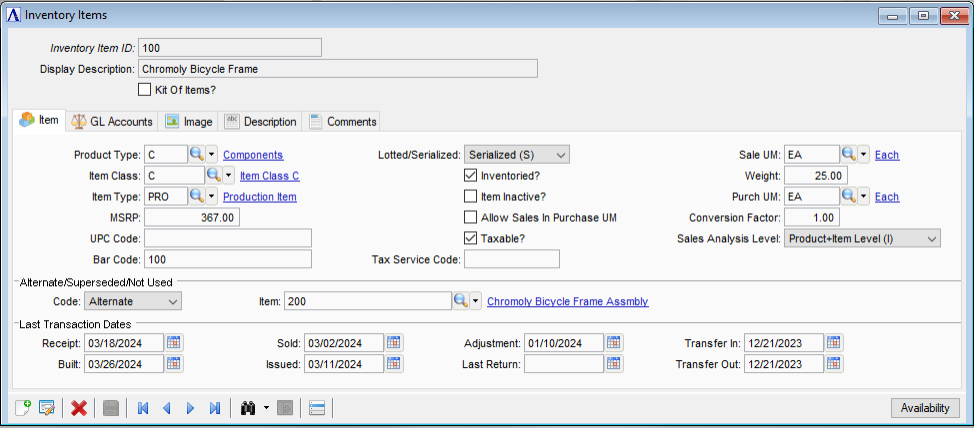
Use this task to create new items, maintain existing items, or delete discontinued items. All information associated with an inventory item is set up through this task and accessed through an option menu displayed after an item is selected. Inventory Item Maintenance features appear in five tabs; Master, GL Accounts, Image, Description, and Comments.
See also the Additional Options dropdown selections.
To access this task...
Select Inventory Items from the Inquiry and Maintenance menu.
Inventory Items Master
About the Fields
The Inventory Item Maintenance screen is divided into several sections. The upper section contains the master information. After selecting an existing item, additional options will appear.
To enable
edits to the form select ") .
.
In the Inventory Item ID field...
-
Enter a valid item number.
-
Click the record navigating buttons;
") to view the first record,
to view the first record, ") to view the previous record,
to view the previous record, ") to view the next record, and
to view the next record, and ") to view the last record.
to view the last record. -
Press Tab to create a new item using the next unassigned sequential number.
-
Click
") to select from a list of active item numbers. To view a list
of all records including inactive records, see Query
Functions.
to select from a list of active item numbers. To view a list
of all records including inactive records, see Query
Functions.
The Inventory Control module provides for automatic sequential item numbering for new items, if desired. It offers a fast, controlled method of assigning item numbers for inventory items where the item number format is not significant. This function is activated when the Use Auto Numbering? parameter is selected within the Application Parameters.
When entering an existing item, the information associated with the item displays on the screen and the Item Maintenance options will appear.
From the Kit Of Items? dropdown...
(Hidden when Bill Of Materials is not installed.)
A kit is a phantom Bill Of Material with only Materials, no Operations and no Subcontracts. A kit provides an Order/Invoice Entry convenience for a group of items typically sold together.
-
Select "Not a kit (N)" if this item is not a kit.
-
Select "Priced kit (P)" if this item is a priced kit.
-
Select "Non-priced kit (Y)" if this item is a non-priced kit.
About the Inventory Item Maintenance Options
Use the Inventory Item Maintenance tabs to enter various information about an item without ever leaving the task. Once an item record is selected, item edits, additions, or deletion may be performed by selecting the appropriate tab.
Item Tab
This area is used to maintain several attributes of an inventory item, including product type, item class, item type, and so forth. Items may be deleted using this option if the balance and order activity is zero.
About the Fields
In the Product Type field...
-
Enter a product type code.
-
Click
") to select from a list of product type codes. See Inventory
Control - Product Types for more information.
to select from a list of product type codes. See Inventory
Control - Product Types for more information.
In the Item Class field...
-
Enter an item class.
-
Click
to select from a list of item classes. See Inventory
Control - Item Classes for more information.
In the Item Type field...
-
Enter an item type.
-
Click
to select from a list of item types. See Inventory
Control - Item Types for more information.
In the MSRP field...
(Disabled for kits.)
- Enter the manufacturer's suggested retail price, if applicable. This field is for reference only.
In the UPC Code field...
(Disabled for kits.)
-
Enter a UPC code, if applicable.
In the Bar Code field...
(Disabled for kits.)
-
Enter a bar code, if applicable.
From the Lotted/Serialized dropdown...
(Disabled for kits.)
-
Select "Lotted (L)" to establish lotted inventory tracking.
-
Select "Serialized (S)" to establish serialized inventory tracking.
-
Select "None (N)" if no lotted or serialized inventory tracking is necessary.
Inventoried? checkbox...
(Disabled for kits.)
Cannot be marked unless the item is Lotted or Serialized and there is zero quantity on hand in all warehouses.
Cannot be unmarked unless there is zero quantity on hand in all warehouses.
-
Mark the box to maintain the item in inventory by lot/serial number.
-
Unmark the box to enter the lot/serial number only when the item is sold.
The "Inventoried?" flag, when set, means that the lot/serial number must be recorded whenever the item on-hand quantity is changed, i.e., when received, built, adjusted, transferred, issued, returned, or sold. When not set, the lot/serial number is assigned only when the item is sold (e.g., for warranty or recall purposes).
Item Inactive? checkbox...
-
Mark the box to render the item inactive. As inactive, the item will create a warning if it is entered on any other form.
-
Unmark the box to keep the item active.
Allow Sales in Purchase UM checkbox...
(Disabled for kits.)
-
Mark the checkbox to allow selling selected items by both their Unit of Purchase and their normal Unit of Sale.
-
Unmark the checkbox to allow selling in only the normal Unit of Sale.
Only enabled if IV Parameter "Allow Sales in Purchase UM" checkbox is marked.
Always disabled if the item is serialized or lotted (does not need to be inventoried).
Always disabled if OP Parameter "Create Work Orders?" is set to "Ask before creating WO (A)" and a Bill of Materials exists for the item and firm.
Taxable? checkbox...
-
Mark the box if this is a taxable item.
-
Unmark the box if the item is not taxable.
When checking the checkbox, the calculation of sales tax is dependent on the tax code associated with the invoice. However, the Taxable checkbox setting is ignored if the tax code uses a Sales Tax Service for doing the sales tax calculation.
In the Tax Service Code field...
Disabled unless OP is installed and OP Parameters has a Sales Tax Service selected.
-
Enter a tax code for the tax service to use instead of the default for the item's Product Type (or Item Class, or Item Type, which ever was selected as the Tax Service Code Source in OP Parameters).
In the Sale UM field...
(Disabled for kits.)
-
Enter a 2-character unit of measure that applies to the inventory item as it is used in the Order/Invoice Processing module. This field is not file verified.
UM Examples:
EA = each, BX = box, LB = pounds, DZ = dozen, GR = gross, CS = case, PR = pair
In the Weight field...
(Disabled for kits.)
-
Enter the weight of one item, in pounds.
In the Purch UM field...
(Disabled for kits.)
-
Enter a 2-character unit of measure that applies to the inventory item as it is used in the Purchase Order module. This field is not file verified.
In the Conversion Factor field...
(Disabled for kits.)
-
Enter a factor for converting from the purchase unit of measure to the selling unit of measure.
Conversion takes place during the Purchase Order module’s Receipt Update process and consists of multiplying the purchase quantity by the conversion factor.
Conversion Factor Example:
If purchasing in dozen (DZ) and selling in each (EA), the conversion factor would be 12.
From the Sales Analysis Level dropdown...
This field is bypassed if the Sales Analysis module is not installed.
-
Select Product Level (P) if sales analysis information is summarized by product level.
-
Select Product + Item Level (I) if sales analysis information is summarized by product and item level.
-
Select No Sales Analysis (N) to exclude this item from all sales analysis.
About the Alternate/Superseded/Not Used Details Fields
From the Code dropdown...
(Disabled for kits.)
-
Select Alternate (A) if an alternate item exists. Alternate items are suggested in order entry when an out-of stock condition exists.
-
Select Superseded (S) if this item has been superseded by another item. Superseded items are always suggested in order entry.
-
Select Neither (N) if none of the above applies.
In the Item field...
(Disabled for kits.)
This field is bypassed if Neither (N) is selected in the Code field.
-
Enter the item number of the replacement.
-
Click
to
select from a list of existing items.
About the Last Transaction Dates Fields
When entering a new item, the following fields are accessible. Thereafter, the information is display only and shows the most recent activity.
In the Receipt field...
-
Enter the most recent receipt date for this item.
-
Click
") to select
a date by using the calendar tool.
to select
a date by using the calendar tool.
In the Built field...
-
Enter the most recent date this item was built.
-
Click
to select
a date by using the calendar tool.
In the Sold field...
-
Enter the last date this item was sold.
-
Click
to select
a date by using the calendar tool.
In the Issued field...
-
Enter the last date this item was issued.
-
Click
to select
a date by using the calendar tool.
In the Adjustment field...
-
Enter the last date that on hand quantity was adjusted for this item.
-
Click
to select
a date by using the calendar tool.
In the Last Return field...
-
Enter the last date this item was returned.
-
Click
to select
a date by using the calendar tool.
In the Transfer In field...
-
Enter the last date this item was transferred into one of your warehouses.
-
Click
to select
a date by using the calendar tool.
In the Transfer Out field...
-
Enter the last date this item was transferred out of one of your warehouses.
-
Click
to select
a date by using the calendar tool.
The Availability button...
(Disabled for kits.)
-
Selecting the button launches the Item/Price Availability form detailing inventory levels across all warehouses.
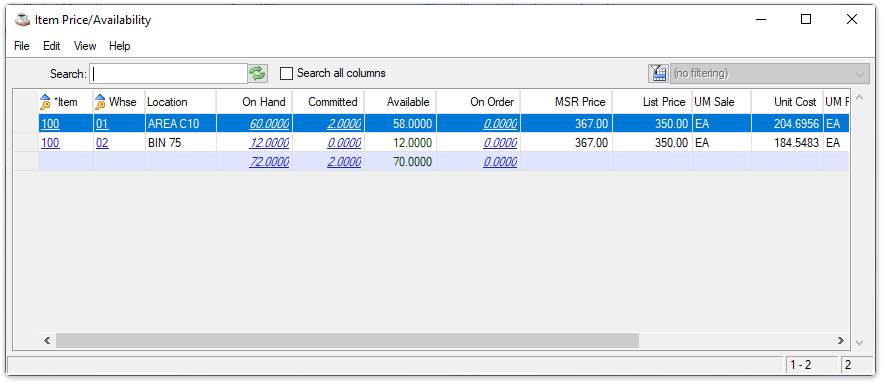
Inventory Items - Item/Price Availability
The Item/Price Availability form includes convenient hyperlinks to the Warehouses, On-Hand, Committed, On-Order, and Alt/Sup Item.
GL Accounts Tab
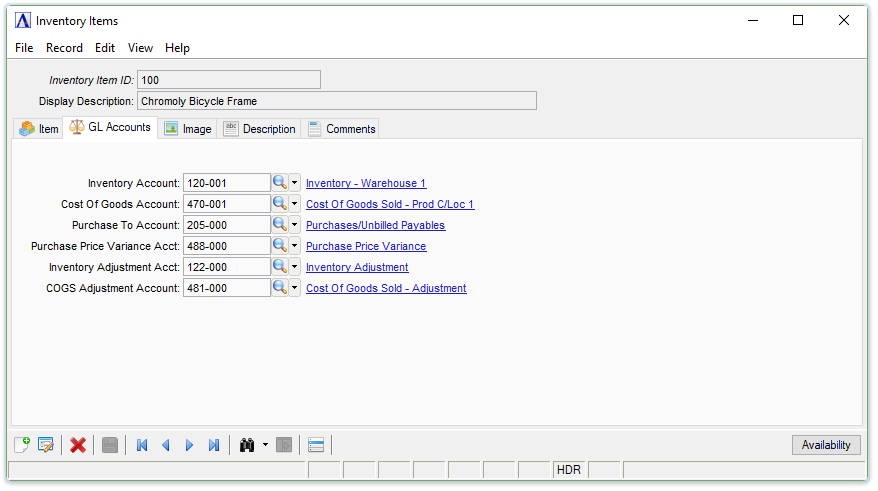
Inventory Items - GL Accounts tab
About the Fields
The following fields are only available if the Distribute Sales By Item parameter in the System Parameter option of the Accounts Receivable Parameter Maintenance task is not checked. GL accounts flagged as 'Inactive' are not accessible. If entry is necessary, the account can be set as active in the Account maintenance task, the entry made, and then setting the account as 'Inactive' once again.
To enable edits to the form select .
In the Inventory Account field...
-
Enter a valid general ledger inventory account number.
-
GL accounts flagged as 'Inactive' are not accessible. If an inactive account needs to be entered in a form, change it to "active" status, make the desired entry, and then set it back to "inactive" again.
-
Click
to select from a list of account numbers.
In the Cost Of Goods Account field...
-
Enter a valid COGS account number.
-
GL accounts flagged as 'Inactive' are not accessible. If an inactive account needs to be entered in a form, change it to "active" status, make the desired entry, and then set it back to "inactive" again.
-
Click
to select from a list of account numbers.
In the Purchase To Account field...
-
Enter a valid purchase to account number.
-
GL accounts flagged as 'Inactive' are not accessible. If an inactive account needs to be entered in a form, change it to "active" status, make the desired entry, and then set it back to "inactive" again.
-
Click
to select from a list of account numbers.
In the Purchase Price Variance Acct field...
-
Enter a valid purchase price variance account number.
-
GL accounts flagged as 'Inactive' are not accessible. If an inactive account needs to be entered in a form, change it to "active" status, make the desired entry, and then set it back to "inactive" again.
-
Click
to select from a list of account numbers.
In the Inventory Adjustment Acct field...
-
Enter a valid inventory adjustment account number.
-
GL accounts flagged as 'Inactive' are not accessible. If an inactive account needs to be entered in a form, change it to "active" status, make the desired entry, and then set it back to "inactive" again.
-
Click
to select from a list of account numbers.
In the COGS Adjustment Account field...
-
Enter a valid COGS adjustment account number.
-
GL accounts flagged as 'Inactive' are not accessible. If an inactive account needs to be entered in a form, change it to "active" status, make the desired entry, and then set it back to "inactive" again.
-
Click
to select from a list of account numbers.
Image Tab
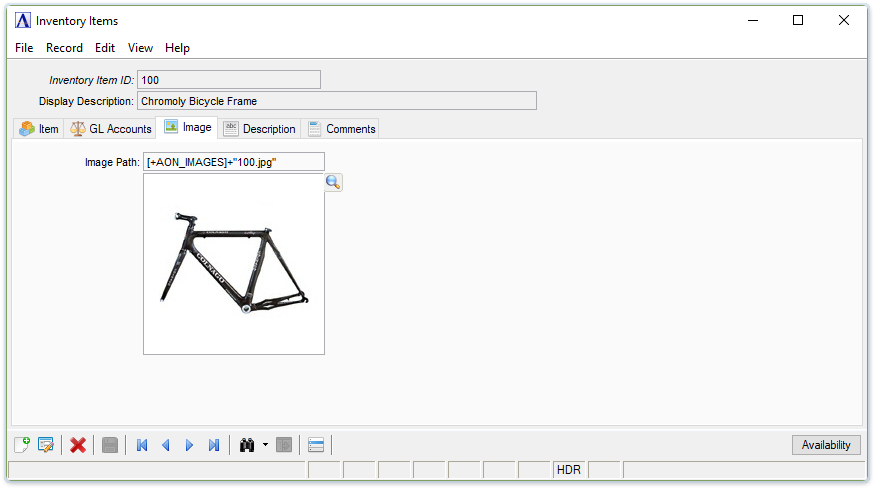
Inventory Items - Image tab
About the Fields
To enable edits to the form select .
In the Image Path field...
-
Enter a valid path to a file an image file.
-
Click
to enter a file lookup dialog.
Description Tab
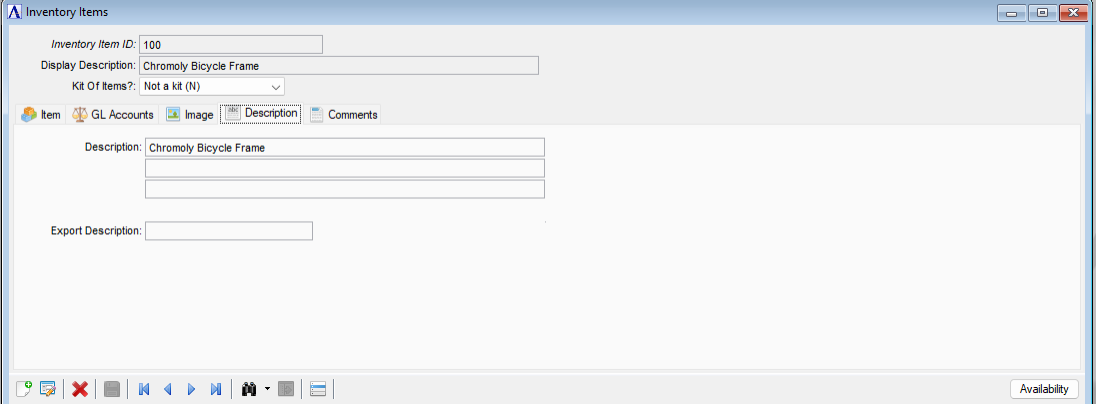
Inventory Items - Description tab
This option is used to change the description of an inventory item. Item descriptions display whenever you are working with the Item Maintenance options.
About the Fields
To enable
edits to the form select .
In the Description field...
-
Enter 1 to 60 characters for a description of the item.
-
Press Tab to leave blank.
The total number of characters used in this field is determined by what is defined in the Item Description fields of the Parameter Maintenance option.
In the Export Description field...
-
The Export Description may be required for export documents when exporting the item.
Comments Tab
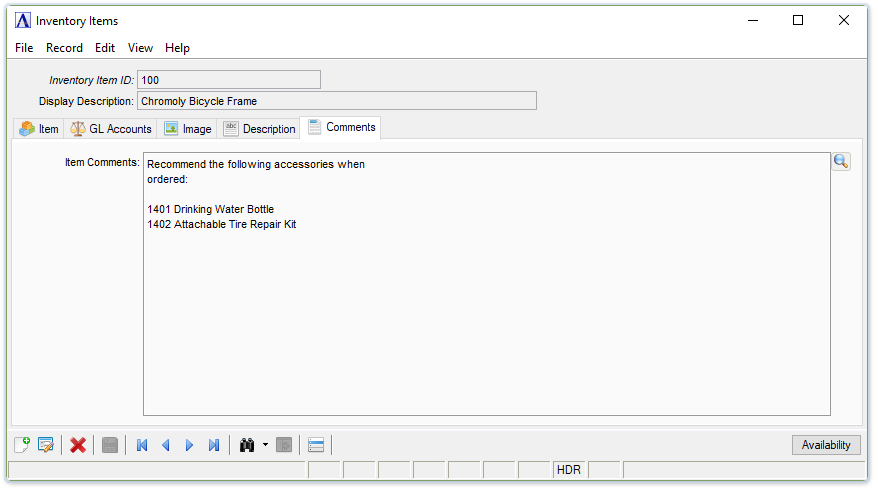
Inventory Items - Comments tab
This option is used to add or edit inventory item comments.
About the Fields
To enable
edits to the form select .
In the Item Comments field...
-
Enter or edit by typing directly into the form field, or click
(or Ctrl+F) to launch the comment editor.
When done making edits:
-
Click
") to save the record.
to save the record.
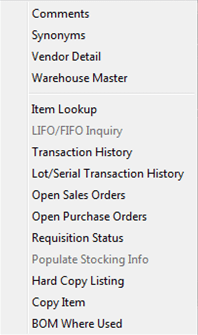
Additional Options
Click ") in the bottom menu bar of any tab screen for easy, direct access to this menu listing of these functions:
in the bottom menu bar of any tab screen for easy, direct access to this menu listing of these functions:
Synonyms Maintenance
Use this option to create alternate search keys that may be used when looking for an item. Synonyms provide a means to search for like items by identifying items of similar types or requirements. Synonyms may be created using a customer and/or vendor part numbers or unique descriptions.
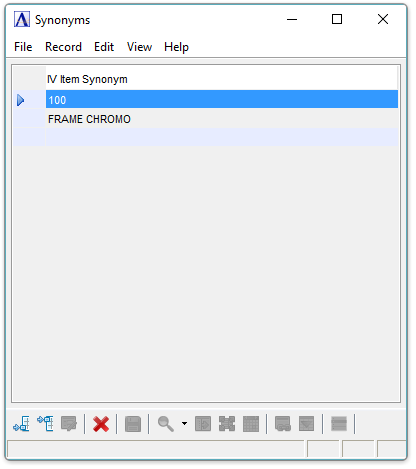
Sample Synonyms maintenance
Synonyms may be entered any time an item number is requested (except within the Item Maintenance task). The Inventory Synonym Lookup window is accessed and displays all items assigned that synonym.
Synonym Example
Your company manufactures bicycles. Within your inventory is a bolt that can be used for attaching handlebars, seats, and gear sockets. Synonyms created for this item might be Bolt, Handlebar, Seat, Gear, Bicycle, and so forth. When you searched for the item using the synonyms, only items assigned the same synonym appear in the list.
When first accessing this option, all known synonyms for the item are displayed and the system allows input of a new synonym.
In the IV Item Synonym field...
-
To enable edits to the form select
. -
Enter 1 to 20 characters for a synonym.
-
Click
") to add new synonyms. Highlight a desired synonym and click
to add new synonyms. Highlight a desired synonym and click ") to insert a new synonym.
to insert a new synonym. -
Click
") to delete a highlighted synonym.
to delete a highlighted synonym. -
Click
to save the record and return to Item Maintenance. -
Use the PgUp and PgDn keys to view several pages of synonyms.
Vendor Detail
Use this option to set up and maintain information on the primary and secondary suppliers for the selected item, including the vendor’s part number and purchase cost information.
NOTE:
The Accounts Payable module must be installed in order for this option to appear on the menu.
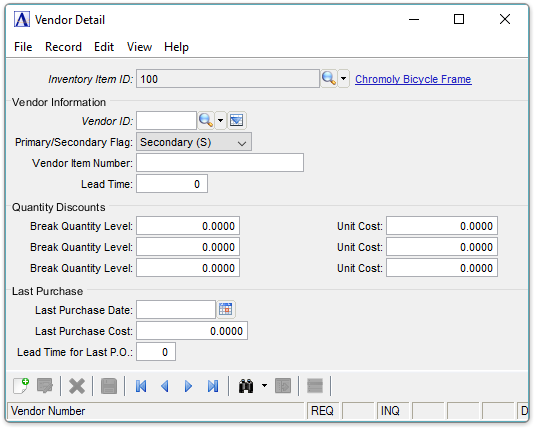
Vendor Detail
-
Click the navigating buttons to view the vendor records;
to view the first record, to view the previous record, to view the next record, and to view the last record. -
To enable edits to the form select
. -
Click
") to begin a new vendor detail record.
to begin a new vendor detail record. -
Click
to delete the displayed record.
The vendor maintenance information is separated into three sections: Vendor Information, Quantity Discounts, and Last Purchase. Vendor information is a separate menu task because its primary purpose is to set up discounts that are offered by vendors based on the quantity purchased. Its main concern is how much is paid for items rather than how many to have in stock.
The Primary/Secondary designation is for user information only; it has no bearing on operations. In most cases, the stocking vendor set-up in Stocking Information will also be the primary vendor set up here. This is intended to reflect the fact that stocking vendor and primary vendor usually mean the same thing in business situations. This vendor usually offers the best quantity discounts as well.
There may be situations where the primary vendor does not offer the best discounts or any at all. Price may not be the most important consideration, especially if there is very little difference in prices between vendors. Ability to deliver quickly and/or on time and quality of goods purchased may be more important than price alone. In cases like that, the "best" vendor is a management decision and should be primary (and the stocking vendor). The others are secondary. Any discounts offered are set up in this task.
Pricing levels set up for the primary & secondary vendors are used when purchase requisitions are generated from the Purchase Order, Shop Floor Control, and MRP modules (if installed).
Vendor Information Details
In the Vendor field...
-
Enter a valid vendor code as defined within Accounts Payable. If the vendor is on file, the vendor description is displayed.
-
Click
to select from a list of existing vendor numbers -
Click
") to display all items associated with the displayed vendor
to display all items associated with the displayed vendor
From the Primary/Secondary Flag dropdown...
-
Select Primary (P) if the vendor is a primary supplier of the item.
-
Select Secondary (S) if the vendor is a secondary supplier.
As many primary and secondary suppliers as required may be created for an item. Only the stocking vendor identified in the Stocking Information option is used for replenishment processing.
In the Vendor Item Number field...
-
Enter the vendor’s item number, if applicable.
This item number is displayed in thePurchase Order Entry task, if provided.
In the Lead Time field...
-
Enter the lead time in the number of days the vendor requires for the item. Lead time is normally maintained and updated by the Purchase Order Receipt Register.
Quantity Discounts Details
If the vendor offers a quantity purchase discount, three levels of quantity and cost information may be entered. This information is used to automatically calculate the purchase price when the item is ordered within the Purchase Order module.
In the Break Quantity Level 1, 2, 3 fields...
-
Enter a quantity break.
In the Unit Cost 1, 2, 3 fields...
-
Enter the cost for the quantity level.
Last Purchase Details
If the Purchase Order Processing module is installed, enter any known details of the last purchase when setting up an item for the first time. Thereafter, the information in these fields is updated automatically each time a purchase order is received for this vendor and item.
In the Last Purchase Date field...
-
Enter the date of the last purchase from this vendor for this item.
-
Click
to select
a date by using the calendar tool.
In the Last Purchase Cost field...
-
Enter the cost of the last purchase from this vendor for this item.
In the Last PO Lead Time field...
-
Enter the lead time required for the last purchase order.
Lead time is normally maintained and updated by the Purchase Order Receipt Register.
When finished making changes...
-
Click
to save the record.
Warehouse Master
Use this option to enter warehouse information about the item such as location, cycle code, and current list price. The warehouse information is divided into two tabs: Warehouse and Stocking.
Note:
These five fields are the only ones enabled for kits; all others are disabled:
-
Warehouse Location
-
Distribution Code
-
Physical Inventory Cycle
-
Current Price
-
Current Price Code
Warehouse Tab

Warehouse Tab - Warehouse Master Details
-
Click the navigating buttons to view the warehouse records;
to view the first record, to view the previous record, to view the next record, and to view the last record. -
To enable edits to the form select
.
In the Warehouse ID field...
-
Enter a valid warehouse code. When entering a warehouse ID that is associated with your selected item, all established information is displayed.
-
Click
to
select from a list of warehouse codes. -
Click
to remove the warehouse information. If any item quantities exist
for the selected item in this warehouse, the system displays the prompt:
The system will also prevent deleting an item selected for physical inventory.
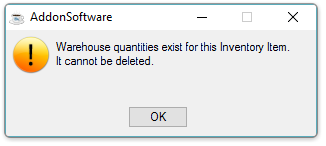
Warehouse Quantities Exist
In the Warehouse Location field...
The location may be up to 10 characters in length and alphanumeric.
-
Enter the warehouse bin or shelf location of the item.
In the Distribution Code field...
This field appears only if the Distribute Sales By Item parameter in the System Parameter option of the Accounts Receivable Parameter Maintenance task is checked.
-
Enter a distribution code.
-
Click
to select from a list of valid distribution codes.
In the Physical Inventory Cycle field...
-
Enter a 2-character (alphanumeric) physical inventory cycle code.
-
Click
to select form a list of define cycle codes.
This code is used to separate a large inventory into different parts for physical inventory counting. It can also provide adjustment amounts for General Journal entries if Cycle Codes have been reserved for specific General Ledger accounts. Refer to Physical Inventory Cycle Codes.
Special Order Item checkbox...
-
Mark the box if this item will be special ordered for the warehouse and not normally stocked.
Selected for Phys Inventory? checkbox...
Display only.Shows if the item is selected for physical inventory.
In the Last Phys field...
-
Enter the date of the last physical inventory for the selected item.
-
Click
to select
a date by using the calendar tool.
Pricing Detail
In the Current Price field...
-
Enter the current list price for the item.
In the Current Price Code field...
-
Enter the 2-character code that associates the item with a particular price list.
The code is alphanumeric and is not file verified.
In the Prior Price field...
-
Enter the number that represents the list price just before the current list price.
In the Prior Price Code field...
-
Enter the 2-character code that associates the item with a particular price list.
The code is alphanumeric and is not file verified.
Costs Details
The fields within the Costs section are only accessible when entering an item for the first time. Thereafter, the information is display only and shows the most recent activity. If using the standard cost method and wanting to make changes to a unit cost after the item is entered into your inventory, use the Cost Change Entry task.
In the Unit Cost field...
(Disabled for kits.)
-
Enter the unit cost of the inventory item.
-
After changing the cost of a kit's component or quantity, run the Bill Of Materials Inventory Costing Update to update the kit's cost.
The unit cost is updated automatically using either the average, standard, or replacement cost method (depending on how the Method for Costingparameter is set). If using the standard cost method, the unit cost is updated only when you use the cost change entry task. The unit cost is used numerous programs throughout the AddonSoftware modules installed on your system to calculate the cost of items and generate postings to the General Ledger.
In the Landed Cost field...
-
Enter the landed cost of the inventory item. Landed cost is not used by the system in any calculation; it is for information purposes only. Regardless of the method of costing chosen, it shows only the most recent landed cost activity as calculated by the Purchase Order Invoicing Task. Refer to the Purchase Order Appendix B - Landed Cost for a more complete discussion.
In the Last Purchase Cost field...
-
Enter the last purchase order cost of the inventory item.
In the Price Table Cost field...
-
Enter a manually maintained cost for the item that is not updated by system activity. It can be used in the OP Pricing Table to calculate a selling price when using either the Markup from Cost or Margin over cost pricing methods.
In the Average Cost field...
-
Enter the average cost of the inventory item.
In the Standard Cost field...
-
Enter the standard cost of the inventory item.
In the Replacement Cost field...
-
Enter the replacement cost of the inventory item.
Inventory quantities and transaction dates are display only and cannot be changed. The Total On Order quantity represents open Purchase Orders and open Work Orders for finished goods. The Total Committed quantity represents open Sales Orders and materials committed to open Work Orders. The Available quantity is calculated from the quantity On Hand minus Total Committed.
Note that the Total On Order and Total Committed amounts are highlighted to alert the user if the sum of goods on order in open Purchase/Work Orders doesn't match the Total On Order, or if the sum of goods committed in open Sales/Work Orders doesn't match the Total Committed. Run the Inventory > Utilities > Rebuild Committed Quantities and/or Rebuild On Order Quantities utilities to correct the totals in the Warehouse Master if needed.
Stocking Tab
Item buyer code, lead time, order quantity, safety stock level, conversion factor, and other stocking information may be edited here. See also Inventory Item Maintenance/Stocking Information in Appendix A - Purchase Order Replenishments.
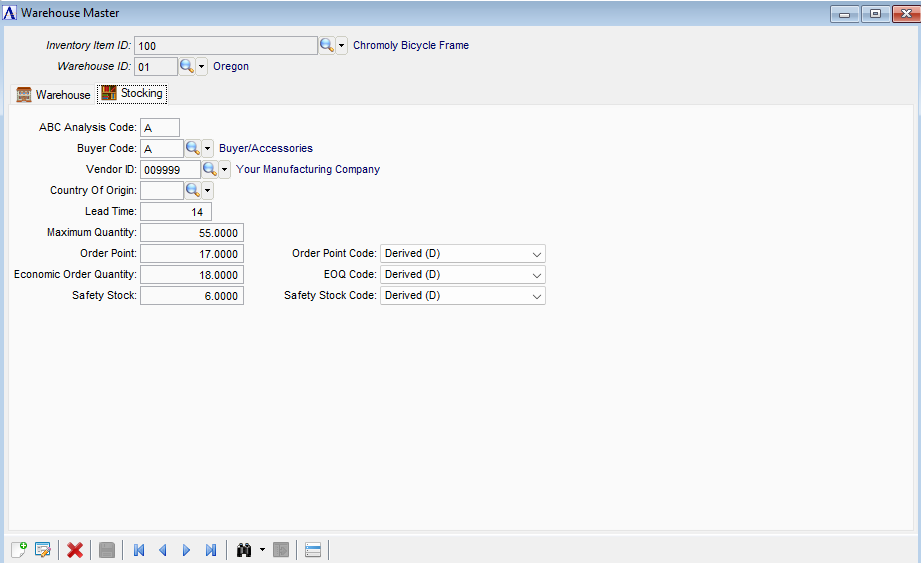
Warehouse Master – Stocking Tab
NOTE:
All fields are disabled for kits.
To enable edits to the form select .
In the ABC Analysis Code field...
-
Enter a valid ABC code.
The code is recalculated by the ABC Analysis Report.
In the Buyer Code field...
-
Enter a valid buyer code.
-
Click
to select from a list of valid buyer codes.
In the Vendor ID field...
-
Enter a valid vendor code.
-
Click
to
select from a list of valid vendor IDs.
In the Country Of Origin field...
-
The Country Of Origin may be required for import documents when importing the item.
-
Click
to
select a country.
NOTE:
Stocking information is comprised of the levels of inventory and how it is stored. If installed, the purchase order module uses stocking information for purchase requisitions. In addition, the Shop floor module if installed, uses the information to generate purchase requisitions. It is recommended that a stocking vendor be set up for all inventory items to enable this information to function correctly.
In the Lead Time field...
-
Enter the lead time for the item.
In the Maximum Quantity field...
-
Enter the largest amount of the item you will stock.
In the Order Point field...
-
Enter the order point for the item.
-
Select Derived (D) to instruct the system to automatically update the Order Point Code field with a calculated valued when you run the EOQ, Order Point, and Safety Stock Report updates.
-
Select Entered (E) to manually set the Order Point Code field, yet have the system automatically update it with a calculated vale when you run the EOQ, Order Point, and Safety Stock Report updates.
-
Select No Recalculation (N) to manually maintain the Order Point Code field.
-
See Background below for more information
In the Economic Order Quantity field...
-
Enter the EOQ for the item.
From the EOQ Code dropdown...
-
Select Derived (D) to instruct the system to automatically update the EOQ Code field with a calculated valued when you run the EOQ, Order Point, and Safety Stock Report updates.
-
Select Entered (E) to manually set the EOQ Code field, yet have the system automatically update it with a calculated vale when you run the EOQ, Order Point, and Safety Stock Report updates.
-
Select No Recalculation (N) to manually maintain the EOQ Code field.
-
See Background below for more information.
In the Safety Stock field...
-
Enter the safety stock for the item.
From the Safety Stock Code dropdown...
-
Select Derived (D) to instruct the system to automatically update the Safety Stock Code field with a calculated valued when you run the EOQ, Order Point, and Safety Stock Report updates.
-
Select Entered (E) to manually set the Safety Stock Code field, yet have the system automatically update it with a calculated vale when you run the EOQ, Order Point, and Safety Stock Report updates.
-
Select No Recalculation (N) to manually maintain the Safety Stock Code field.
Background on EOQ, Order Point, and Safety Stock
EOQ, Order Point, and Safety Stock fields are maintained by the system or by the user. The behavior is determined by the D/E/N (Derived, Entered, No recalc) flag on the Stocking tab of the Warehouse Master option in Item Maintenance.
The flow of processing is designed so that the system can automatically calculate the values in the EOQ, Order Point and Safety Stock fields based on usage. This calculation happens during the update offered after the "EOQ, Order Point and Safety Stock Report" prints. In this way, stocking levels can be automatically maintained. To keep inventory at optimal levels, these values should be updated periodically based on volatility of demand/usage.
The values can also be maintained by hand. This manual editing does not require running the update.
Understanding the D/E/N flag
If the flag is set to N, the corresponding field (EOQ, Order Point or Safety Stock) was keyed in by the user and is maintained only by the user (system never recalculates it).
If the flag is set to D, it means that the value in the corresponding field (EOQ, Order Point or Safety Stock) was either 1) calculated by the system OR 2) keyed in by the user and never updated by the system (eg the update hasn't been run for this field). When the update is run and this field is selected for updating, the system will recalculate and update this field.
If the flag is set to E, it means that the value in the corresponding field (EOQ, Order Point or Safety Stock) was keyed in by the user.
NOTE:
It's important to understand that when the update is run for this field, the system will recalculate and update this field *and* change the flag from E to D.
When you are finished making changes to an item...
-
Click
to save the record. The form is cleared in preparation for a new entry. -
Click
to begin a new item master record. -
Click
to delete the recordNOTE:
The system will not allow deletion if item quantities exist.
Lot /Serial Number Master
Use this option to maintain lot and serial number information associated with an inventory item and warehouse location, including costing, quantity, vendor, and transaction date information.
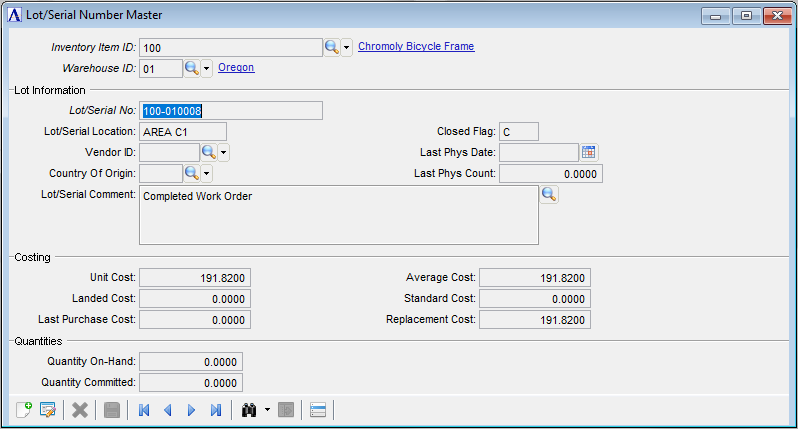
Lot/Serial Number Master
About the Fields
The Lot/Serial Number Master form allows entry and maintenance of lot and serial number details associated with the selected inventory item and warehouse.
In the Inventory Item ID field...
Displays the inventory item ID associated with the selected lot/serial number record.
Click
to search and select an inventory item record.
In the Warehouse ID field...
Displays the warehouse ID associated with the selected lot/serial number record.
Click
to search for and select a warehouse record.
In the Lot/Serial No field...
Enter the lot/serial number associated with the selected inventory item and warehouse.
In the Lot/Serial Location field...
Enter the location associated with the selected lot/serial number record.
In the Vendor ID field...
Enter the vendor ID associated with the selected lot/serial number record.
Click
to search for and select a vendor record.
In the Country of Origin field...
Enter or select the country of origin associated with the selected lot/serial number record.
Click to search for and select a country record.
In the Lot/Serial Comment field...
Enter the comment associated with the selected lot/serial number record.
Click to open the Lot/Serial Comment window for entering or editing comments.
In the Closed Flag field...
Displays the status indicating whether the selected lot/serial number record is closed.
In the Last Phys Date field...
Enter or select the last physical inventory date.
Click the to select a date from the calendar.
In the Last Phys Count field...
Displays the quantity recorded during the last physical inventory count.
In the Unit Cost field...
Display only. Shows the unit cost for the selected lot/serial number record.
In the Landed Cost field...
Display only. Shows the landed cost for the selected lot/serial number record.
In the Last Purchase Cost field...
Display only. Shows the last purchase cost for the selected lot/serial number record.
In the Average Cost field...
Display only. Shows the average cost for the selected lot/serial number record.
In the Standard Cost field...
Display only. Shows the standard cost for the selected lot/serial number record.
In the Replacement Cost field...
Display only. Shows the replacement cost for the selected lot/serial number record.
In the Quantity On-Hand field...
Display only. Shows the quantity currently on-hand for the selected lot/serial number record.
In the Quantity Committed field...
Display only. Shows the quantity committed for the selected lot/serial number record.
Item Lookup
For a quick lookup of inventory items, select the drop down tool to choose the sort criteria. When the search results are displayed in the table, select the item to display inventory details in the right side of the window.
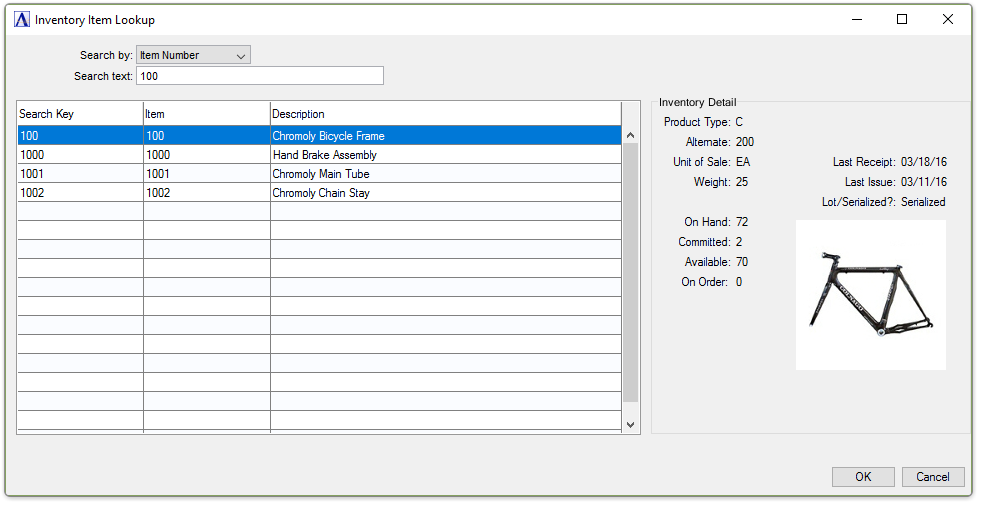
Inventory Item Lookup
From the Search by dropdown...
-
Item Number
-
Product Type
-
Vendor
-
Synonym
In the Search text field...
-
Enter additional search words to narrow the results.
-
Tab or mouse click past the Search text box to view the search results.
In the Search Key results grid...
- Selecting a result row populates the Inventory Detail information on the right side of the form.
-
Select either the OK or Cancel buttons to close the Inventory Item Lookup window.
LIFO/FIFO Inquiry
This option may be used to view LIFO/FIFO cost information about the selected inventory item for all warehouses. Unlimited tiers track cost and quantity information for all inventory receipt and adjustment transactions that result in additions to the on-hand quantity for the item.
Select LIFO/FIFO Inquiry from the Additional Options dropdown list.
NOTE:
If The LIFO/FIFO Code parameter in the Application Parameters window not set to LIFO (L) or FIFO (F), LIFO/FIFO Inquiry in Additional Options will appear inactive as shown below:
For a complete explanation of how LIFO/FIFO costing methods work, along with examples of how cost tiers are updated, refer to Appendix A - Inventory Costing Calculations.
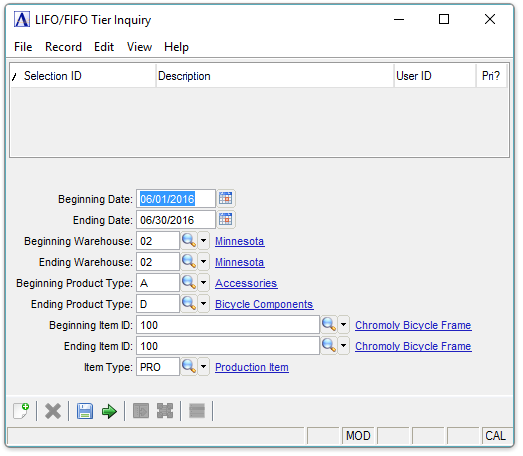
LIFO/FIFO Tier Inquiry
In the Beginning/Ending Date field...
-
Enter a date for the first/last transaction of the inquiry.
-
Click
to select
a date by using the calendar tool.
In the Beginning/Ending Warehouse field...
-
Enter the first/last warehouse code.
-
Click
to select from a list of valid warehouse codes.
In the Beginning/Ending Product Type field...
-
Enter the first/last product code.
-
Click
to select from a list of valid product codes.
In the Beginning/Ending Item ID field...
-
Enter the first/last item ID.
-
Click
to select from a list of valid item codes.
In the Item Type field...
-
Enter an item type .
-
Click
to select from a list of valid item types.
When done making selections...
-
Click
") to run the LIFO Detail Inquiry.
to run the LIFO Detail Inquiry. -
Click
to clear
the form and re-enter options.
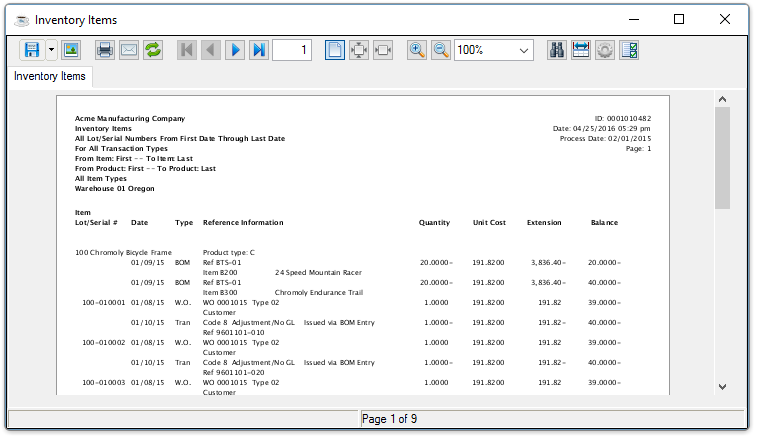
The LIFO/FIFO information is displayed with totals generated for the quantity and extended cost amounts.
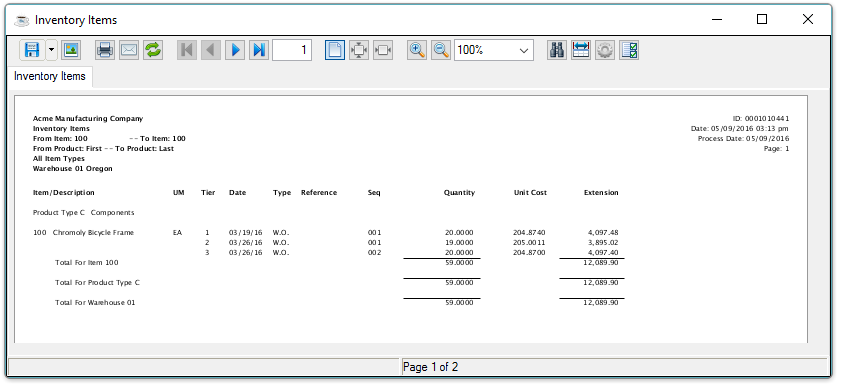
Sample LIFO-FIFO Tier Report
See Output Options.
Report Explanation
In the Date field...
Display only. Shows the date of the transaction.
In the Type field...
Display only. Displays the type of transaction.
-
BEG Beginning Balance
-
BOM Bill of Materials Production Entry
-
PHYS Physical Inventory Adjustment
-
REC Purchase Order Receipt
-
SOLD Sale
-
TRAN Inventory Transaction Entry
-
W.O. Work Order Receipt or Issue
-
XFER Warehouse Transfer (in/out)
In the Reference field...
Display only. Shows the reference number used for the transaction, such as the purchase order number, work order number, etc.
In the Seq field...
Display only. Shows the sequence number of the transaction for the date.
In the Quantity field...
Display only. Shows the quantity of the item for the tier.
In the Unit Cost field...
Display only. Shows the cost of the item as received into inventory.
In the Extension field...
Display only. Shows the extended cost of the tier.
Item Transaction History
For details Click here.
Lot/Serial Transaction History
Use this display to view the historical Lot/Serial Number inventory transactions for a single inventory item by warehouse. A range of dates for the transaction information may be selected for review.
Select Lot/Serial Transaction History from the Additional Options dropdown list.
NOTE:
If the Lotted/Serialized parameter in the Application Parameters is set to Neither (N), this option will not appear on the Status Inquiry option menu.
![]()
Inventory Lot/Serial Transaction History
In the Beginning/Ending Date field...
-
Enter the date of the first/last transaction for the inquiry.
-
Click
to select
a date by using the calendar tool. -
Press Tab to select the first/last date record.
In the Beginning/Ending Warehouse field...
-
Enter a warehouse code.
-
Press Tab to view transaction history for the first warehouse record.
-
Click
to select from a list of valid warehouse codes.
In the Beginning/Ending Product Type field...
-
Enter a product code.
-
Click
to select from a list of valid product codes.
In the Beginning/Ending Item ID field...
-
Enter an item code.
-
Click
to select from a list of valid item codes
In the Item Type field...
-
Enter an item type .
-
Click
to select from a list of valid item types.
From the Open/Closed/Both dropdown...
-
Select Open (O) from the list for Open Lot/Serial Numbers only.
-
Select Closed (C) from the list for Closed Lot/Serial Numbers only.
-
Select Both (B) from the list for Both open and closed.
Total by Item checkbox...
-
Mark the box to total transactions by item.
-
Unmark the box for no totals.
Transaction Types options...
-
Mark the checkboxes for the transaction code(s) that you wish to display in the report.
-
ALL Transactions – Unmark the checkbox to make individual selections:
-
-
Purchase Orders
-
Sales
-
Inventory Trans
-
Physical Inventory
-
Transfers In
-
Transfers Out
-
WO Issue
-
WO Receipt
-
Bill of Materials Prod
-
The selection of a specific transaction type provides a means to audit transactions for a selected process. For instance, choosing Order Processing generates a report by item sequence that shows the purchaser of the item, the invoice number, and the date of purchase. Select as many transaction types as required.
When done making selections...
-
Click
to clear the form and re-enter options. -
Click
to create the Item Transaction History Listing. -
Click the "Close Window" button to return to the Item Maintenance menu.
![]()
Sample Inventory Lot/Serial Transaction History Report
See Output Options.
Open Sales Orders (for this item)
This option is used to view a listing of all open orders for the current item.
Select Open Sales Orders from the Additional Options dropdown list.
NOTE:
The Order Processing and Accounts Receivable modules must be installed in order for these options to appear on the menu.
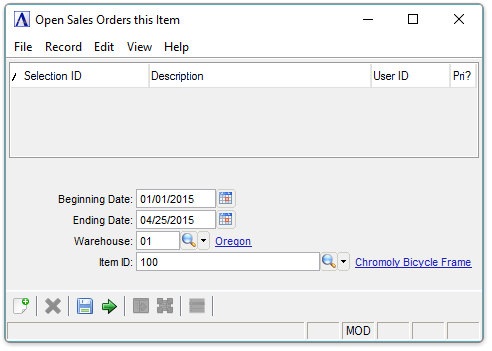
Open Sales Orders
In the Beginning/Ending Date field...
-
Enter the date of the first/last open sales order for the inquiry.
-
Click
to select
a date by using the calendar tool. -
Press Tab to select the first/last date record.
In the Warehouse field...
-
Enter a warehouse code.
-
Click
to select from a list of valid warehouse codes.
In the Item ID field...
-
Enter the desired item for the inquiry.
-
Click
to select from a list of valid item codes.
When done making selections...
-
Click
to create the Open Sales Order Listing. -
Click
to clear
the form and re-enter options.
The open order status information is displayed with totals generated for the quantity and extended cost amounts.
Sample Open Sales Order Report
See Output Options.
Report Explanation
In the Order # field...
Display only.Shows the order number of the transaction.
In the Sts field...
Display only.Shows the three characters that describe the type of open order.
1st Character 2nd Character 3rd Character
O=Open P=Printed L=Locked
C=Credit N=Not Locked
In the Customer field...
Display only.Shows the customer for the open order.
In the Ordered field...
Display only.Shows the date the order was created.
In the Ship field...
Display only.Shows the date the order will ship.
In the Quantity field...
Display only.Shows the quantity of the item for the transaction.
In the Com? field...
Display only.Shows if the item has been committed.
In the Extension field...
Display only.Shows the extended cost of the item for the transaction.
Open Purchase Orders
Use this option to view a listing of all open purchase orders for the current item.
Select Open Purchase Orders from the Additional Options dropdown list.
NOTE:
The Purchase Order Processing module must be installed in order for this option to appear on the menu.
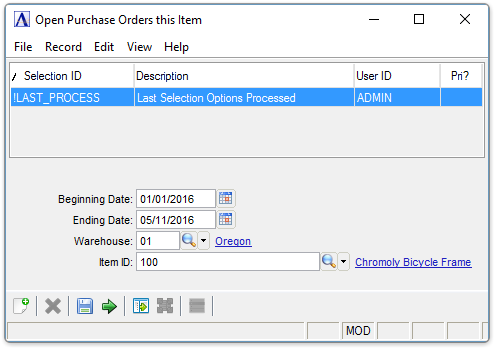
Open Purchase Orders this Item
In the Beginning/Ending Date field...
-
Enter the date of the first/last open purchase order for the inquiry.
-
Click
to select
a date by using the calendar tool. -
Press Tab to select the first/last date record.
In the Warehouse field...
-
Enter a warehouse code.
-
Click
to select from a list of valid warehouse codes.
In the Item ID field...
-
Enter the desired item for the inquiry.
-
Click
to select from a list of valid item codes.
When done making selections...
-
Click
to create
the report. -
Click
to clear
the form and re-enter options.
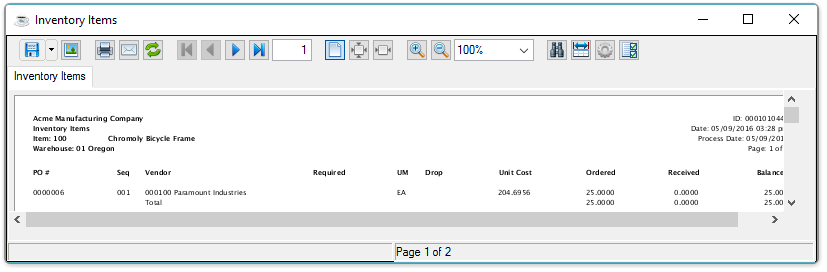
Sample Open Purchase Order Report
The open purchase order status information is displayed with totals generated for the quantity and extended cost amounts.
See Output Options.
Report Explanation
In the PO # field...
Display only.Shows the purchase order number for this item.
In the Seq field...
Display only. Shows the line sequence number for this item on the purchase order.
In the Required field...
Display only. Shows the date this item is required.
In the Drop field...
Display only. Shows if the order is drop-shipped.
In the UM field...
Display only. Shows the stocking unit of measure used for the item.
In the Unit Cost field...
Display only. Shows the cost of each unit in the stocking unit of measure.
In the Ordered field...
Display only. Shows the quantity ordered in the stocking unit of measure.
In the Received field...
Display only. Shows the quantity received to date for the order.
In the Balance field...
Display only. Shows the balance remaining on the order.
Requisition Status
Use this option to view a listing of all requisitions for the current item.
Select Requisition Status from the Additional Options dropdown list.
NOTE:
The Purchase Order Processing module must be installed in order for this option to appear on the menu.
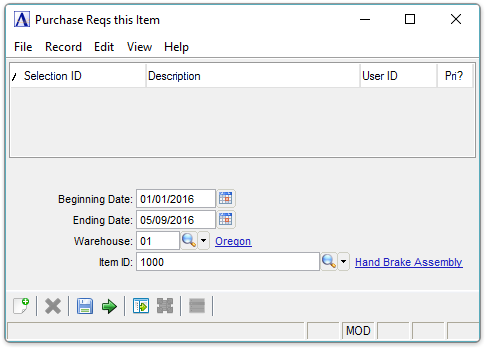
Purchase Requisitions
In the Beginning/Ending Date field...
-
Enter the date of the first/last open purchase requisition for the inquiry.
-
Click
to select
a date by using the calendar tool. -
Press Tab to select the first/last date record.
In the Warehouse field...
-
Enter a warehouse code.
-
Click
to select from a list of valid warehouse codes.
In the Item ID field...
-
Enter the desired item for the inquiry.
-
Click
to select from a list of valid item codes.
When done making selections...
-
Click
to clear
the form and re-enter options. -
Click
to create the Purchase Order Reqs Listing.
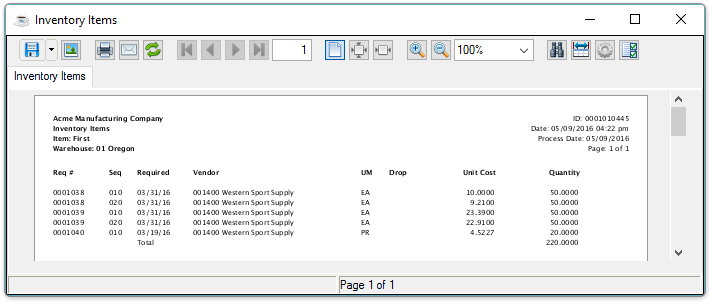
Sample Open Purchase Order Report
See Output Options.
Report Explanation
In the Req # field...
Display only. Shows the requisition number for this item.
In the Seq field...
Display only. Shows the line sequence number for this item on the purchase requisition.
In the Required field...
Display only. Shows the date this item is required.
In the Vendor field...
Display only. Shows the vendor for this requisition.
In the UM field...
Display only. Shows the stocking unit of measure used for the item.
In the Drop field...
Display only. Shows if the order is drop-shipped.
In the Unit Cost field...
Display only. Shows the cost of each unit in the stocking unit of measure.
In the Quantity field...
Display only. Shows the quantity in the stocking unit of measure required for the requisition
Hard Copy Listing
For details Click here.
Copy Item
Use this option to copy item masterfile information from the selected item to a new item number.
Select Copy Item from the Additional Options dropdown list.
In the Inventory Item ID field...
Display only. Displays the item from the Inventory Master form.
In the New Item ID field...
-
Enter the new item number.
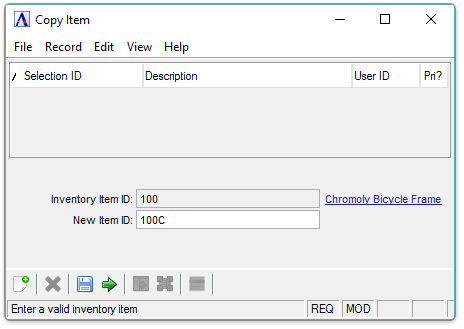
Copy Item
If a number currently assigned to an item is entered, the system displays the prompt:
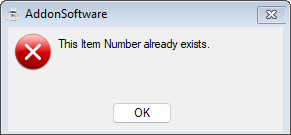
Item Number already exists
NOTE:
Location, last transaction date, UPC code, maximum quantity, order point, safety stock, and EOQ information are not copied to the new item number.
When finished making selections...
-
Click
to save the record. -
Click
to begin a new item master record. -
Click
to delete the recordNOTE:
The system will not allow deletion if item quantities exist.