General Ledger - Accounts
Function
The GL Accounts maintenance menu runs as a form. Enter the GL account number into the field or launch the inquiry function to select from a list of existing GL accounts to review or edit. Use the buttons on the form to create a Summary Activity report or a Transaction History for the selected GL account. Selecting [Display additional options] provides access to these functions - Summary Activity, and Transaction History, Account Comments, and Account/Report Maintenance. Buttons are also provided for Summary Activity and Transaction History.
=> To access this task...
Select Accounts from the Inquiry and Maintenance menu.
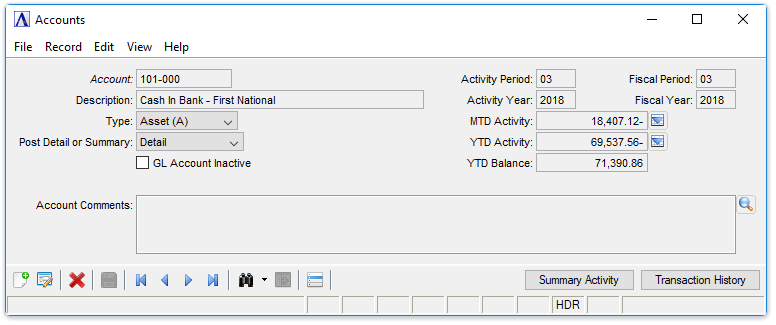
Accounts Master
About the Fields
To enable edits to the form select  .
.
In the Account field...
-
Enter a valid GL Account number.
-
Click
 to select a GL account number from a list of active records. To view a list of all records including inactive records, see Query Functions.
 -
Click the record navigating buttons;
 to view the first record,
  to view the previous record,
  to view the next record and
  to view the last record.
In the Description field...
-
The account description displays for the entered record.
The description appears on all reports and inquiries showing accounts and their descriptions.
From the Type dropdown...
- Select the Account Type from the dropdown list:
-
-
Asset (A)
-
Liability (L)
-
Capital (C)
-
Income (I)
-
Expense (E)
-
From the Post Detail or Summary dropdown...
Selection is disabled and defaults to Summary unless the Post Detail Transactions parameter is marked in the Application Parameters settings. When marked/enabled, the selection defaults to Detail.
- Select Detail to post detail transactions.
-
Select Summary to post only summary information to this account (i.e. summarized by journal ID and date).
NOTE: Active accounts (those with open transactions) may not be deleted. To delete an account, its balance must be brought to zero and all transactions cleared.
GL Account Inactive checkbox...
-
Mark the box to render the account inactive.
-
Unmark the box to keep the account active.
In the Activity Period field...
The period associated with the MTD Activity, YTD Activity, and YTD Balance. Defaults to the current fiscal period. Change to view different data in the MTD and YTD fields.
-
Displays the current financial period as defined by the GL Parameters setting.
-
Enter the financial period for a summary view. This does not change the GL Parameters setting.
In the Activity Year field...
The year associated with the MTD Activity, YTD Activity, and YTD Balance. Defaults to the current fiscal year. Change to view different data in the MTD and YTD fields.
-
Displays the current financial year as defined by the GL Parameters setting.
-
Enter the financial year for a summary view. This does not change the GL Parameters setting.
In the MTD Activity field...
Displays the sum of transactions applied to this GL account for the period and year selected.
-
Display only. Select the drilldown button to display a queryable transaction history grid for the selected month.
In the YTD Activity field...
Displays the sum of transactions applied to this GL account for the period and year selected.
-
Display only. Select the drilldown button to display a queryable transaction history grid for the selected year.
In the YTD Balance field...
Display only. Displays the sum of transactions applied to this GL account for the period and year selected.
In the Fiscal Period field...
Display only. Displays the current accounting period.
In the Fiscal Year field...
Display only. Displays the current accounting year.
-
Click
 to open a dropdown menu containing optional processes (Summary Activity, and Transaction History, Account Comments, and Account/Report Maintenance).
Summary Activity
- Select the [Summary Activity] button of the current form or select Summary Activity from the Display additional options...dropdown .
This option provides a summarized display of account activity by period, along with beginning and ending balances for the selected GL Account.
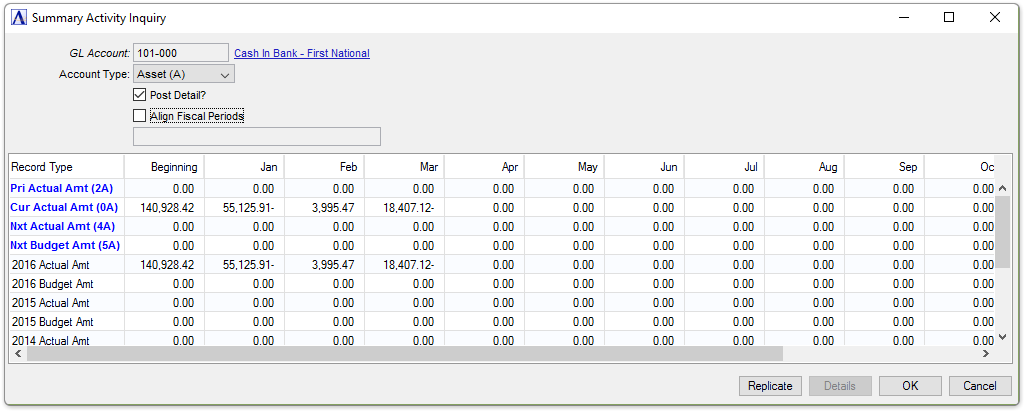
Sample Summary Activity Inquiry
In the GL Account field...
Display only. Displays the GL account selection made in the Accounts maintenance form.
In the Account Type field...
Display only. Shows the account type as defined in Account Maintenance.
Post Detail? checkbox...
Display only. Shows the setting of the detail transactions flag in Account Maintenance.
Align Fiscal Periods checkbox...
The checkbox is disabled if the fiscal calendars are the same, i.e. the periods are already aligned.
-
Mark the box to re-align periods in a previous fiscal year to match the current fiscal year's calendar in order to facilitate comparative financial reporting.
-
Unmark the box to perform no re-alignment.
From the Record Type dropdown...
The first four rows are determined in the Budget Maintenance section of the Default Display Columns option of the Application Parameters task. The selections may be changed by double-clicking on a blue Record Type and selecting from the list. Only budget information can be changed.
Data for the current fiscal year and previous five fiscal years is displayed at the bottom of the grid. The data displayed in these rows is based on the Record Types selected for the first four rows, i.e. Actual Amounts, Actual Units, Budget Amounts and/or Budget Units.
Grid Buttons...
-
Select the [Replicate] button to replicate a selected amount to the remainder of the periods in the same row. Selecting an amount is required before proceeding.
-
Selecting a cell in the grid enables the [Details] button. Select the button to view the GL Transaction Detail grid for the selected month.
-
Select the [OK] or [Cancel] buttons to close the window.
(back to Display Additional Options)
Transaction History
-
Select the [Transaction History] button of the current form or select Transaction History from the dropdown
.
This option displays any transactions for a selected general ledger account during a specified range of accounting periods. After entering the search parameters for the transactions, a display screen appears with the results showing the transaction period, the date, reference information, audit number, and the transaction amounts.
Transaction History Report
In the Beginning Period field...
-
Enter the number of the beginning period to show on the inquiry.
In the Beginning Year field...
-
Enter the year of the beginning period to show on the inquiry.
In the Ending Period field...
-
Enter the number of the ending period to show on the inquiry.
In the Ending Year field...
-
Enter the year of the ending period to show on the inquiry.
In the Beginning/Ending Account field...
-
Enter the beginning/ending account number to show on the inquiry.
-
Click
 to select from a list of existing type GL Account codes.
In the Wildcard Mask field...
Understanding Wildcard Masks
Certain tasks allow for the input of an account wildcard to enable you to select accounts that have common numbering as part of their identification. The wildcard can use the ‘?’ and ‘-’ characters; the '?' represents a single character, and the dash '-' is a literal. For example, assume an account mask set to 000-000, as is the case with standard demo data. If you want to select all accounts that end with '1', use the wildcard mask ???-??1. The question marks stand in place of the account digits; the dash is located as expected in the mask.
In the Journal ID field...
-
Enter any Journal ID to include on the report.
-
Click
to select from a list of existing type Journal ID codes.
From the Detail or Summary dropdown...
-
Select Detail (D) from the list to display the transactions in detailed format.
-
Select Summary (S) from the list to display the transactions in summarized format by journal ID and date.
Export format field...
-
Mark the Export format box to create a report without blank data fields for manipulation in Excel.
-
Unmark the Export format box to create a report of the raw data.
When done making selections...
-
Click
 to accept the selections and the transactions matching the criteria that appears in a Document Output Display window.
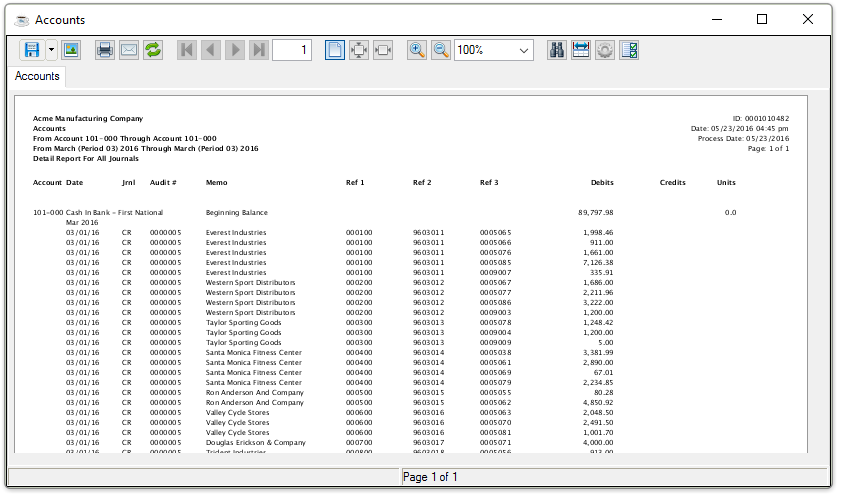
Sample Transaction History Report output
See Output Options.
The following information appears in the Transaction History Inquiry detailed display:
Account - The GL Account number selected from the Account Master Window.
Date - The date the transaction was posted to the general ledger. It normally will fall within the date range of the selected periods, though postings with a prior date may also be included if they were posted during the selected period.
Jrnl - This column displays the two-digit journal ID associated with this transaction.
Audit # - The number is generated and appears on the register creating this transaction.
Memo - This line displays the description of the transaction as entered in the Account No./Memo field as part of a journal entry (if applicable) or a memo generated automatically by a subsidiary module interfaced to the General Ledger. The line is directly below the Journal ID description.
Ref 1, Ref 2, Ref 3 - This line displays the referencing numbers of this account and is directly below the Memo description. Each transaction can have three 10-character references assigned to them.
Debits - This column displays the total debits associated with this transaction.
Credits - This column displays the total credits associated with this transaction.
Units - This column displays the total number of units associated with this transaction. This column will only appear if the Use Units? parameter was checked in the Application Parameters' in Parameters option from Maintenance > Parameters menu.
NOTE: Refer to the Installation section for a complete explanation of how the Unit Mask may be set up.
A summarized display of the transactions shows everything. The amount and units are totaled for all transactions with the same journal ID and date.
(back to Display Additional Options)
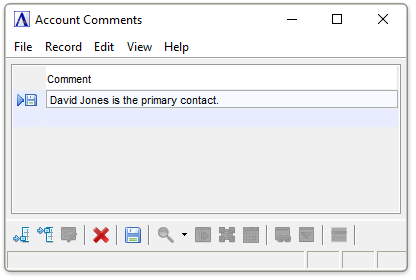
Account Comments
Account Comments allows for the creation, modification, deletion, and inquiry of account comments.
Select and select Account Comments from the dropdown list.
To edit a comment...
-
Press [Enter] to access the selected comment.
-
Type over original comment.
In the Comment field...
-
Enter any comment of up to 48 characters in length.
Editing options...
-
Click
 to save the current records.
 -
Click
 to add a new comment after the last current row.
 -
Click
 to insert a new comment before the currently selected row.
 -
Click
 to delete current comment in the selected line.
(back to Display Additional Options)
Account/Report Maintenance
This option links the selected account with as many as ten financial reports. Each link is established by specifying the report and line number where this account is to be reported.
Click and select Account/Report Maintenance from the dropdown list.
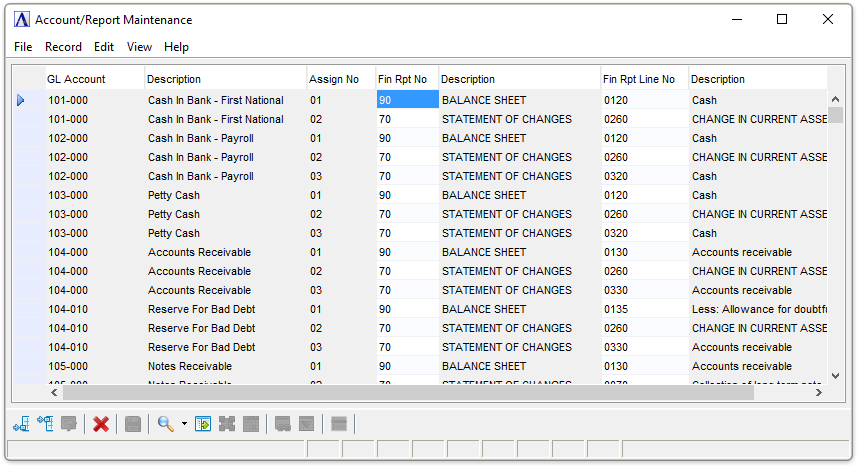
Account/Report Maintenance
In the Assign No field...
Display only. Displays the number of the assignment.
In the Fin Rpt No field...
-
Enter a valid financial report number.
This field specifies which report is to be linked with this account. Up to ten report linkages can be specified for each account. The name of the report will be displayed. Reports must first be defined in the Financial Report Maintenance task before accounts can be assigned to lines here.
In the Description field...
Display only. Displays the description of the linked report.
In the Fin Rpt Line No field...
-
Enter a valid report line number. The report format listing is a useful tool for referencing line numbers.
-
Click
to select from a list of all valid line numbers.
This field specifies the line on the report linked to this account.
In the Description field...
Display only. Displays the name of the line number entered.
When done making selections...
-
Click
to insert new details at the end of the listing or click to insert above a certain row. -
Click
to save the current records.
______________________________________________________________________________________
Copyright BASIS International Ltd. AddonSoftware® and Barista® Application Framework are registered trademarks.