Accounts Payable - Vendor Maintenance - Display Additional Options
About the Vendor Maintenance Options
Use the Vendor Maintenance option menu to enter varied information about a vendor without ever leaving the main task. Once you have selected a vendor record, you can view, change, add or delete vendor information by selecting available options from the menu.
Select  to reveal a dropdown list to other Vendor Maintenance tasks.
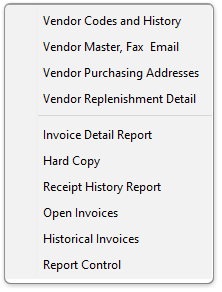
AP Vendor 'Display additional options' menu:
Vendor Codes and History (back to top)
Select in the Vendor Master window and then Vendor Codes and History from the dropdown list.
Use this option to inquire about and change vendor detail information, accounts payable types, distribution codes, payment groups, terms codes. This window also displays the Purchase History of the vendor. When the General Ledger module is installed, you can also access default general ledger expense accounts. This option is accessed automatically during the setup of a new vendor or you can use it at any time to change information for established vendors.
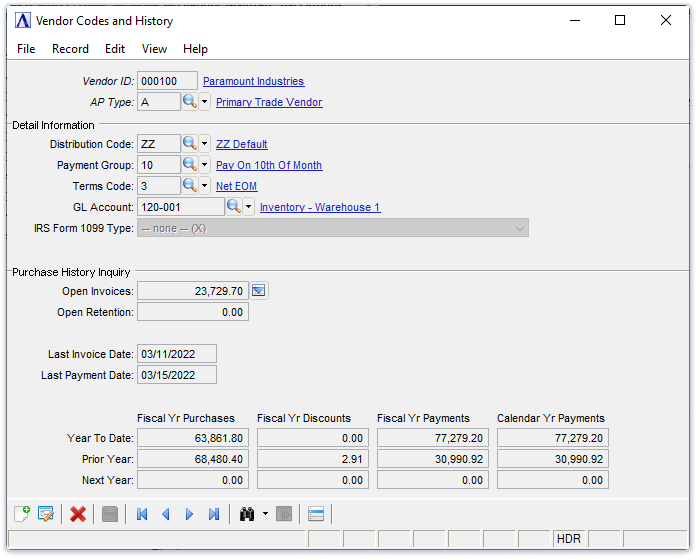
Vendor Codes and History
About the Fields
To enable edits to the form select  .
.
In the AP Type field...
This field appears when the Multiple AP Types parameter is checked. The accounts payable types assist in managing accounts payable information. When multiple accounts payable types are used, a vendor may have one or more type. If an existing AP type for this vendor is selected, the detail information and purchase history for that AP type and vendor is displayed.
-
Enter a valid accounts payable type code.
-
Click
 to select from a list of existing type codes.
About the Fields in the Detail Information section
In the Distribution Code field...
-
Enter a valid distribution code.
-
Click
to select from a list of existing distribution codes.
Distribution codes are defined in the Distribution Code Maintenance task. When the General Ledger module is installed, the general ledger account for accounts payable, cash, discounts and retention payable are assigned to each Distribution Code.
NOTE: Assigning a distribution code to the vendor provides a default distribution for invoices entered for the vendor.
In the Payment Group field...
The payment group code places the vendor in a group that you can select for automatic payment. The payment group specified is assigned to new invoices that are entered.
-
Enter a valid payment group code.
-
Click
to select from a list of existing payment group codes.
In the Terms Code field...
The terms code is assigned to new invoices that are entered.
-
Enter a valid terms code to specify the vendors default payment terms.
-
Click
to select from a list of existing terms codes.
In the GL Account field...
This field appears only when the General Ledger module is installed.
-
Enter a valid general ledger account number.
-
GL accounts flagged as 'Inactive' are not accessible. If an inactive account needs to be entered in a form, change it to "active" status, make the desired entry, and then set it back to "inactive" again.
-
Click
to select from a list of existing general ledger account numbers.
Enter the account number that is the "normal" expense account for purchases from the vendor. Although this number appears as a default expense account for the vendor during the Invoice Entry and Manual Check Entry tasks, the account can be changed during entry.
In the IRS Form 1099 Type field...
Disabled unless "1099?" is checked on the Vendors maintenance form.
When done making selections...
-
Click
 to save the record.
 -
Click
 to clear the form and begin again.
 -
Click
 to delete the record.
NOTE: You cannot delete an Accounts Payable type definition for a vendor when there is current activity for that vendor/distribution combination.
About the Fields in the Purchase History Inquiry section
When multiple accounts payable types are used, the purchase history is displayed for each AP type assigned to the vendor.
In the Open Invoices field...
Display only. Shows the total balance owed to the vendor (for a particular accounts payable type if the Multiple AP Type is checked ). To view the detail information that supports this figure, use the Open Invoice Inquiry option.
In the Open Retention field...
Display only. Appears only if Retention Account is checked. When the Retention Account parameter is checked, the total retention payable to the vendor is displayed.
In the Last Invoice Date field...
Display only. Shows the date of the most recent invoice received from the vendor.
In the Last Payment Date field...
Display only. Shows the date of the most recent check printed for the vendor.
In the Year To Date fields...
Fields are display only, unless the form's "Edit History" addition option is selected and the password entered.
-
The Fiscal Yr Purchases, Fiscal Yr Discounts and Fiscal Yr Payments fields show the amounts Year To Date for the current AP fiscal year. When the AP fiscal year is closed, these Year To Date field amounts are moved to the corresponding Prior Year fields, then the Year To Date fields amounts are replaced with the corresponding Next Year field amounts.
-
The Calendar Yr Payments field shows the amount to Year To Date for the current 1099 calendar year. When the Close Form 1099 Year task is run, this Year To Date amount is moved to the Prior Year field, then replaced with the Next Year field amount.
In the Prior Year fields...
Fields are display only, unless the form's "Edit History" addition option is selected and the password entered.
-
The Fiscal Yr Purchases, Fiscal Yr Discounts and Fiscal Yr Payments fields show the amounts for the prior AP fiscal year. When the AP fiscal year is closed, these Prior Year fields are cleared and replaced with the corresponding Year To Date amounts.
-
The Calendar Yr Payments field shows the amount for the prior 1099 calendar year. When the Close Form 1099 Year task is run, this Prior Year field is cleared and replaced with the Year To Date amount.
In the Next Year fields...
Fields are display only, unless the form's "Edit History" addition option is selected and the password entered.
-
The Fiscal Yr Purchases, Fiscal Yr Discounts and Fiscal Yr Payments fields show the amounts for the next AP fiscal year. When the AP fiscal year is closed, these Next Year fields amounts are moved to the corresponding Year To Date fields, then the Next Year fields are cleared for the new next AP fiscal year.
-
The Calendar Yr Payments field shows the amount for the next 1099 calendar year. When the Close Form 1099 Year task is run, this Next Year field amount is moved to the Year To Date field, then is cleared for the new next AP fiscal year.
Vendor Master, Fax, and Email Maintenance (back to top)
Select in the Vendor Master window and then Vendor Master, Fax, Email from the dropdown list.
Use this option to edit a vendor's primary and CC email addresses as well as their fax number and the name of the contact person receiving the fax. A vendor's Web address (URL) may be edited here as well.
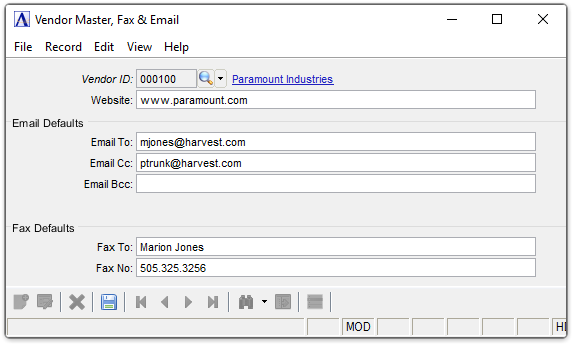
Vendor Master, Fax and Email
About the Fields
To enable edits to the form select .
In the Website field...
-
Enter the company's web URL.
In the Email To field...
-
Enter email address(es) for this vendor to receive reports and invoices when this feature is selected from the Document Output window. Enter a comma between multiple addresses.
In the Email Cc/Email Bcc fields...
-
Enter email address(es) for this vendor to receive reports and invoices as a Cc when this feature is selected from the Document Output window. Enter a comma between multiple addresses.
In the Fax To field...
-
Enter the name of the recipient of faxed reports and invoices when this feature is selected from the Document Output window.
In the Fax No field...
-
Enter the fax number for this vendor to receive reports and invoices when this feature is selected from the Document Output window.
When done entering comments...
-
Click
to save the record. -
Click
 to return to the Vendor Master window.
Vendor Purchasing Addresses (back to top)
Select in the Vendor Master window and then Vendor Purchasing Addresses from the dropdown list.
Use this window to accommodate multiple purchasing addresses a vendor may have. Each vendor can have up to 99 alternate purchasing addresses.
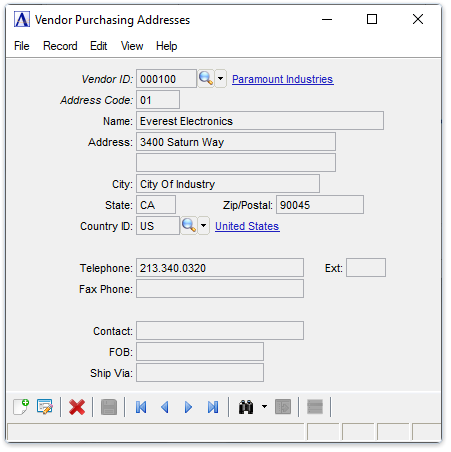
Vendor Purchasing Addresses
About the Fields
To enable edits to the form select .
In the Address Code field...
-
Enter the address code for the alternate purchasing address.
-
Click
 to view the address records (if any) for this vendor.
 -
Click the record navigating buttons;
 to view the first record,
  to view the previous record,
  to view the next record and
  to view the last address record.
In the Country ID field...
-
Click
to view the country code displayed or if blank, to search the valid country codes.
When done making changes...
-
Click
to save the record. -
Click
to clear the form and begin again. -
Click
to delete an existing address record.
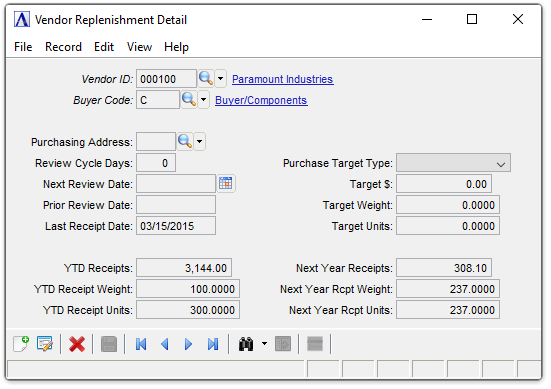
Vendor Replenishment Detail (back to top)
Select in the Vendor Master window and select Vendor Replenishment Detail from the dropdown list.
If the automatic replenishment function in Purchase Order Processing is used, you can also assign replenishment parameters to each vendor. Supporting information about buyers, review cycles and purchase targets are defined in the Vendor Replenishment Detail window.
Vendor Replenishment Detail
About the Fields
To enable edits to the form select .
In the Buyer Code field...
-
Enter the Buyer code to review/edit the replenishment detail.
-
Click
to view the buyer code(s) for this vendor. -
Click the record navigating buttons;
to view the first record, to view the previous record, to view the next record and to view the last replenishment record.
When done making changes...
-
Click
to save the record. -
Click
to clear the form and begin again. -
Click
to delete an existing Buyer Code record.
Invoice Detail Report (back to top)
Select in the Vendor Master window and then Invoice Detail Report from the dropdown list.
Use this function to quickly create a report of the open invoices for the selected vendor.
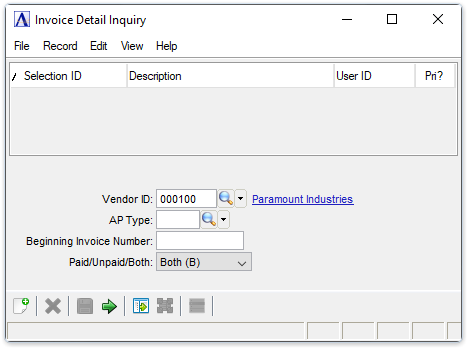
Invoice Detail Inquiry
In the Vendor ID field...
The queried vendor number and name are populated from the Vendor Master record.
-
Click
to view Vendor ID records.
In the AP Type field...
-
Enter the AP Type.
-
Click
to view the AP Type records.
In the Beginning Invoice Number field...
-
Optional field. Enter the specific Invoice Number to query.
From the Paid/Unpaid/Both dropdown...
-
Select the type of invoice to query from the list - Paid invoices, Unpaid invoices, or both Paid and Unpaid invoices.
When done making selections...
-
Click
 to create an invoice report
 -
Click
to save the selections for future queries. -
Click
to clear the form and enter new selections.
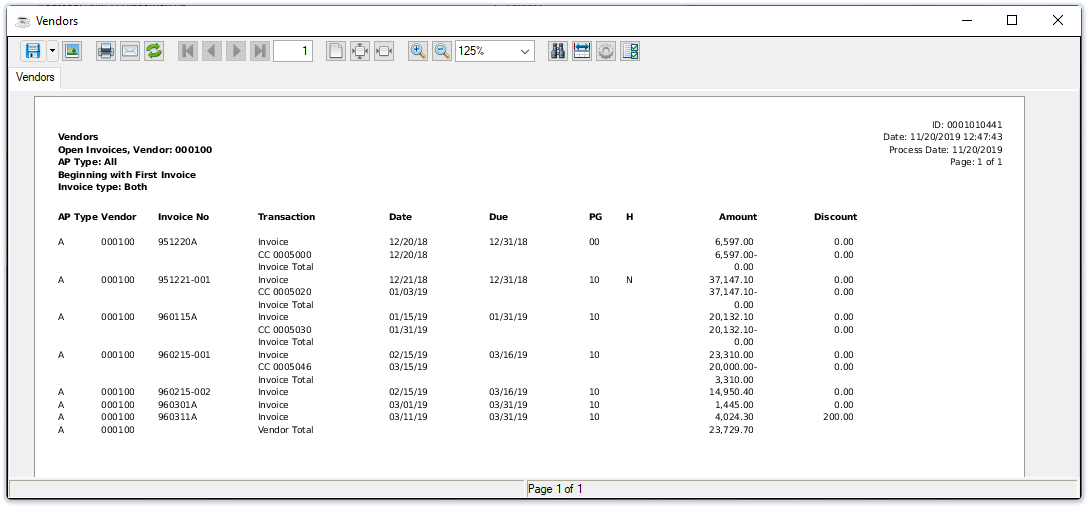
Sample Invoice Detail Report
See Output Options.
Hard Copy (back to top)
Select in the Vendor Master window and select Hard Copy from the dropdown list.
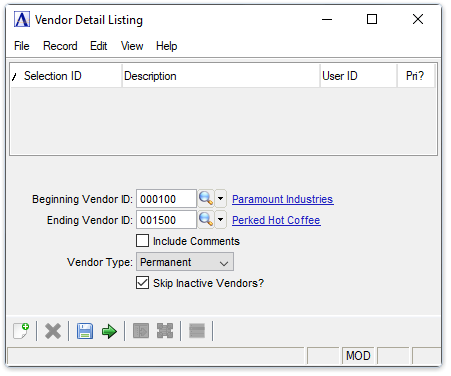
Vendor Detail Listing
About the Fields
In the Beginning/Ending Vendor ID field...
-
Enter the number of the first/last vendor to appear on the report.
-
Leave the field blank to begin the report with the first vendor on file.
-
Click
to select from a list of existing vendor numbers.
Include Comments checkbox...
-
Mark the box to include vendor comments on the report.
-
Unmark the box to exclude vendor comments.
From the Vendor Type dropdown...
-
Select All, Permanent, or Temporary vendor types from the list for the report.
When done making selections...
-
Click
to run the listing report. -
Click
to save these report settings. -
Click
to clear the form and begin again.
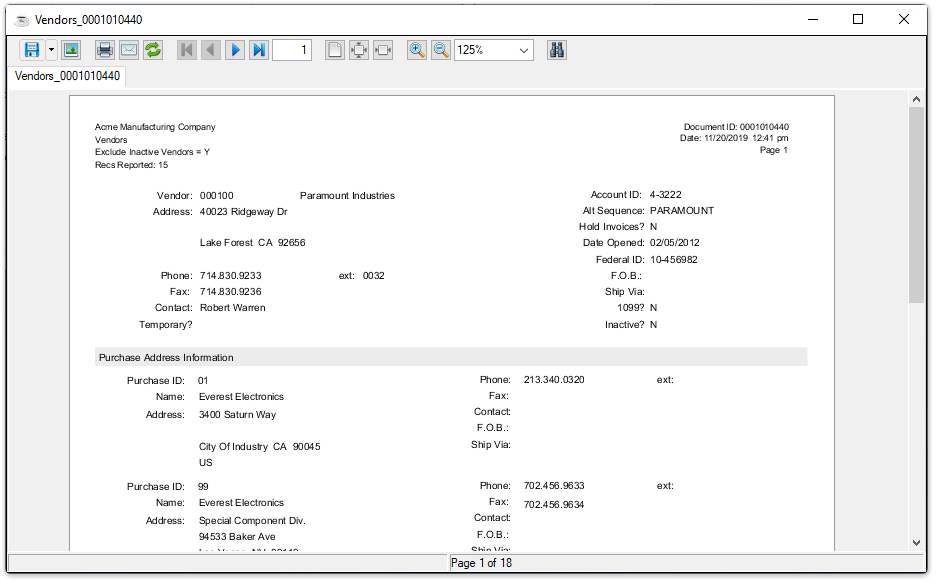
Sample Vendor Detail Listing
See Output Options.
Receipt History Report (back to top)
Select in the Vendor Master window and select Receipt History Report from the dropdown list. Use this query to quickly create a report in summary or detail of this particular vendor's receipt history.
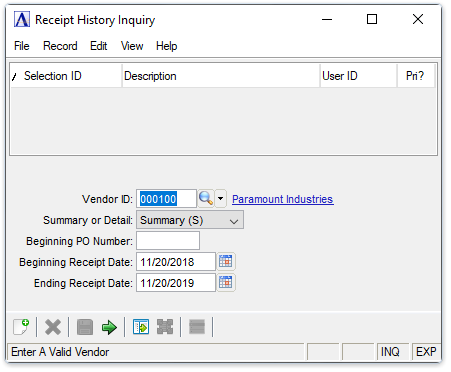
Receipt History Inquiry
About the Fields
In the Vendor ID field...
The queried vendor number and name are populated from the Vendor Master record.
-
Click
to view Vendor ID records.
From the Summary or Detail dropdown...
-
Select Summary to create a report with only PO numbers, received dates, dollar value ordered and received.
-
Select Detail to create a report detailing the items on each PO received.
In the Beginning PO Number field...
-
Optionally enter a purchase order number to query receipts for that PO and later PO's to be reported.
In the Beginning/Ending Receipt Date field...
-
Defaults to the current processing date. If a Beginning PO Number is entered, the Beginning/Ending Receipt Dates are cleared.
-
Enter the beginning/ending date range to query
When done making selections...
-
Click
to create an invoice report -
Click
to save the selections for future queries. -
Click
to clear the form and begin again.
Open Invoices (back to top)
Select in the Vendor Master window and select Open Invoices from the dropdown to display a query of Open Invoices by Vendor grid.
Display additional options
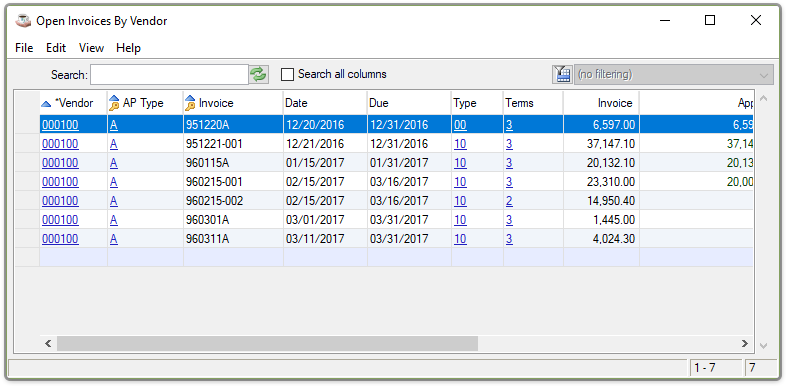
Open Invoices by Vendor
See Query Functions
Historical Invoices (back to top)
Select in the Vendor window and select Historical Invoices from the dropdown to display a query of Historical Invoices by Vendor grid.
Display additional options
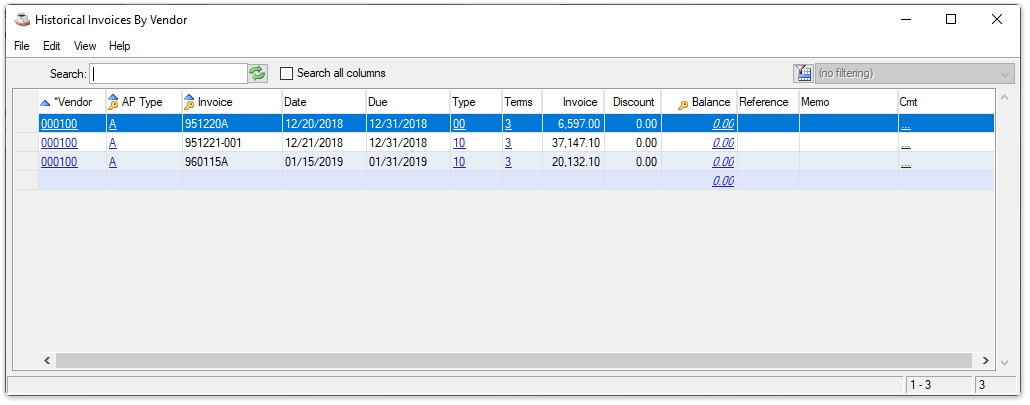
Historical Invoices by Vendor
See Query Functions
Report Control (back to top)
Use the Report Control form to add, change or delete information about which documents the specified vendor wishes to receive via email or fax. This is a filtered version of the Report Control Recipients form available in the AddonSoftware Administration > Report Control menu, available here as a convenience, and for users who may not have security access to the administration menu. See that topic for more information - Report Control Recipients.
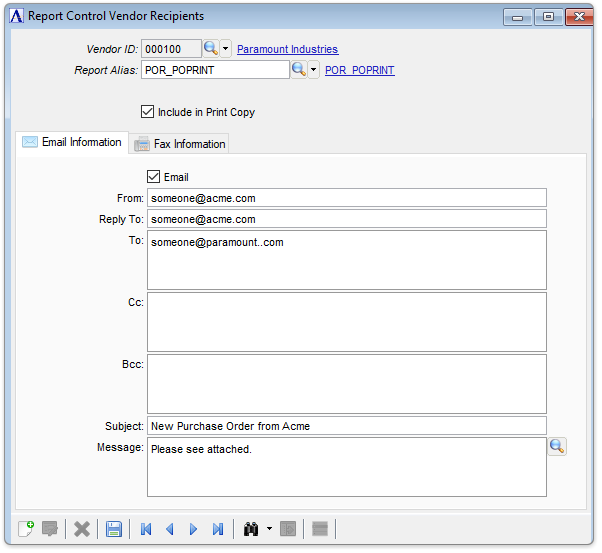
Report Control Vendor Recipients
______________________________________________________________________________________
Copyright BASIS International Ltd. AddonSoftware® and Barista® Application Framework are registered trademarks.