Accounts Payable - Vendors
Function
Use this task to enter new vendor information, maintain existing vendors, inquire about vendor status and delete inactive vendors. There are three tabs for this form - Vendor Information, Payment Information, and Comments. The vendor information associated with this task is accessed through an options menu that displays when the Options button  in the Vendor master window is selected. From here, more details about a vendor can be added, changed, or viewed using the menu displayed when clicking
  .
.
 For more Vendor Maintenance tasks, select the Display additional options button
  for a drop down list.
=> To access this task...
Select Vendors from the Inquiry and Maintenance menu.
Vendor Maintenance
About the Fields
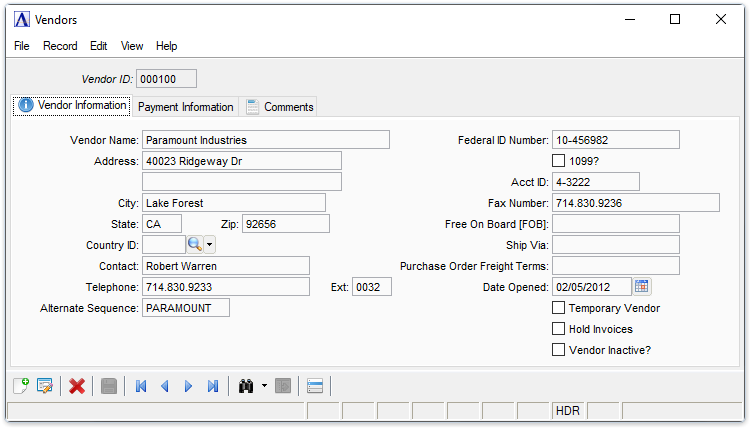
This screen contains information about the vendor such as the address and phone number. When you select an existing vendor, the vendor information is displayed.
To enable edits to the form select  .
.
In the Vendor ID field...
-
Enter a valid vendor number. When a valid Vendor ID is entered, the address information associated with the vendor displays.
-
Click
 to select a vendor code from a list of active code records. To view a list of all records including inactive records, see Query Functions.
 -
Click the record navigating buttons;
 to view the first record,
  to view the previous record,
  to view the next record and
  to view the last vendor record.
Vendor Information tab
In the Vendor Name field...
-
Enter the name of the vendor.
In the Address fields...
-
Enter up to 2 lines of address information.
-
Press [Tab] to leave this field blank.
In the City field...
-
Enter the city of the vendor.
-
Press [Tab] to leave this field blank.
In the State field...
-
Enter 2 letter state abbreviations.
-
Press [Tab] to leave this field blank.
In the Zip field...
If the zip code is 9-digits, enter with separating dashes (Example: #####-####).
-
Enter the zip/postal code.
-
Press [Tab] to leave this field blank.
In the Country ID field...
-
Optionally add a country code for the vendor.
In the Telephone field...
-
Enter the telephone number with area code of the vendor.
-
Press [Tab] to leave this field blank.
In the Ext field...
-
Enter an extension for the telephone.
-
Press [Tab] to leave this field blank.
In the Contact field...
-
Enter the name of the contact within the vendors business.
-
Press [Tab] to leave this field blank.
In the Alternate Sequence field...
This code is used by the Lookup function.
-
Enter an alphabetic code of 1 to 10 characters for the vendor.
-
Press [Tab] to accept the first 10 characters of the Vendor Name as default Alt Sequence.
In the Federal ID Number field...
-
Enter the vendor's federal ID number.
1099? checkbox...
-
Mark the box if 1099 Forms are printed for the vendor.
-
Unmark the box if 1099 Forms are not printed for the vendor.
In the Acct ID field...
-
Enter any account number assigned by the vendor.
-
Press [Tab] to leave this field blank.
In the Fax Number field...
-
Enter the telephone number with area code of the vendor's fax machine.
-
Press [Tab] to leave this field blank.
In the Free On Board [FOB] field...
-
Enter up to 15 characters to identify the freight charge description.
-
Press [Tab] to leave this field blank.
In the Ship Via field...
-
Enter the standard shipping method for this vendor.
-
Press [Tab] to leave this field blank.
In the Purchase Order Freight Terms field...
-
Enter the PO freight terms.
-
Press [Tab] to leave this field blank.
In the Date Opened field...
-
Enter the date this account was opened.
-
Press [Tab] to accept the defaulted date.
Temporary Vendor checkbox...
-
Mark the box if this is a Temporary Vendor.
-
Unmark the box if this is a regular, permanent vendor.
Hold Invoices checkbox...
-
Mark the box to hold future invoices for this vendor.
-
Unmark the box to allow future invoices to be paid.
Vendor Inactive? checkbox...
-
Mark the box to render this vendor inactive.
-
Unmark the box to indicate that this is an active vendor.
When done making selections:
-
Click
 to save the record.
 -
Click
 to begin a new vendor record.
 -
Click
 to delete the record.
Payment Information tab

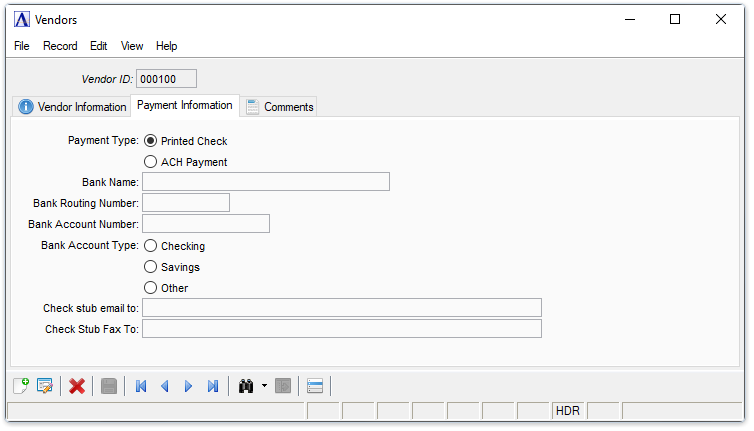
Vendor Payment Information tab
About the Fields
To enable edits to the form select  .
.
From the Payment Type selector...
-
Select Printed Check if the vendor will not be paid electronically. Other fields on the form are disabled with this selection.
-
Select ACH Payment to enable electronic payments. Other fields on the form are enabled with this selection.
In the Bank Name field...
-
Optionally enter the name of the bank for ACH payment,
In the Bank Routing Number field...
-
Enter the bank's routing number for ACH payment.
In the Bank Account Number field...
-
Enter the bank account number for ACH payment. The bank account number is stored encrypted on disk (see Barista Administration > Configuration Records, Configuration ID "BANK_ACCT_AUTH"), and can only be viewed via this form. Therefore, be sure to set security appropriately.
From the Bank Account Type selector...
-
Select Checking, Savings, or Other.
In the Check stub email to: field...
-
Display only. Displays the vendor's "To" email address as set in the AddonSoftware Administration > Report Control > Report Control Recipients task. This is required in order to automatically email the ACH payment documents to the vendor.
In the Check Stub Fax To: field...
-
Display only. Displays the vendor's "Fax Number(s)" as set in the AddonSoftware Administration > Report Control > Report Control Recipients task. This is required in order to automatically fax the ACH payment documents to the vendor.
When done making selections:
-
Click
 to save the record.
 -
Click
 to begin a new vendor record.
 -
Click
 to delete the record.
Comments tab

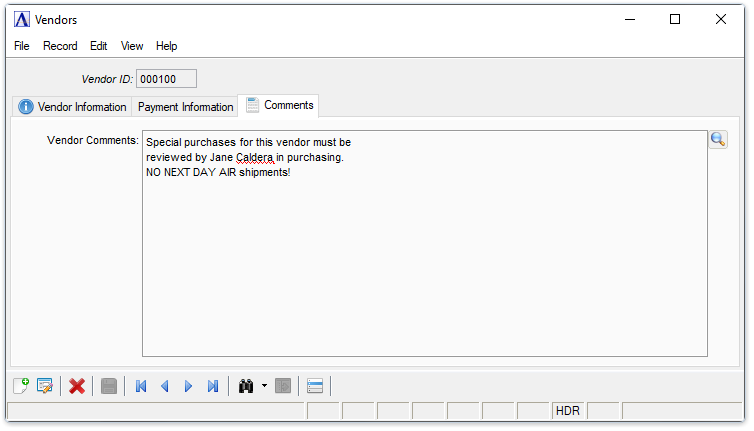
Vendor Comments maintenance tab
About the Fields
To enable edits to the form select  .
.
In the Vendor Comments field...
Enter free-form comments about the vendor that will appear on the Purchase Order Entry, Invoice Entry, Manual Check Entry, and Vendor Maintenance Listing tasks. These comments are useful in tracking special purchasing or accounting information for a vendor.
-
Enter or edit by typing directly into the form field, or click
 (or Ctrl-F) to launch the comment editor.
When done making selections:
-
Click
 to save the record.
 -
Click
 to begin a new vendor record.
 -
Click
 to delete the record.
CAUTION: Do not delete vendors that require 1099 forms until the end of the calendar year.
______________________________________________________________________________________
Copyright BASIS International Ltd. AddonSoftware® and Barista® Application Framework are registered trademarks.
