Working with the Dialog Wizard Plug-in
Overview of the Dialog Wizard Plug-in
For BBj 26.00 and higher, accessing the BDT plug-ins in the BDT Studio, a standalone application, supersedes using the Eclipse IDE.
The primary purpose of the Dialog Wizard Plug-in is to generate BBj source code using a resource file (.arc) and a predefined or custom template. The plug-in also offers features to assist the developer in modifying the generated code. The plug-in offers three BDT Studio views to help the developer quickly adapt the generated source code: (1) “Register Callback”, (2) “Data Exchange”, and (3) “Options”. Each view and its usage is further described below.
In addition, the plug-in also offers features like the “Reload” function. “Reload” updates the controls in the generated program by parsing the resource file for any changes. This allows the developer to quickly update the controls used in the program without having to change existing custom code for each resource file modification.
The Dialog Wizard Plug-in offers the following features and benefits:
-
Generate BBj source code using a resource file (.arc) and the default template
-
Create custom templates and use them to generate BBj source code
-
Reload the BBj controls into the generated program when the resource file changed
-
Add/Remove callback routines using the “Register Callback” view
-
Add/Remove data exchange variables referring to BBj controls defined in the resource file
Installing the Dialog Wizard Plug-in
For BBj 26.00 and higher, access the Dialog Wizard Plug-in by installing the BDT Studio, a standalone application that supersedes using the Eclipse IDE. Then, you can proceed to the next section, Accessing the Dialog Wizard Plug-in.
For versions prior to BBj 26.00, you must first install Eclipse. Follow the steps below to configure the Eclipse plug-in environment:
-
Install the version of Eclipse and the BDT CodeEditor plug-in recommended in the instructions found on https://www.basis.cloud/eclipseplug-ins (see the “ECLIPSE PLUG-INS” section at the top of the page).
-
Install BBjUtils and the Dialog Wizard plug-in by following the instructions found on https://www.basis.cloud/eclipseplug-ins (see the “BASIS PLUG-INS” section). From the table, select the appropriate URL to install the plug-in:
-
Identify the BASIS plug-in to install in the left column.
-
Select the URL in the column with the same major revision number as the version of BBj being run. For example, if you will be running BBj 18.00 (or 18.11, or even 18.20), then choose a URL that has “18” in it. For older versions see the “HISTORICAL PLUG-INS” section).
-
If you are unsure which URL to use, select the URL in the “LATEST OFFICIAL XX.xx RELEASE” column (usually right next to the plug-in name). This will be the most recent public release. Simply upgrade BBj on the development computer to the most recent version with the same major revision identifier (18.xx, 17.xx, etc.).
Accessing the Dialog Wizard Plug-in
Now that the Dialog Wizard plug-in is installed, start start BDT Studio (or Eclipse for versions prior to BBj 26.00) and complete the following steps:
-
Open the BDT perspective from the main menu (Window > Perspective > Open Perspective). Select BDT if it is available. If BDT is not available, select Other, then select BDT and click [Open].
-
Ensure that the BDT Explorer is open. If it's not open, then select either Window > Show View > BDT Explorer or Window > Show View > Other … > BDT > BDT Explorer and click [Open].
-
Open the DialogWizard views from the main menu:
-
Window > Show View > Other…
-
Expand the BBj Utilities Dialog Wizard group
-
Select the Data Exchange, Options, and Register Callback views
-
Click the [Open] button.
-
-
Expand the BBj Project that contains an .arc resource file you want to use to create a BBj program.
Using the Dialog Wizard Plug-in
Your IDE is now configured to display information about the Dialog Wizard plug-in and is ready to be used. Since there are a number of ways to use the plug-in, refer to the steps below to perform the most important tasks:
Generate BBj source code using a resource file (.arc) and the default template
-
In the BDT Explorer, right-click the resource file and select Create Dialog Wizard Class > Default Template as shown in Figure 1 below.

Figure 1. Default Template Menu Item
-
Enter the filename and folder for the BBj file to contain the generated source code. In Figure 2 below the file is named “Test.bbj” to pair it with the “Test.arc” file.
-
Select one of the Top Level Components as the base window to use when generating the BBj source code. If there is only one TLC in the .arc file, it will automatically be selected for you. In Figure 2 below the only TLC, “Window101,” is automatically selected.
-
Click [Ok].
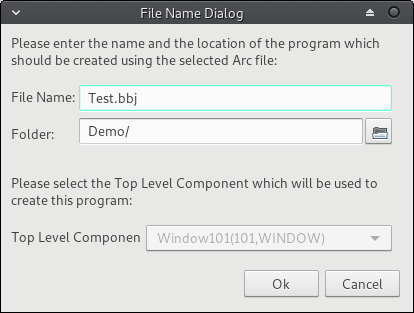
Figure 2. File Name Dialog
The DialogWizard then creates a file with the given name in the specified folder as shown in Figure 3 below:
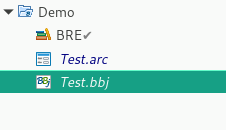
Figure 3. The New Test.bbj File in the BDT Explorer
The BBj file should appear in the BDT Explorer in the same BBj Project as the .arc file. One special note, however: if it appears there in italics (as it does in Figure 3 above), then it was not successfully added to BDT’s Source Path (and won’t be fully recognized by BDT as a source file). To correct this, simply right-click the new file and select Source Path > Include; click [OK] in any prompt or confirmation dialogs that may appear.
If the file is not open in a BBj Code Editor, double-click it in the BDT Explorer to open it, and examine the new editor’s contents as seen in Figure 4 below. You will see that the file contains special Dialog Wizard markers which will not affect the program during its execution, but are necessary for the Dialog Wizard to identify blocks in the program where it does its work.
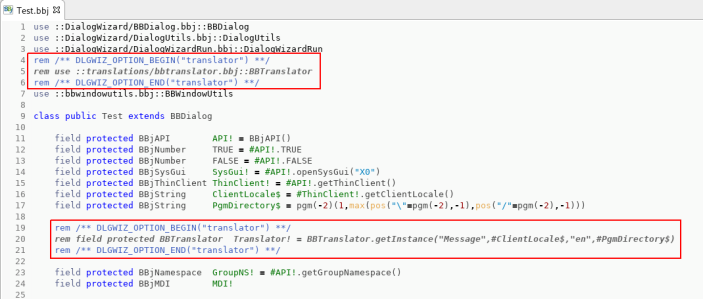
Figure 4. Special Dialog Wizard markers in the New Test.bbj File
Create custom templates and use them to generate BBj source code
-
Right-click on any ARC file in the BDT Explorer and select Create Dialog Wizard Class > Manage Templates… as shown in Figure 5 below.
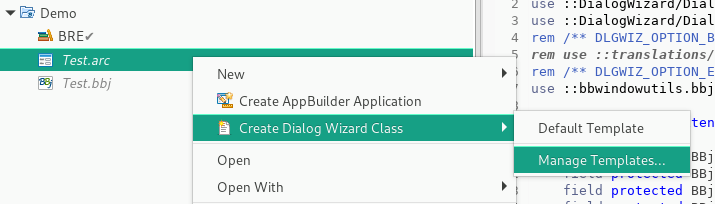
Figure 5. Managing Existing Templates from an ARC File
-
Alternatively, once you select an ARC file in the BDT Explorer, you can click on the down-arrow to the right of the Dialog Wizard icon in the Eclipse toolbar (as shown in Figure 6 below) and select Manage Templates…
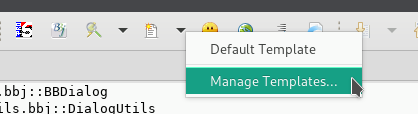
Figure 6. Managing Existing Templates from the Toolbar
-
Create a new template by clicking on the “+” next to the Template drop-down as shown in Figure 7.
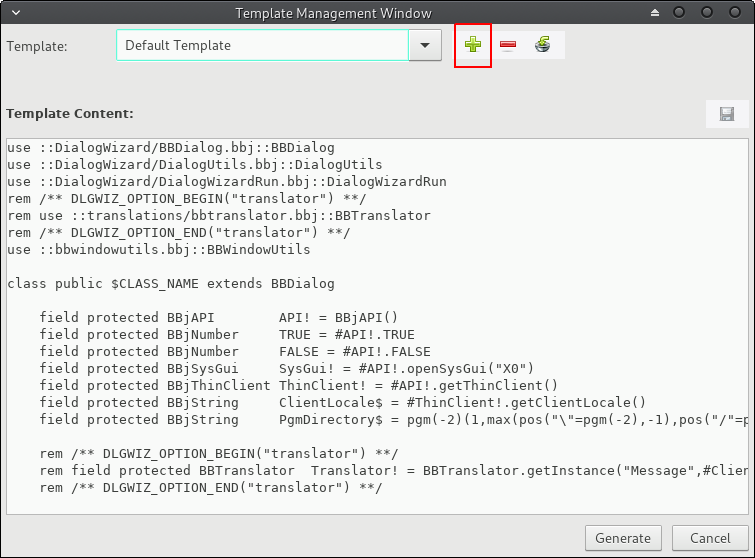
Figure 7. Create a New Template
-
Enter the name of the template and its location on the disk as seen in Figure 8, and click [OK].
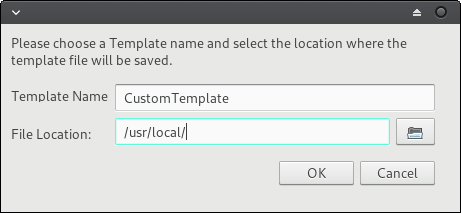
Figure 8. Define the New Template's Properties
-
Edit the template as desired:
Template files are a simple way to define for the Dialog Wizard a code format to use when generating BBj programs. Templates contain BBj source code, along with some placeholders, that will be written to the generated file. These placeholders are replaced with their corresponding values during the file generation. You can use these placeholders to adapt your program even more. The following placeholders are currently recognized by the Dialog Wizard plug-in:
$CLASS_NAME - The name of the class to generate
$ARC_FILE_NAME - The name of the resource file used to generate the program
$TOP_LVL_WND_ID - The ID of the Top Level Window used to generate the program
The following placeholders are used exclusively by the Dialog Wizard and should not be changed in any way since they are required for special purposes:
$DLGWIZ_RES_MARKER
$DLGWIZ_FLD_MARKER
$DLGWIZ_FLC_MARKER
$DLGWIZ_BAR_MARKER
$DLGWIZ_CBS_MARKER
$DLGWIZ_DDX_MARKER
$DLGWIZ_INI_MARKER
$DLGWIZ_SET_MARKER
$DLGWIZ_GET_MARKER
-
When you are done, click the small floppy-disk icon at the upper-right of the Template Content edit box (see Figure 9 below) to save your changes.
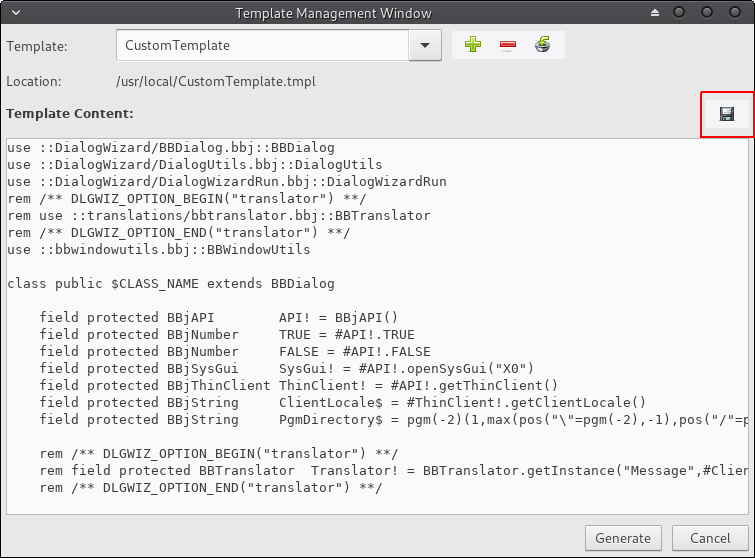
Figure 9. Save the New Template
-
To generate a BBj program using this template, click [Generate] as indicated in Figure 10.

Figure 10. Generate a BBj Source File Using the New Template
Now that your new template is complete, its name will appear in the context menu as shown in Figure 11. You can follow the steps in Generate BBj source code using a resource file (.arc) and select the new template instead of the default template.
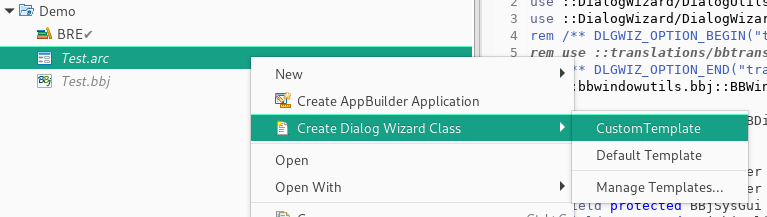
Figure 11. Generate a BBj Source File from the ARC File
Reload the BBj controls into the generated program when the resource file changed
-
Open the Dialog Wizard generated program file in a BBj Code Editor.
-
Open the .arc resource file in a WindowBuilder editor if it is not already open.
-
In the WindowBuilder editor, make a change and use the File > Save menu option or any other method to save your changes to the resource file.
-
Click in the BBj Code Editor window of the Dialog Wizard generated program file (it must be the active editor).
-
In the Register Callback view opened earlier, press the refresh tool button labeled “Reload the BBjControls from the Arc file” as seen in Figure 12:

Figure 12. Reloading the Controls from an Edited ARC File
-
Update the Dialog Wizard generated program file currently open in the BBj Code Editor by clicking [Yes] (see Figure 13):
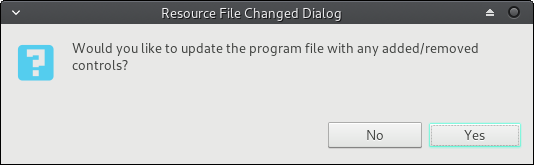
Figure 13. Reloading the Controls from an Edited ARC File
-
In the Editor Controls update window, add/remove controls from the program by checking/unchecking them in the corresponding list (Figure 14) and then click [OK].
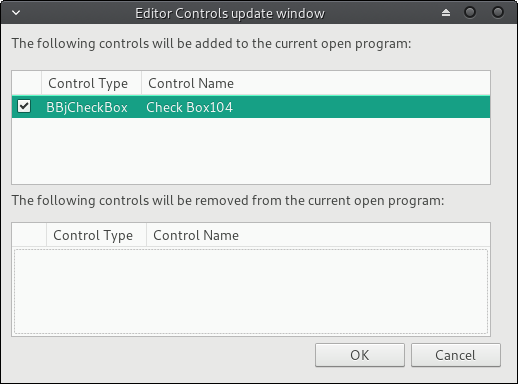
Figure 14. Adding or Removing Controls for the Dialog Wizard
The following changes (the red boxes in the two images in Figure 15) are an example of adding the “Check Box104” control shown in Figure 14:
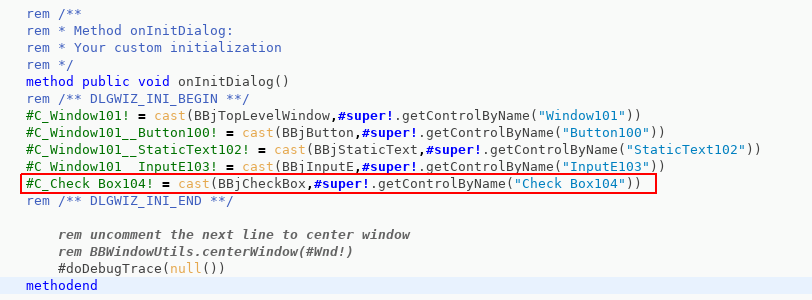
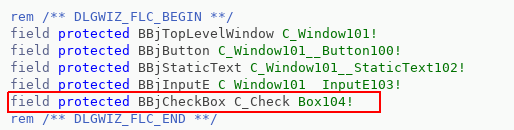
Figure 15. Dialog Wizard Code Changes from Adding a Control
Add/Remove callback routines using the "Register Callback" view
-
Click in already open BBj Code Editor window of the Dialog Wizard generated program file (it must be the active editor).
-
Examine the Register Callback view opened earlier and notice that it contains all of the BBj controls that are defined in the program, as well as a list of the callback methods that can be registered (in a check-box tree as seen in Figure 16):
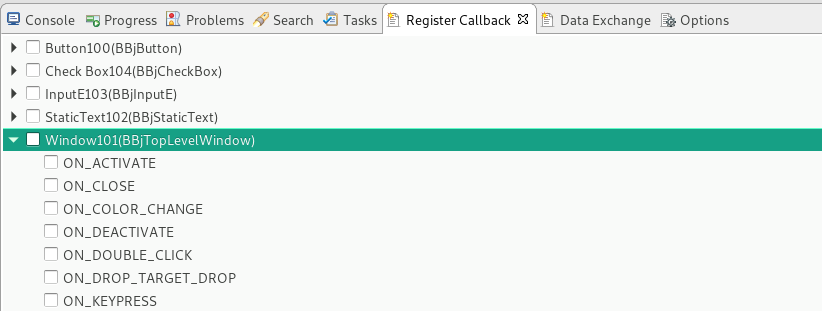
Figure 16. Register Callback View’s Control and Event List
-
Check any event for a BBj control displayed in the tree (see Figure 17 for an example):
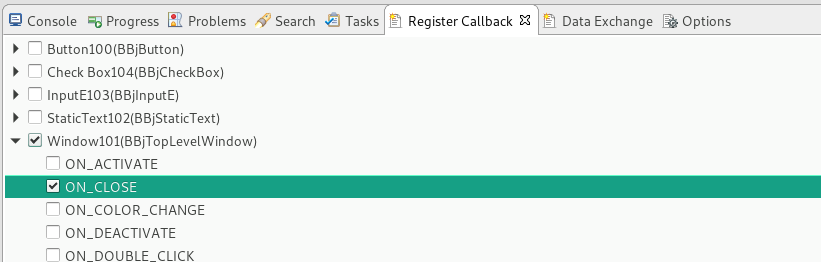
Figure 17. Adding an Event Handler Callback for ON_CLOSE
-
Examine the BBj Code Editor and notice that it now contains an event handler callback routine for that event. It automatically scrolled to bring the new callback routine into view and placed the cursor on the first line (usually the first comment line associated with the method).
-
To remove any callback, simply uncheck the control’s event and the setCallbacks() code that calls your event handler (as shown in Figure 18) will be removed from the code:
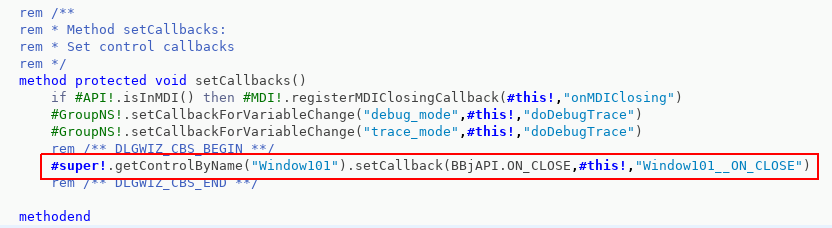
Figure 18. The setCallbacks() Code That Calls the Event Handler
-
You will be prompted in a Delete Confirmation Window to see if you also want to remove the generated method. Click [Yes] to delete the code, or [No] to keep whatever code you may have written to handle the event.
Add/Remove data exchange variables referring to BBj controls defined in the resource file
-
Click in already open BBj Code Editor window of the Dialog Wizard generated program file (it must be the active editor).
-
In the Data Exchange view opened earlier, click on the “+” toolbar button (with the hover text “Adds a variable which holds the handle of a BBj control”).
-
In the drop-down list, select the control that needs a data exchange variable and click [OK].
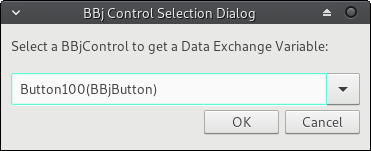
Figure 19. Selecting a BBj Control to Have a Data Exchange Variable
-
Notice that the following entry appears in the Data Exchange view (Figure 20):

Figure 20. A Data Exchange Variable
-
In addition, the entries shown in Figures 21 and 22 were added to the program displayed in the currently active editor:

Figure 21. The Field for a Data Exchange Variable
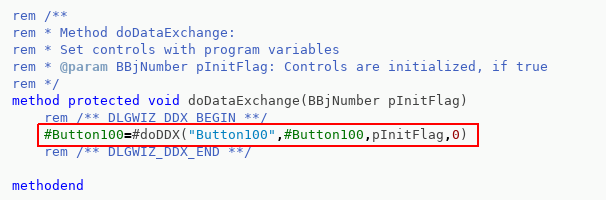
Figure 22. The Exchange Code for a Data Exchange Variable
-
You can edit the values directly in the Data Exchange view as shown in Figure 23:

Figure 23. Editing the Data Exchange Properties
Create options and manage them using the “Options” view
Options are the plug-in solution for code that might be useful in the program for one user, but not for another. Using the plug-in’s Options view (opened earlier in this article), the developer can choose whether or not an option is to be activated. Do this by selecting or deselecting the checkbox for the corresponding option. Each option can have multiple sub-options, but only one sub-option can be activated at a time.
The Dialog Wizard’s default template currently includes two options: (1) translator and (2) toolbar. You will learn shortly how to create custom options for your Dialog Wizard program files.
The Default Options
The default translator option can be activated, causing the generated application to be available in different languages. The toolbar option works similarly. You must decide whether or not your application should have a toolbar. Since most applications do not require a toolbar, this option is by default deactivated.
Choose whether or not to activate any option by selecting (or deselecting) the corresponding checkbox in the Options view. A deactivated option results in commented code (see Figures 24 and 25 below):

Figure 24. The Translator Option is Deactivated
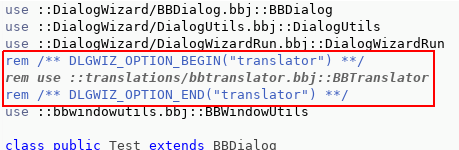
Figure 25. The Translator Option Code is Commented
Whereas an activated option results in uncommented code (see Figures 26 and 27 below):

Figure 26. The Translator Option is Activated
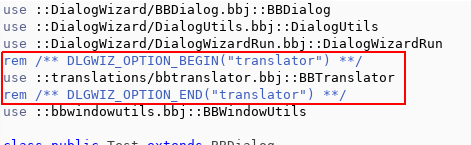
Figure 27. The Translator Option Code is Uncommented
If an option has sub-options, you can choose between sub-options directly in the Options view (see Figure 28):

Figure 28. Choosing a Sub-Option
Only the sub-option selected (see Figure 29) is activated in the code.

Figure 29. The Activated Sub-Option
The code will look like the example in Figure 30:
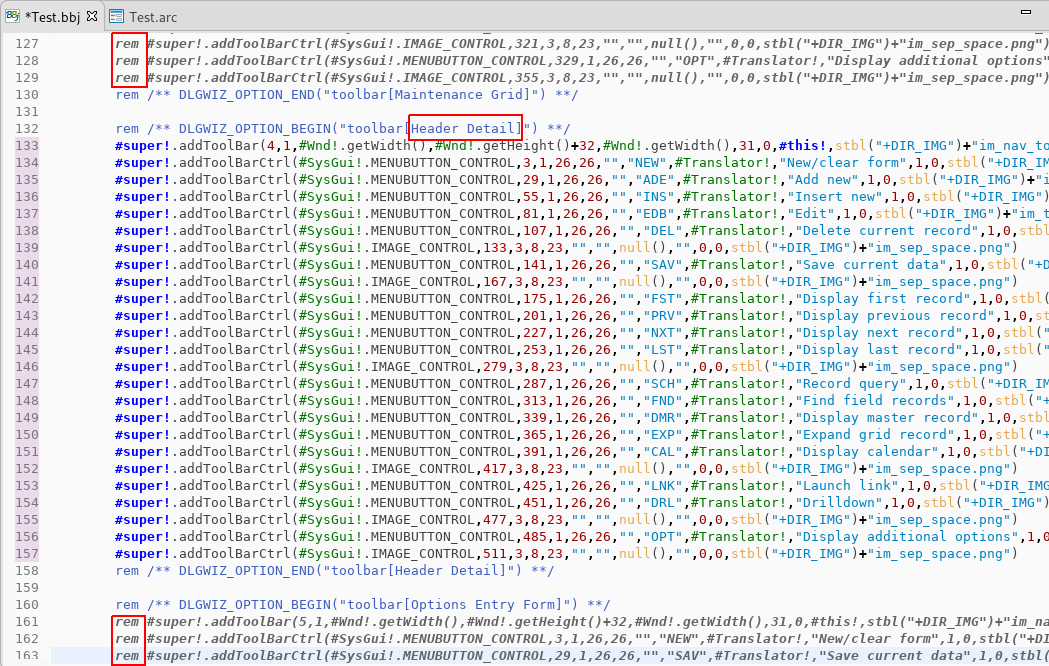
Figure 30. Deactivated Sub-Options in Code
To deactivate a sub-option, simply deactivate the option and all sub-options are then deactivated.
Creating custom options
The plug-in doesn’t only work with the default options. You can create custom options by copying the syntax shown in Figure 31 into your source code:

Figure 31. Deactivated Sub-Options in Code
This creates a custom option called “Hello World”. The Options view entry shown in Figure 32 appears:

Figure 32. A Custom Option in the Options View
To create sub-options, change the code following the pattern in Figure 33:
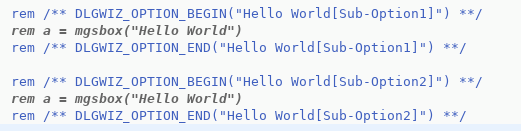
Figure 33. Custom Sub-Options in Code
The Options view sub-options shown in Figure 34 appear:
![]()
Figure 34. Custom Sub-Options in the Options View
See Also
"The Magical Reusable Dialog Wizard" (BASIS Advantage Article)