BBjGridExWidget - Getting Started
Overview
The BBjGridExWidget is a BBj Plugin that was first included with BBj 18.21. It is a feature-rich grid component for BBj based on HTML and JavaScript. Because it is HTML/Javascript based, it works and loads quickly in BUI programs. But it is not limited to BUI — it can also be used in GUI by combining it with the BBjHtmlView control, leveraging the Chromium engine.
The BBjGridExWidget is optimized to display large data sets based on the com.basiscomponents.db.ResultSet (a collection of DataRows). Just build a ResultSet and fill the grid with it.
Dashboards usually do not show large amounts of data, but the BBjGridExWidget brings other features that are also useful in a Dashboard. Starting as a preview in BBj 19.10, BASIS made the BBjGridExWidget available in the Dashboard with the GridExWidget class.
See the BBjGridExWidget Official Documentation for more information on using the BBjGridExWidget.
BBjGridExWidget Features and Functionality
Below are the basic features the BBjGridExWidget offers.
Basic Features
The basic features listed below are available with the BBj GridExWidget (although current Software Asset Management (SAM) is necessary to use it in a BBjHtmlView control). These basic features include:
-
Column setup and formatting
-
Change column order with Drag & Drop
-
Freeze columns to the left or right side
-
Filtering/Searching by column or globally
-
Conditional styling
-
Column Groups
-
Save and restore layout
-
Themes
-
Icons and images
-
Custom cell renderers
-
User interface translations (customizable)
-
Multi-Selection, Single Selection, and Checkbox Selection
Enhanced Features
Additional features are available with the enhanced version, which requires an incremental surcharge to SAM. Contact your BASIS Sales Representative for details. The enhanced version is available for all users or just for a subset. The enhanced functionality is enabled for a particular license serial number.
Here are some of the additional features:
-
Slider menu
-
Toggle column visibility
-
Create row groups (hierarchy view)
-
Define aggregation
-
Define pivot tables
-
-
Tree Data
-
Status Bar showing row counts, selection, etc.
-
Custom Context Menus
-
Ad-hoc Charting
-
Data Export
Future Features
The BBjGridExWidget is not yet completely implemented. Two important features are still being developed:
-
A server-side paging solution to delay retrieval of large data sets until the user displays them.
-
An editing solution for records retrieved using an SQLRecordSet. Although it supports editing individual grid cells by offering "cell editors" for various types of values, there is no solution yet to save such edits using SQL database access.
Getting Started
There are a few steps you must take to get started using the BBjGridExWidget plugin.
Install the BBjGridExWidget Plugin
Before you can use the BBjGridExWidget, you must install it on the BBj server where you intend to run programs that use it. Use the Plugin Manager that comes with BBj to install it.
The Plugin Manager helps you install, manage, and uninstall BBj Plugins, including the BBjGridExWidget. It provides an interface for you to view and install the released versions of the BBjGridExWidget, as well as a convenient method for detecting and applying updates when they become available. For step-by-step instructions on using the Plugin Manager to install a BBj plugin, see the BBj Plugin Manager Usage Guide.
Installing the BBjGridExWidget plugin also installs a number of BBj programs that demonstrate how to use a number of its features. To run any of these demos, follow these steps:
-
In the BBj Plugin Manager, select the Installed Plugins tab.
-
Select the BBjGridExWidget entry that is now present.
-
Notice that a dropdown button appears in the upper right of the window showing “Demo.bbj” as seen here:
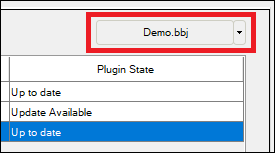
Figure 1. Running the BBjGridExWidget Demo.bbj Program
-
To run the demo “Demo.bbj”, simply click the button.
-
To run another demo, click the down arrow on the right side of the button and click any demo listed there.
Installing the BBjGridExWidget plugin places a collection of files in the <bbj_home>/plugins/BBjGridExWidget/ directory. It also creates source code files for the BBjGridExWidget demos mentioned above. These source code files are in the <bbj_home>/plugins/BBjGridExWidget/demo/ directory. For example, the source code for “Demo.bbj” can be found at <bbj_home>/plugins/BBjGridExWidget/demo/Demo.bbj.
Reference the BBjGridExWidget Plugin
Because the default PREFIX for BBj includes the <bbj_home>/plugins/ directory, you can use the BBjGridExWidget plugin once you add a USE statement like this to your program:
use ::BBjGridExWidget/BBjGridExWidget.bbj::BBjGridExWidget
Of course, for the BBjGridExWidget to be useful, you will probably need it to communicate with a database, which requires some additional classes. The BBjGridExWidget is designed to work with a collection of BASIS Components classes, including ResultSet and SqlQueryBC.
Let us look at a simple BBj program that demonstrates the basic use of the BBjGridExWidget plugin.
Sample Program #1
This sample BBj program instantiates a BBjGridExWidget, queries the CD-Store demo database installed with BBj, and displays the results of that query in the grid. It assumes that you have installed the BBjGridExWidget as outlined above.
|
Program 1. A Simple BBjGridExWidget Program
Running this program gives us the output shown in Figure 2:
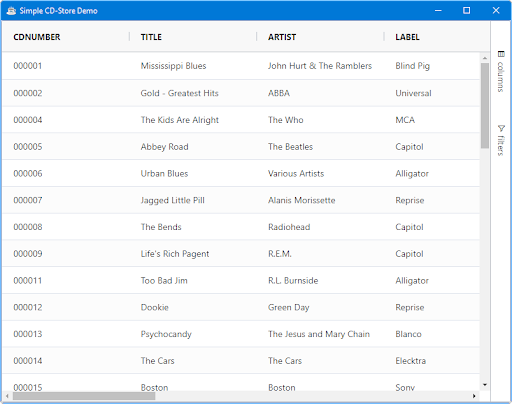
Figure 2. Output From the Simple BBjGridExWidget Program
The grid shown in Figure 2 offers a number of basic features without requiring any special BBj code. Let us take a look at some of those features. We will start with the features accessible directly from the grid display.
Sorting by One Column
By default, the grid displays with the rows in "default order." This should be the order in which the rows were retrieved from the database (so it is affected by the query used). As shown in Figure 2, the grid is not yet sorted by any column. This outcome is evident because each column lacks any sort of indicator. For example, the CDNumber column is not currently sorted, and the header appears as shown in Figure 3:

Figure 3. CDNumber Column Header Without Sorting
To sort by any column, simply click on the column name in the column header. For example, click on the "CDNumber" text in the first column to sort ascending by CD Number. The header now looks like Figure 4:

Figure 4. CDNumber Column Header Sorted Ascending
To change the sort to descending, simply click on the column name text again. The header now looks like Figure 5:

Figure 5. CDNumber Column Header Sorted Descending
Clicking the column name text again returns the CDNumber column to the "not sorted" state (the original order), and the header once again appears, as shown in Figure 3.
Sorting by Multiple Columns
To sort the grid by multiple columns, simply set the sort criterion for each column in the order for the sort to occur. For each sort column, hold down the <Shift> key and click on the name text (say, the Title or Artist column). <Shift>-click that column's name until the order for that column is correct (ascending, descending, or not sorted), and then continue to the next column. Once two or more columns have sort criteria, the grid will add a number in each columns' header to indicate the sort order.
Note:
At any time, if you release the<Shift> key and click on a column name, all existing sort criteria will be cleared, and that column will become the first (and only) sorted column.
As an example, if no sort criteria are defined in the grid and you <Shift>-click according to these steps:
-
<Shift>-click on the Title column text
-
The Title column is now sorted as ascending and shows an upward-pointing arrow similar to Figure 4.
-
-
<Shift>-click again on the Title column text
-
The Title column is now sorted as descending and shows a downward-pointing arrow similar to Figure 5.
-
-
<Shift>-click on the Artist column text
-
The Artist column is now the second sort column and shows the number "2" following the column name.
-
The Artist column is sorted as ascending and shows an upward-pointing arrow similar to Figure 4.
-
The grid ends up as shown in Figure 6:

Figure 6. The Column Headers with a Two-Column Sort
You can continue <Shift>-clicking to define additional column sorting criteria.
After following the steps above, the Artist column also has a faint blue outline (as seen in Figure 5). This focus indicator is useful if you wish to use the keyboard to interact with the grid because you can:
-
Use the keyboard left- and right-arrow keys to move to a different column header.
-
Use the [Enter] key to cycle through the ascending/descending/no sort states of the column that has the focus.
-
Hold the <Shift> key down while hitting the [Enter] key to cycle through the sort states and continue updating the multiple-sort column criteria.
Setting Properties for the Columns
There are a few other interesting things you should notice about the column headers. If you hover your mouse over one of the vertical bars that separate the column header cells, your mouse cursor will change shape to indicate that you can interact with that separator:
-
Click and drag to move the separator (resizing the width of the column to the left).
-
Double-click the separator to automatically resize the column to the left so that it shows all of the contents of that column's cells, and the column header shows the full column name with room for any decorations and the menu icon.
If you hover your mouse over one of the column header cells, you should notice that a menu icon appears to the right of the column name, as shown in Figure 7:
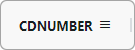
Figure 7. A Column Header With a Menu Icon
Clicking that menu icon presents you with a number of options to set properties on that column, as shown in Figure 8:
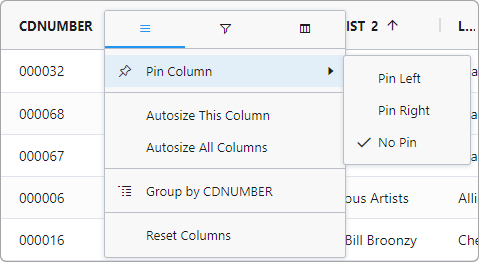
Figure 8. A Column Header Menu
Pinning a Column
You can pin the selected column to remain visible on the right or left side of the grid. To pin or up-pin a column, click on the appropriate menu item: Pin Left, Pin Right, No Pin. If one or more columns are already pinned on the side you request, this column will be pinned next to them. Here is what the grid looks like after pinning the Title column on the left (Figure 9):
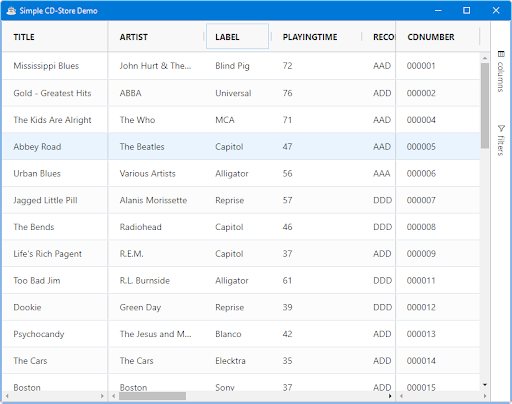
Figure 9. Pinned Columns: Title on the Left, CDNumber on the Right
Notice that the horizontal scroll bars at the bottom of the grid are now different. There is one scrollbar in the middle for all of the un-pinned columns. Since only one column is pinned on the left and the right, no scrollbars are needed. However, after pinning multiple columns, pinning may be necessary based on the column sizing.
Autosizing Columns
You can ask the grid to automatically adjust the width of the selected column (Autosize This Column) or all of the columns (Autosize All Columns). The grid's autosizing algorithm looks for the largest entry in the column, including the column header text, and sets the width to display that text without truncation.
Tip:
You can also autosize one column by double-clicking on the vertical separation bar to the right of the column header text.
Grouping by a Column
You can ask the grid to group its information by the values in any column by using the "Group by NUMBEROFTRACKS" (or the name of whatever column you have selected), as shown in Figure 10.
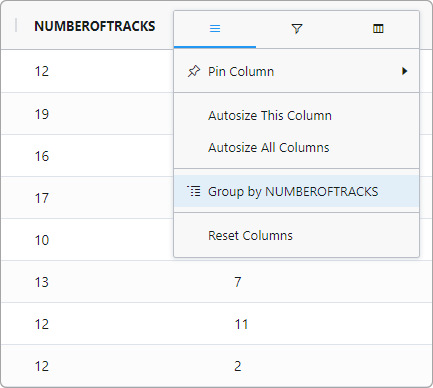
Figure 10. Grouping by the NumberOfTracks Column
The grid will automatically consolidate the displayed information to show only the counts for the various unique values present in a "Group" column and move the "Group" column to be the far-left column (as shown in Figure 11).
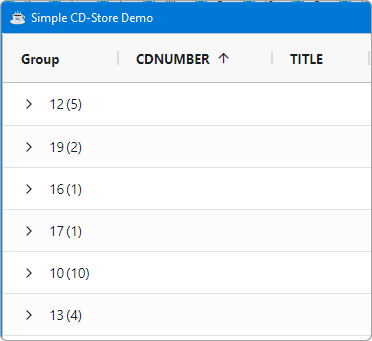
Figure 11. Grouped by the NumberOfTracks Column
The number in parentheses after each value represents the number of occurrences of that value in the result set. To see the specific rows for a grouped value, simply expand a value by clicking its ">" symbol (see Figure 12):
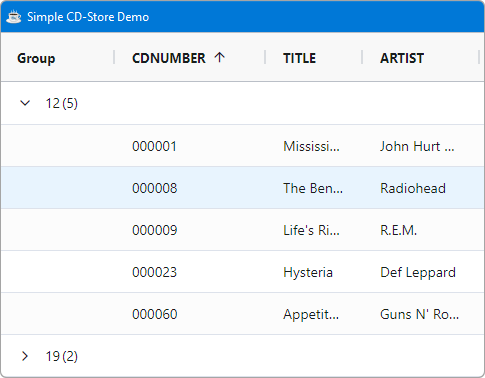
Figure 12. An Expanded Group - The Five Rows With 12 Tracks
Notice that grouping is only available on a single column. If you attempt to group by a different column, such as the Retail column, the first grouping will be replaced by the Retail grouping.
Once you have a Group column, you can click on its menu icon (similar to the one shown in Figure 7) and choose from additional items such as Reset Columns, Expand All and Collapse All, as seen in Figure 13 below:
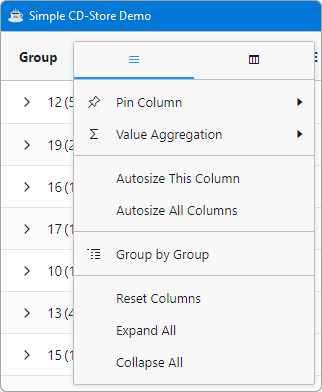
Figure 13. Group Column Menu Items
Resetting the columns will return the grid to its default column configuration, with no columns pinned and no Grouping column.
Expand All and Collapse All do as they suggest, expanding or collapsing all groups in the Group column.
There are also more options that you can explore on your own, such as Value Aggregation and its sub-items. These options are an advanced topic that is beyond the scope of this discussion.
Grid Properties
The grid also offers a secondary menu of options along the right side of the display. Figure 2 shows two expandable panels, one accessible from the columns control and the other from the filters control (both showing as text running vertically along the right side of the grid). The options that appear when you expand either of these controls offer alternate ways to set some of the column properties already discussed. Instead of setting them one column at a time, these controls offer the ability to view and work with the entire collection of columns at one time. They are mostly convenience controls, and we will not spend any time on them here.
Sample Program #2
Below is a more complex sample BBj program, where we will discuss the various sections of the code as we add them to create a fully functioning program. This program queries the CD-Store demo database as before but demonstrates how to use the BBjGridExWidget API to configure the grid differently from its defaults. Once again, it assumes that you have installed the BBjGridExWidget.
|
Program 2-1. Use and Declare Statements
In the Program 2-1 code block, we set up the use statements and variable declarations that we need for our BBjGridExWidget program.
|
Program 2-2. Creating Controls and Event Handlers
In the Program 2-2 code block, we create a main window, add a number of BBj controls to it, and finally set a number of callbacks to handle events on those controls. Each of the event handler subroutines will be discussed later in this example, as they become more relevant.
|
Program 2-3. Instantiating the BBjGridExWidget
In the Program 2-3 code block, we finally instantiate a BBjGridExWidget. The arguments to its constructor set it as the child of the top level window in wnd!, and specify the control ID, x and y coordinates, and width and height values. At this point, the BBjGridExWidget becomes a "child" control of the top level window, and is drawn (even though it is empty).
Since an empty grid is of little value, the code then calls two subroutines directly (loadDatabases and doQuery), and one subroutine indirectly (loadTables) to get a list of the available databases, load the tables for the ChileCompany database, and populate the grid with some default information. In the Program 2-4 code block, we look at the logic involved in those subroutines. You may notice that in the full program, these subroutines are defined further down in the code, but for the sake of readability we will discuss them when they are called.
|
Program 2-4. loadDatabases, loadTables, and doQuery
In loadDatabases, the program uses the SQLLIST function to obtain a list of the available databases. It then iterates over that list, adding each database's name to the database list button control. When it finds one named "ChileCompany," it saves the index so that it can select that entry later. Once it selects the "ChileCompany" database, it loads a list of all of the tables contained there, and finally populates the table list button control. Lastly, having selected a database and a table ("CUSTOMER") in that database, the program calls doQuery to populate the grid with all of the columns and rows in that table.
Notice that doQuery contains code to check the BBj version. Until BBj 17.10, the BBjAPI().getJDBCConnection(db$) call could not be used with the BASIS Components library, so the code can only be executed and get results with a newer BBj.
However, with the newer BBj and BBjGridExWidget, bc!.retrieve("SELECT * FROM " + tbl$) is all that is needed to get the information from the ChileCompany database, and grid!.setData(rs!) is all that is needed to load that result set into the grid.
|
Program 2-5. Processing Events
In the Program 2-5 code block, we call BBj's process_events verb to have BBj begin handling events as the user interacts with the graphical user interface. The Program 2-6 code block consists of the remaining three events handling subroutines set up earlier.
|
Program 2-6. Processing Events
In the Program 2-6 code block, we see byebye, a standard way to respond when the user asks to close the BBj program. We also see resize, which will resize the BBjGridExWidget when the top-level window is resized. Lastly, we see toggleFitToGrid, which adjusts the width of each of the grid's columns when the fit button is pushed.
Running this program gives us the output shown in Figure 14:
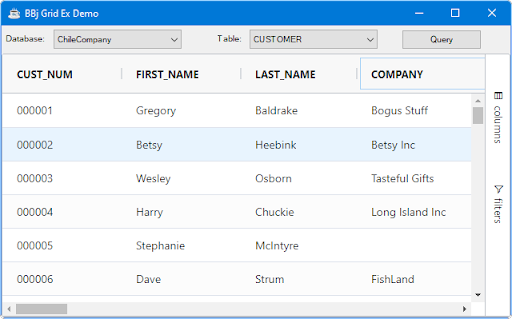
Figure 14. The Output from Sample Program #2
Summary
The BBjGridExWidget is simple to use and offers a significant amount of user-friendly functionality "out of the box." For more complex user interface displays, the BBjGridExWidget offers an amazing array of configuration and execution options. Those advanced options are beyond the scope of this "getting started" document. Advanced documentation will be published as time permits.