The BBjCalendarWidget Plug-In - Demos
Overview
This page provides a collection of BBjCalendarWidget plug-in demonstrations that showcase widget features, configuration options, and common usage scenarios. The examples build upon concepts introduced in the Technical Overview and Advanced Topics pages and provide practical references for implementing calendar functionality in BBj applications.
Demo 1
To show what the plug-in is capable of and how little code is usually needed, we’ll take a tour of the demo programs installed with the plug-in.
The first is very simple, as it creates a BBjWindow then adds the BBjCalendarWidget to that window via this line of code.
|
Running the program displays a fully functioning calendar showing today’s date in a grid view. Even though we haven’t added any entries to the calendar yet, we can still navigate backward and forward to different months and years, as well as change the view type.
Creating a Calendar Application
The easiest way to get started with the BBjCalendarWidget plug-in is to run some of the included demos located in the BBjCalendarWidget/demos directory. The first demo, calDemo1-BasicCalendar.bbj, is very short and simply adds a calendar to a BBjWindow using one of the constructors that just takes a parent window for the calendar:
|
Executing the demo in GUI results in a BBjTopLevelWindow containing a calendar courtesy of the line of code from above, and is shown in Figure 7.
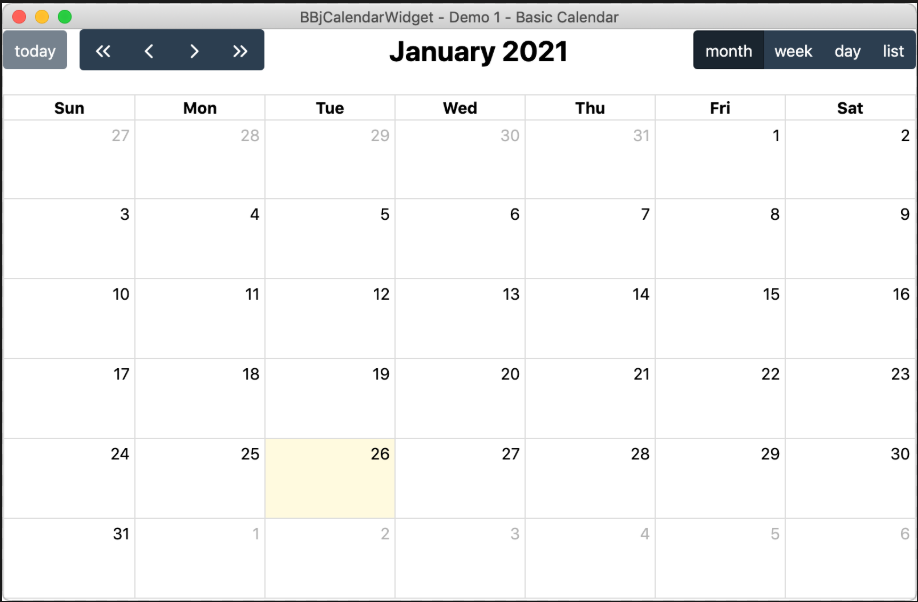
Figure 7. The first BBjCalendarWidget demo that creates a functional calendar
Even though this demo is very basic, we still have a functional calendar control that offers several view types and gives the user the ability to move backward and forwards through the months and years.
Demo 2
The second demo application, demo2.bbj, builds upon the first example by adding events to the calendar. After running the second demo, you should see something similar to the calendar shown in Figure 8.
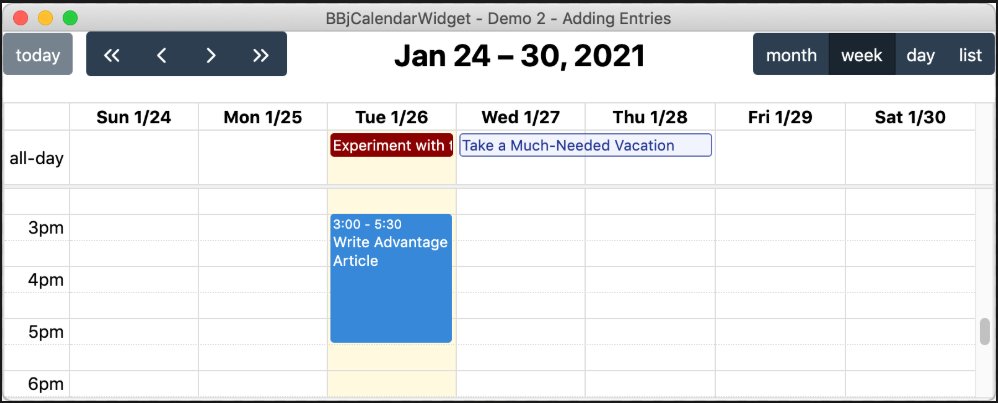
Figure 8. The second BBjCalendarWidget demo
This program adds events to the calendar, but it must first set a callback so that it’s notified when the calendar widget has completed its initialization and is ready for interaction. We accomplish that with the following callback code:
|
With this callback in place, the BBjCalendarWidget will execute our custom code in the "OnCalendarReady" subroutine. The code in that subroutine adds three entries to the calendar:
-
An all-day entry for today that has a red background
-
A timed entry for today that runs from 3 PM until 5:30 PM and uses default colors
-
A multi-day entry starting tomorrow that runs for two days and uses custom colors
Demo 3
The third demo also starts with a basic calendar and registers a callback for the ON_CALENDAR_READY event just like demo2.bbj. However, instead of adding individual entries to the calendar, this program retrieves entries from the internet. The code in "OnCalendarReady" subroutine adds three entry sources to the calendar:
-
A web service that provides entries in a JSON array
-
A public Google calendar for weather conditions
-
A public Google calendar for moon phases
When we run the third demo, we end up with a calendar filled with multiple events, as shown in Figure 9.
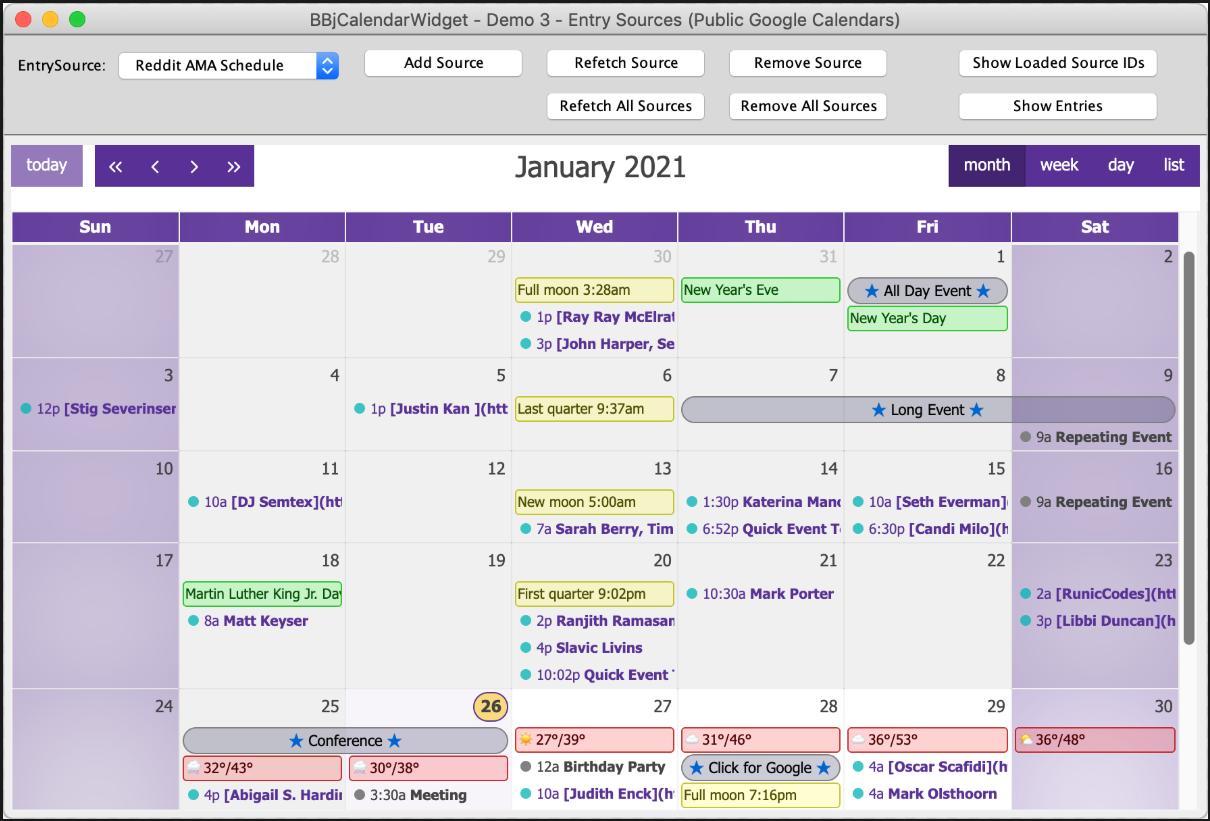
Figure 9. The third BBjCalendarWidget demo
Notice that the entries with the weather conditions have a custom yellow background so that it’s easy to differentiate them from the other events which use the default blue colors.
We also set another callback on the calendar with this line:
|
This callback results in the BBjCalendarWidget executing the code in the "OnCalendarEntryClick" subroutine whenever the user clicks on an entry in the calendar. The callback code gets the click event, derives the CalendarEntry that's associated with the click, and presents the user with information about the calendar entry that they clicked on. The information associated with the entry will vary depending on the event source. As we mentioned earlier, CalendarEntrys should have a title, starting time/date, and an internal UUID. But they are other optional parameters, like description, that may also be filled out with useful information. And entries also support any number of custom key/value pairs in its extended properties. Clicking on a simple event displays a message box like the one shown in Figure 10.
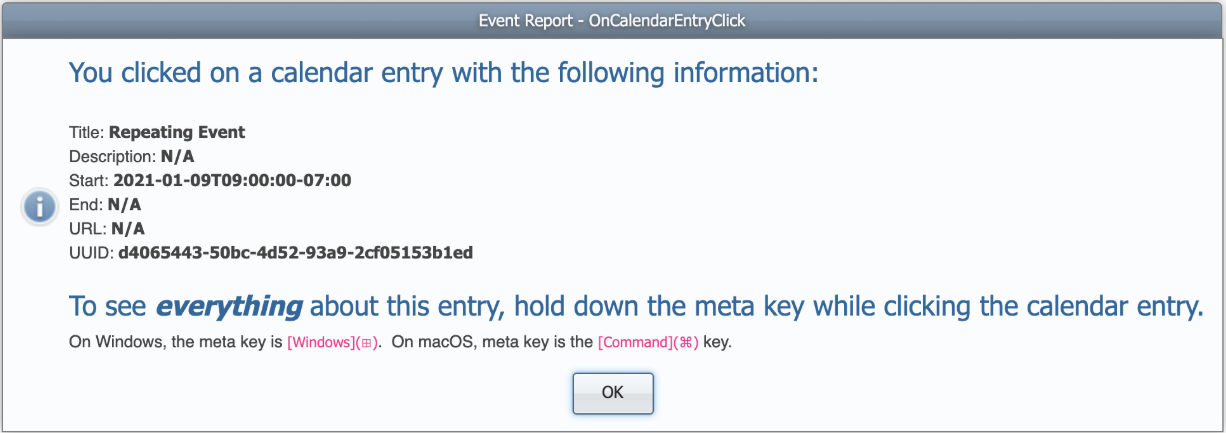
Figure 10. The message box that displays after clicking on a calendar entry
This entry didn’t have a lot of extra information included in its definition, and we can see that the Description field wasn’t filled out. Neither was the End property, which means that the entry’s ending time will be determined by the BBjCalendarWidget’s DefaultTimedEntryDuration. This defaults to 60 minutes, and can be modified by calling the CalendarOptions::setDefaultTimedEntryDuration() method.
Clicking on one of the weather events results in a very different looking message box that’s shown in Figure 11.
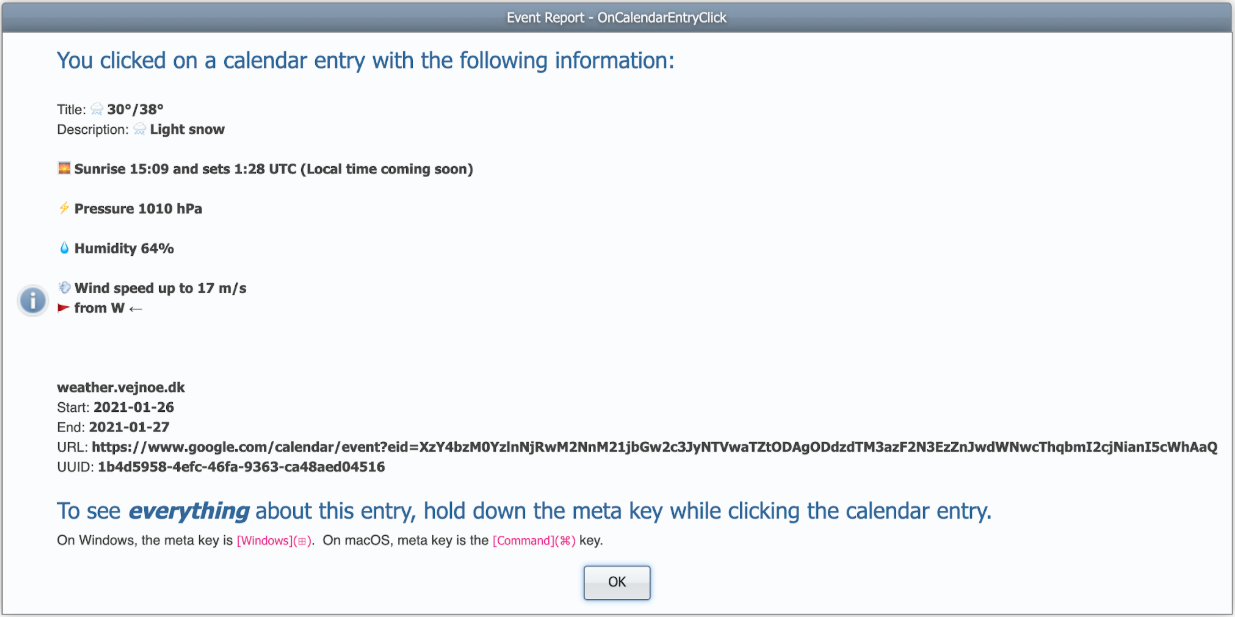
Figure 11. The message box that displays after clicking on a calendar weather entry
Notice that this calendar entry has a lot more useful information in it. While the previous entry didn’t have anything set in its Description field, this entry contains a host of weather-related information including the current conditions, sunrise and sunset times, pressure, humidity, etc.
Demo 4
The fourth demo illustrates how the calendar may be heavily customized before creation by passing in a pre-configured CalendarOptions object to the creation method. Notice that the demo sets the calendar’s valid range so that only today, yesterday, and tomorrow are available to the user. The demo sets several other non-default options, such as displaying the week number (W 4 in Figure 12 below), enabling the "now" time indicator (the red arrow and line indicating the current time in the grid), changing the slot duration to 15-minute intervals (compared to the usual 30-minute interval), and changes the list view button’s text to "agenda".
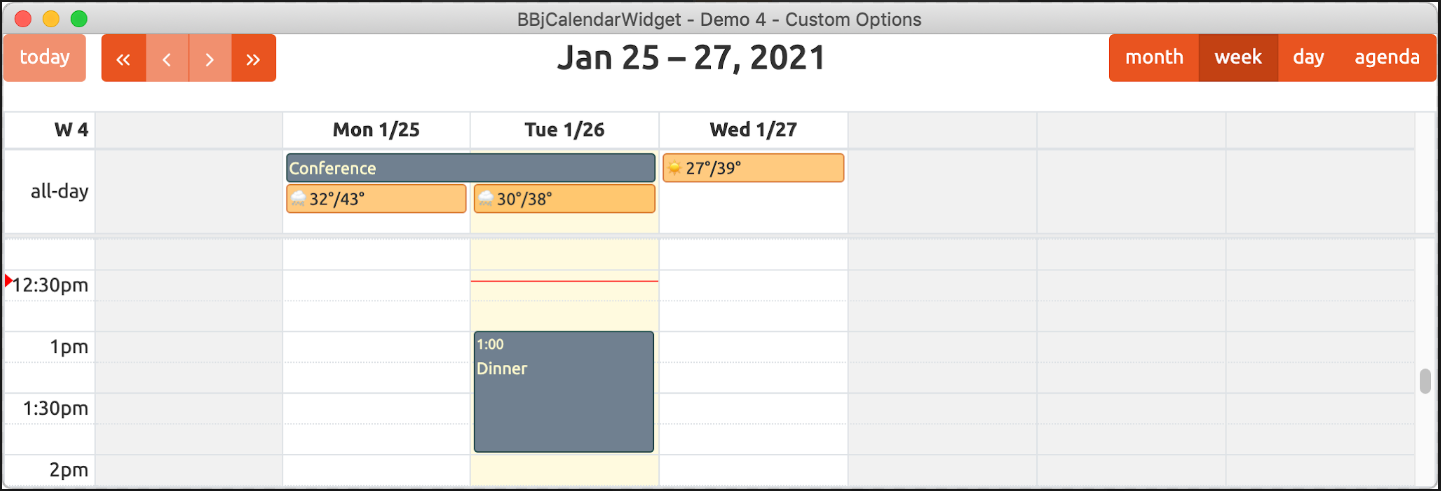
Figure 12. The fourth demo which sets the valid date range to a three-day span
Demo 5
The fifth demo shows how you can hide and show entries by selecting a checkbox in the Visible Tags or Hidden Tags sections on the left-hand side of the form. The demo uses a built-in BBj SPROC to read in entry data from a comma-separated value (CSV) file via standard SQL syntax and a string template. Each entry in the CSV file contains a list of applicable tags for the entry, and the program assigns unique colors to the entries based on the tags. When the user selects one of the Visible Tags or Hidden Tags checkboxes, the callback routine sets the appropriate visible or hidden tags on the calendar which causes the associated entries to be displayed or hidden as desired. Figure 13 below is a simple animation that shows what happens when you choose to hide entries with the "programming" tag.

Figure 13. The fifth demo showing how to hide and show entries by tag value
The demo sets another callback - this time for the ON_CALENDAR_DATE_CLICK event. With this in place, whenever the user clicks on a date in the calendar then our callback routine gets a CalendarDateClickEvent object. From that object variable, the code gets the date that the user clicked and then instructs the calendar to navigate to that date. It also changes the view type to the day list view so that the user sees an agenda for their chosen date.
Demo 6
The sixth demo illustrates some of the navigation features by providing controls in a BBjChildWindow at the top of the form.
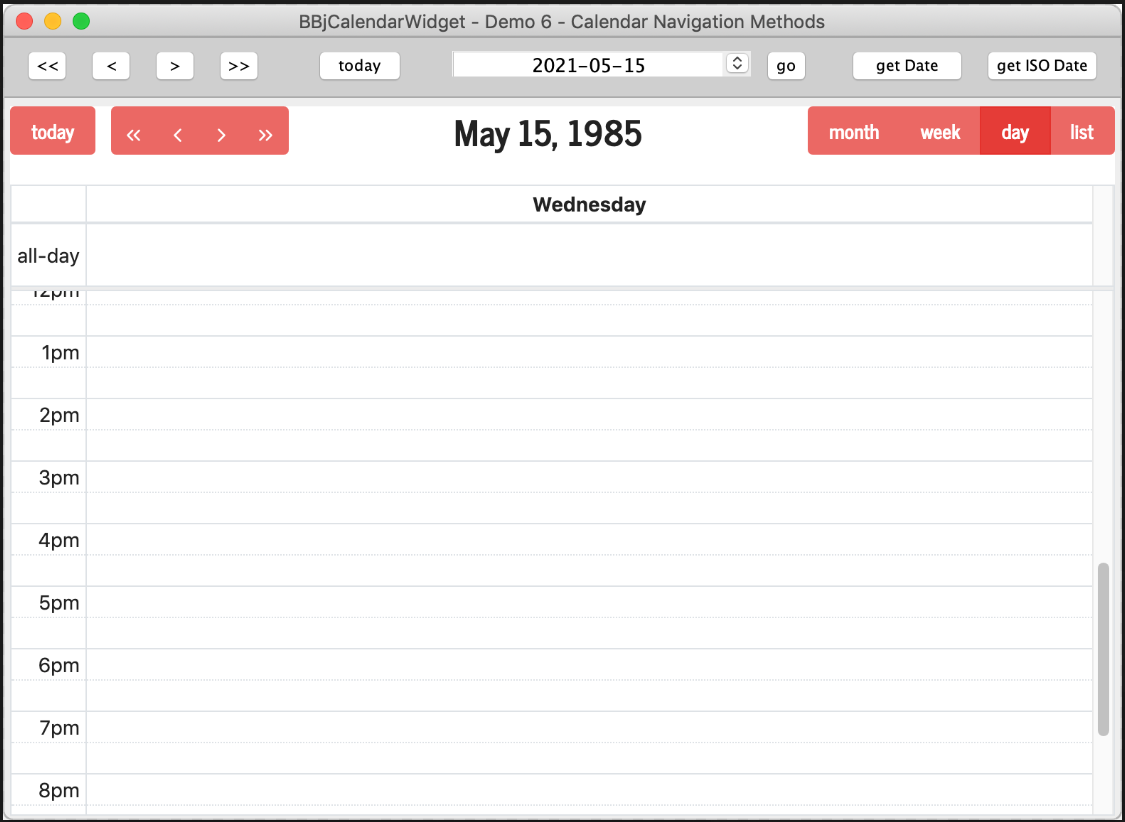
Figure 14. The sixth demo
Demo 7
The seventh demo, shown in Figure 15 below, displays a calendar that has been populated with entries read in from an MKEYED file. When you click on an entry in the calendar, the program gets the information about the entry in the callback subroutine for the CalendarAPI.ON_CALENDAR_ENTRY_CLICK() event and fills out a property sheet on the right-hand side of the window. You can modify the entry’s properties using the input controls in the right-hand pane, then click the Save All Entries to Entry Data File button to persist your changes back to the MKEYED file. Of course, one of the biggest benefits of the calendar widget is that the end-user can modify the entries directly since the demo turned on all entry editing options. Users can drag entries to different days, or grab the entry’s left or right edge and drag to extend the date or time range depending on the active view type. To reset all changes to the entries, you can click the Recreate Entry Data File button, which reads in the entry information from DATA statements in the program, sets all the starting dates to the current date, populates the MKEYED file, then reads in the entries and adds them to the calendar.
The Demo Options section of the right-hand pane also allows you to pick one of the supplied themes for the calendar. The demo gets a listing of all the installed themes by executing the BBjCalendarWidget::getThemes() method, which returns a BBjVector filled with the theme names. This vector is used to populate the BBjListButton, and selecting a new theme from the dropdown calls the BBjCalendarWidget::setTheme() method with the selected theme name which applies the desired Bootstrap CSS theme to the calendar. Themes generally affect the fonts and colors used in the calendar, but it’s possible to have the theme CSS affect the BUI version of the demo by adding specific Bootstrap class names to the BBjChildWindows used in the Demo Options and Selected Entry Detail panes.
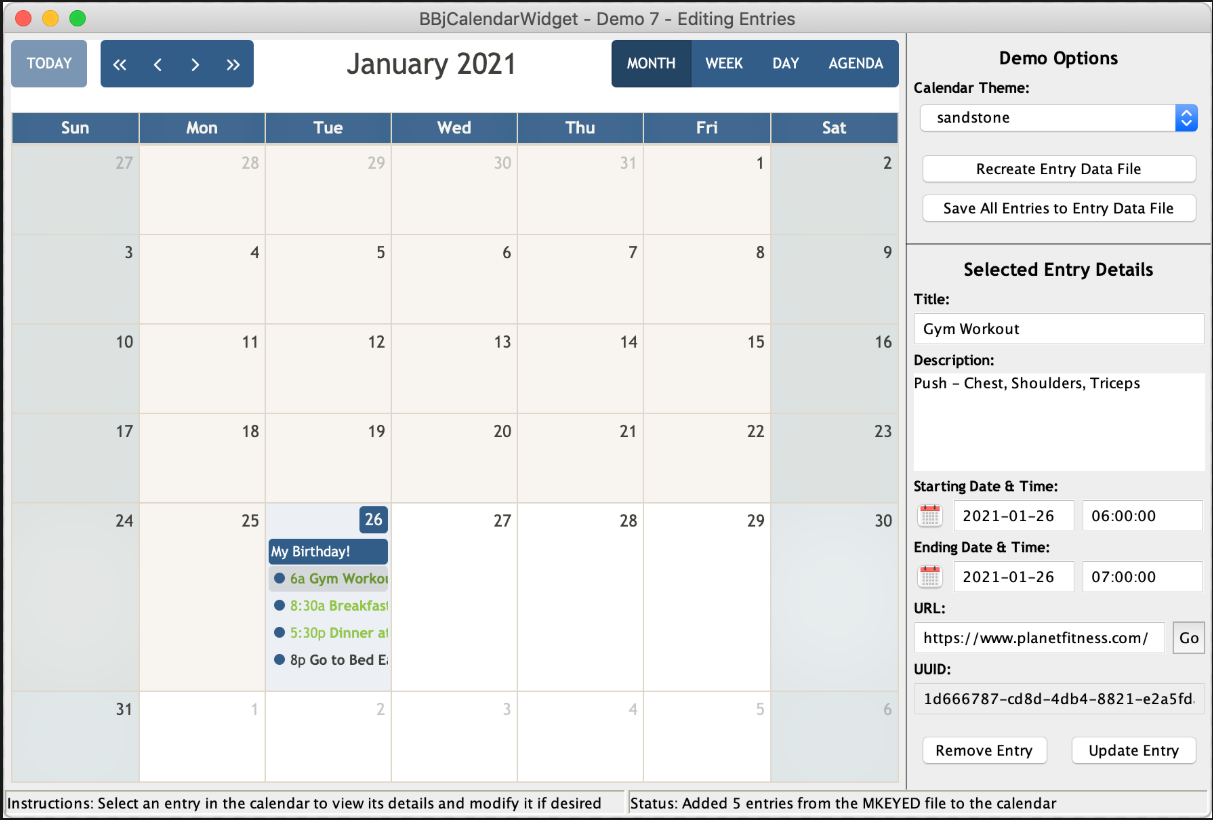
Figure 15. The seventh demo
See Also
Advantage Article: Introducing the BBjCalendarWidget Plug-In
BBjCalendarWidget Plug-In - Technical Overview
The BBjCalendarWidget Plug-In - Advanced Topics