Payroll Entry
Function
This task is used to manually enter earnings not included in automatic processing or to modify earnings information generated by automatic processing. It is also used to record earnings information for manual (handwritten) checks, to reverse a previously issued computer-generated check or manual check, or to void an unused check.
The Payroll Entry form has five tabs - Earnings, Deductions, Taxes, Contributions, and Accruals.
On Demand Payroll Checks may also be created in this task using the [Display addition options...] button
=> To access this task...
Select Payroll Entry from the Daily Processing menu.
If batching has been enabled then you will be presented with the Process Batch Control Screen, to either select an existing batch, or create a new one. Batching allows several people to work within the payroll system at the same time on a different set of processes. The batch number assigned carries through the Daily Processing Menu Choices.
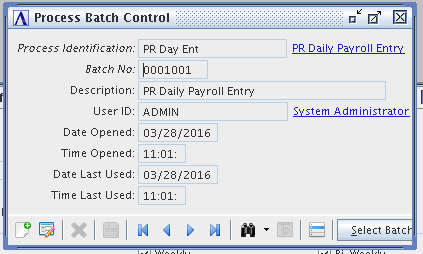
Process Batch Control
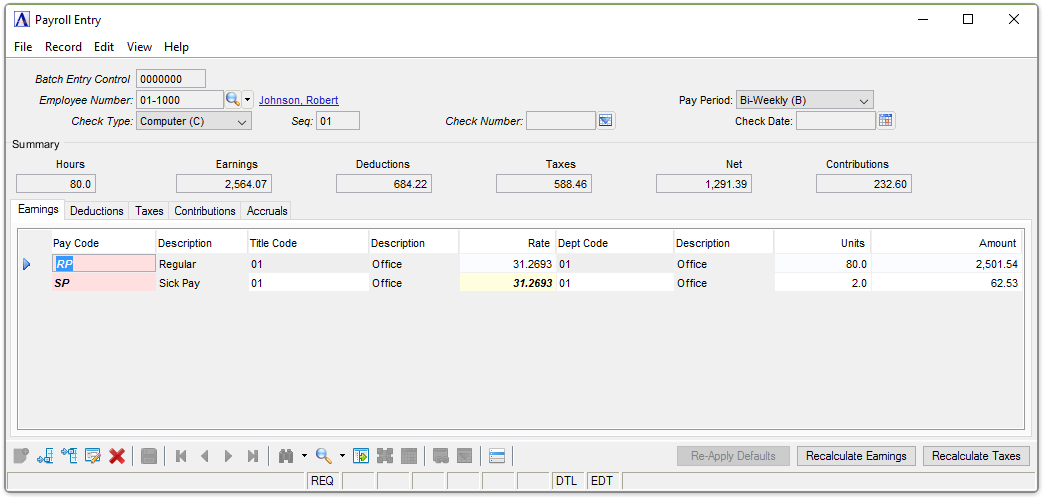
Sample Payroll Entry
About the Fields
Editing is Automatically Enabled, selecting  is not required.
The Payroll Entry screen is divided into three sections:
-
The upper section heading fields are for the entry of the employee number, name, and information about the type of check to be issued.
-
The middle Summary section keeps a running total of Hours, Earnings, Deductions, Taxes, Net Payment Amount, and Contributions.
Note: The Hours are affected by the Productive/Non-Productive Fields.
-
The lower section consists of several tabs. One tab is for the entry of earnings, another tab is for the entry of deductions, another tab for the entry of taxes, another tab for the entry of employer contributions, and the final tab for entry of accrual information.
In the Employee Number field...
-
Enter a valid employee number. The employee’s name is displayed.
-
Click
 to select from a list of valid codes.
 -
Click
 to select from a list of existing records.
 -
Click the record navigating buttons;
 to view the first record,
  to view the previous record,
  to view the next record, and
  to view the last record.
 -
Click
 to delete the employee record selected. You will be prompted for Confirmation
NOTE: The format of the employee number is defined in the Payroll Parameter Maintenance task.
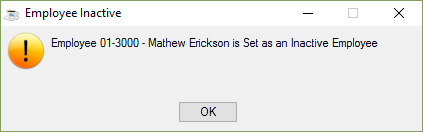
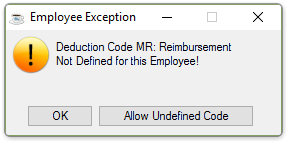
Entering the Employee Number for an inactive or terminated employee produces the following warning:
-
Select [OK] to return to the form to edit.
From the Pay Period dropdown...
The system displays the pay period that is the basis for this employee's pay, as set up in Employee Maintenance/Employee Information.

If the Pay Period is not part of the currently selected period in the Payroll Period Definition task, it will be displayed with a different Background Color and Font, but is otherwise allowed.
From the Check Type dropdown...
-
Select Computer (C) for a computer generated check. The Default.
-
Select Manual (M) For a manual (handwritten) check. Refer to Appendix B Entering Special Payrolls, for more information.
-
Select Reversal (R) For a check reversal. Refer to Appendix B Entering Special Payrolls, for more information.
-
Select Void (V) For a voided check. Refer to Appendix B Entering Special Payrolls, for more information.
Note: A Void only marks the check as voided, It does not reverse entries from the Employee Records.
In the Seq field...
This field is only enabled if you have selected a Computer (C) type of check.
- Enter the sequence number of a computer-generated check.(01-99)
When more than one computer check is desired for an employee during the same check run, the sequence entry identifies the order in which each check is generated. For example, if an employee is to receive a regular check, a vacation check and a bonus check, as separate checks, the first check would be SEQ 01, the second SEQ 02 and the third SEQ 03. (Refer to Appendix B Entering Special Payrolls, for more information.) Only one entry in the Seq field for each check generated is required.
Note: Deductions, taxes, contributions, and accruals are calculated against all entries pending within the payroll system,
including other batches, if batching is enabled. This is to prevent exceeding limits and balances.
In the Check No field...
Used only for manual check entry, to reverse an existing check, or void an unused check (Refer to Check Type).
-
Enter the number of the manual check.
-
Enter the number of the check to be reversed or voided. Only a check number assigned to this employee may be reversed.
-
Click on
 to search for existing checks in the history records.
If the Check/Payments history is present, all entries including deductions, taxes, contributions, and accruals will be automatically entered with reversal amounts. A check number is automatically assigned to computer-generated checks when checks are printed.
In the Check Date field...
Used only for manual check entry, to reverse an existing check, or to void an unused check (Refer to Check Type).
-
Enter the date of the manual check.
-
Click
 to select from the calendar tool.
Enter the effective date for voiding an unused check or enter the effective date for reversing an existing check. For check reversal entries, the date the check was written is automatically displayed following entry of the check number. Overwrite the original check date with the date the check is to be reversed. The Employee History Records will be updated based upon this new check date.
Sample Payroll Entry Earnings tab
The Earnings Tab...
In this option, entry and modification of employee earning information such as pay code, title, department, hours worked, and earnings amount is made. When employees work in multiple departments and/or work under different job titles, earnings should be entered separately for each department or title in Payroll Entry so that labor expense is properly reflected in the General Ledger and on payroll reports such as the Payroll Earnings Register.
The information entered is used to generate computer-printed checks, to distribute earnings to the General Ledger, and produce the various payroll reports that display earning information. The Earnings option can also be used to record earnings information for a manual (handwritten) check and reduce earning amounts when processing a check reversal. The Daily Entry Register Update Process also posts its entries into this section.
About the Fields
In the Pay Code column...
Earnings Code, may be displayed as Pay Code on some modules.
-
Enter a valid pay code. A description of the pay code appears in the next column.
-
Click
to select from a list of valid codes.
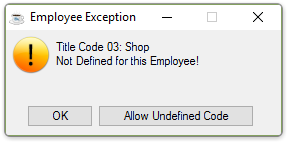
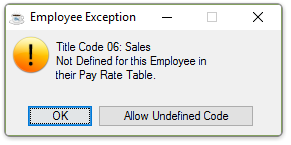
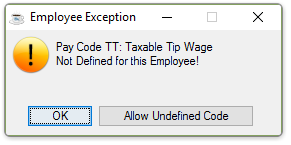
If the Pay Code selected is not defined for the Employee in the Employee Maintenance Record then you will be presented with an error message, but you have a choice to override it by selecting [Allow Undefined Code].
-
Select [OK] to return to the form for editing.
-
Select [Allow Undefined Code] to override the employee settings.
If the Undefined Code is accepted, it will display with a different Background Color and Font. It will also be reported on all succeeding reports as an exception, until either the corresponding Earnings Code Record is defined for the Employee, or you continue to override the update prompts.

If for some reason the code used was valid when entered, and later the corresponding Earnings Code Record is deleted from the Employee Maintenance Record, It will display with a more urgent Background Color and Font. It will also be reported on all succeeding reports as an exception, until either the corresponding Earnings Code Record is defined for the Employee, or you continue to override the update prompts.

In the Title Code column...
Note: The Title Code Column will only be Enabled if the Multiple Titles checkbox is checked in the Parameters, otherwise the Normal Title Code defined for the employee is used.
-
Enter a valid title code for this employee. A description of the title code appears in the next column
-
Click
to select from a list of valid codes.
The normal pay rate defined for this employee using this title code is displayed.
-
Select [OK] to return to the form for editing.
-
Select [Allow Undefined Code] to override the employee settings.
In the Rate column...
The pay rate is automatically displayed based on the title code entered above and may be overwritten with a different pay rate.
-
Enter a pay rate for the employee’s title.
In the Dept Code column...
The Employee's Home Department code is used as the default. A description of the department code appears in the next column. The department code determines the distribution of the earnings to the General Ledger.
-
Enter a department code for the employee.
-
Click
to select from a list of valid codes.
In the Units column...
-
Enter the number of hours worked (or other appropriate units).
NOTE: When this pay code is designated not to use units to calculate earnings (e.g., vacation pay),
the cursor will advance to the Amount field for an entry without stopping at this field.
In the Amount column...
The amount in this field is automatically calculated when the defined pay code uses units.
-
Enter the earnings amount.
NOTE: Recalculate Dollar Amounts button can be chosen on any line, to recheck the Rate, Unit, and Amount Calculation where applicable.
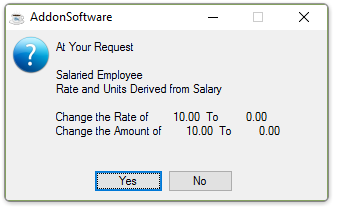
If there is to be a change to any of the amounts, you will be presented with the option to continue:
-
Select [Yes] to change the rate.
-
Select [No] to return to the form for editing.
When finished entering Earnings Information...
-
Click
 to save the record.
 -
Click
 to add a new record at the end of the form or
  to insert a new record at the current location.
 -
Click
to delete the record selected. You will be prompted for Confirmation.
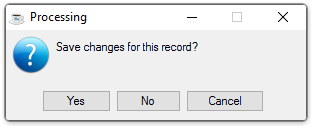
If the Window is closed without saving the record, or you try to navigate away from the current record, the module issues this confirmation prompt:
The Deductions Tab...
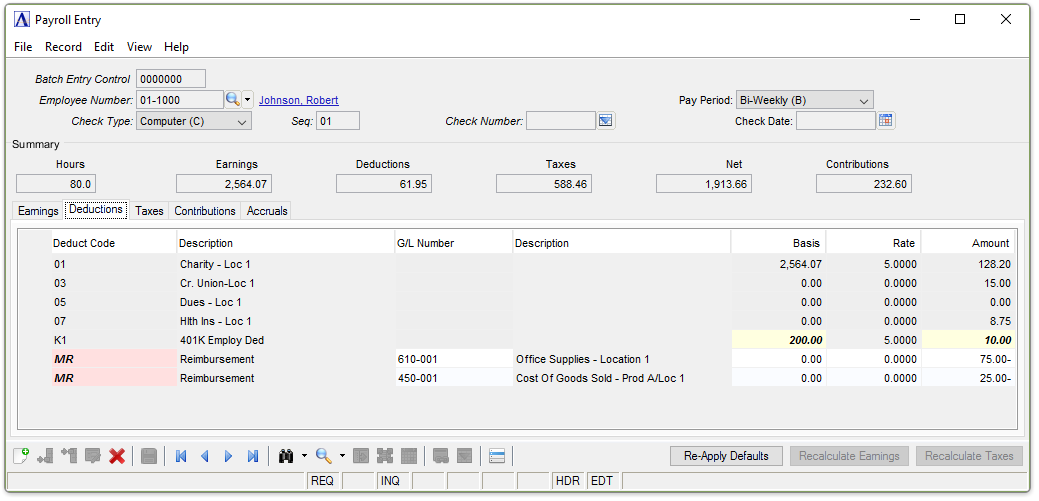
Payroll Entry Deductions tab
This option of the Payroll Entry task allows entry and modification of voluntary employee deductions for items such as health insurance, credit union savings, union dues, etc. The information entered in this option is used to generate computer-printed checks and produce the various payroll reports that contain deduction information. This option may also be used to record deduction information for a manual (handwritten) check and reverse deduction amounts when reversing an existing check.
About the Fields
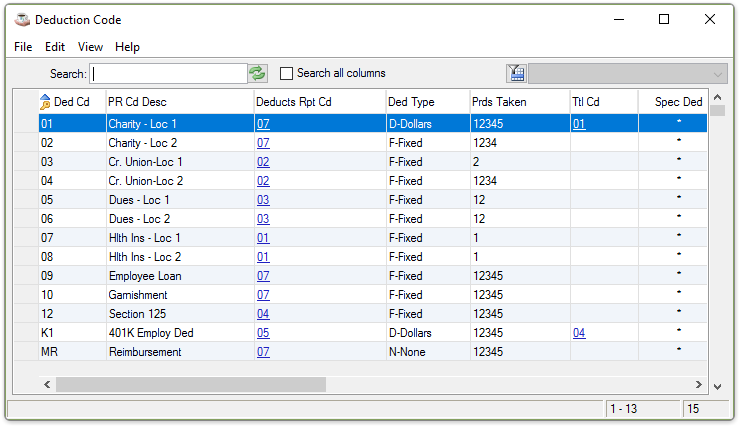
In the Deduct Code field...
-
Enter a valid deduction code. A description of the deduction code appears in the next column.
-
Click
to select from a list of valid codes.
Deduction Code Query
If the Deduction Code selected is not defined for the Employee in the Employee Maintenance Record then you are presented with an error message:
-
Select [OK] to return to the form for editing.
-
Select [Allow Undefined Code] to override the employee settings.
If the Undefined Code is accepted, it will display with a different Background Color and Font. It will also be reported on all succeeding reports as an exception, until either the corresponding Deduction Code Record is defined for the Employee, or you continue to override the update prompts.

If for some reason the code used was valid when entered and later, the corresponding Deduction Code Record is deleted from the Employee Maintenance Record, It will display with a more urgent Background Color and Font. It will also be reported on all succeeding reports as an exception, until either the corresponding Deduction Code Record is defined for the Employee, or you continue to override the update prompts.

If the Deduction Line was generated by the System, such as during the auto-generation process, then the next fields are display only. However you may delete the selected line.
In the G/L Number field...
If the corresponding Deduction Code allows GL Number entry, this is not an automatic deduction and Post to General Ledger is enabled in Application Parameters then access to this field may be used for debit entries.
-
Enter a valid GL number.
-
Click
to select from a list of valid codes.
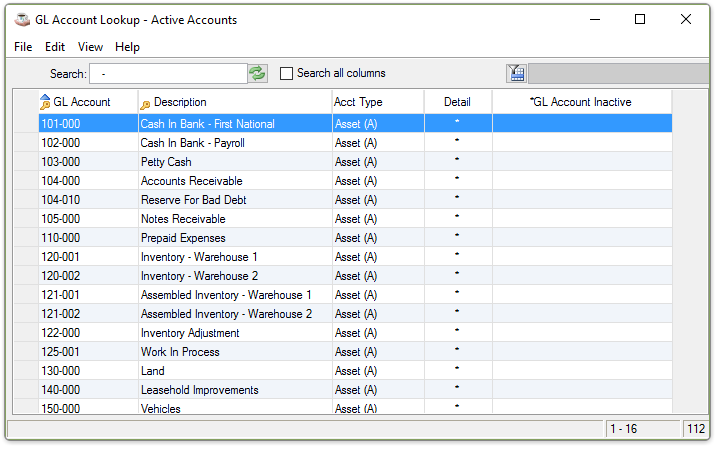
GL Accounts Lookup
These GL Accounts are used for the Debit Entry in both the GL Distribution Report and the Check Register Update -- General Ledger Summary.
In the Basis column...
Use this field when basing an amount on a percentage of units worked or dollars earned, not for fixed dollar amounts.
-
Enter the number of units worked or dollars earned.
In the Rate column...
This rate is multiplied by the basis entered above. The deduction amount is displayed in the Amount field.
- Enter the rate to be used in calculating the deduction amount.
In the Amount column...
The amount in this field is automatically calculated when the defined deduction code is not based on fixed dollar amounts.
- Enter the deduction amount.
If the Basis or Amount have exceeded or reached a predefined limit, this condition will be indicated by a different Background Color and Font. You will not be allowed to exceed this calculated limit.

When finished entering Deduction Information...
-
Click
to save the record. -
Click
to add a new record at the end of the form or to insert a new record at the current location. -
Click
to delete the record selected.
If the Window is closed without saving the record, or you try to navigate away from the current record, the module issues this confirmation prompt:
The Taxes Tab...
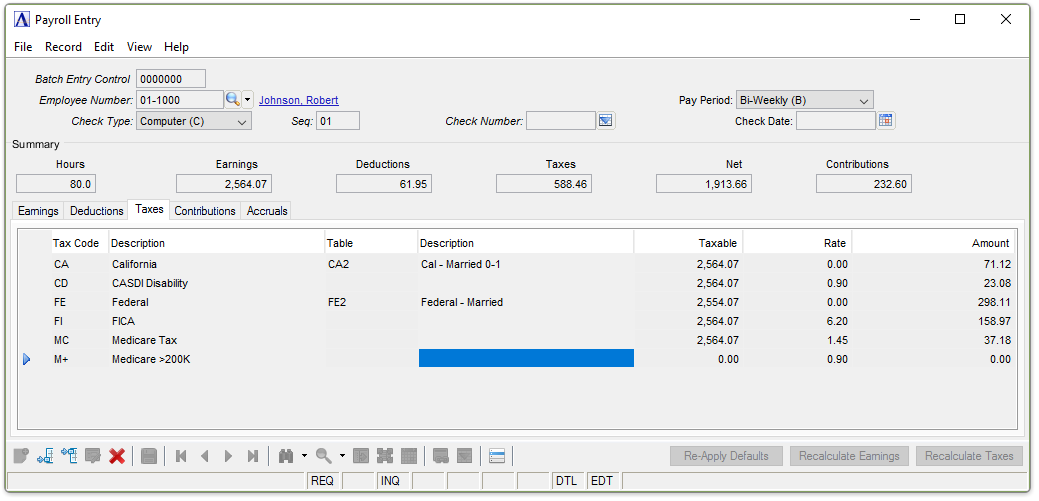
Payroll Entry Taxes tab
This option allows entry and modification of employee tax information. The information entered in this task is used to generate computer-printed checks, produce the various payroll reports containing tax information, and accumulate tax amounts reported on employee W-2 forms. This option may also be used to record tax information for a manual (handwritten) check and reduce tax amounts when reversing an existing check.
About the Fields
In the Tax Code column...
-
Enter a valid tax code defined for this employee. The description is displayed.
-
Click
to select from a list of valid codes.
NOTE: Refer to the tax code entry procedures under “Entering a Manual Check” in Appendix B for instruction about manual check tax code entry.
If the Tax Code selected is not defined for the Employee in the Employee Maintenance Record then you will be presented with an error message:
-
Select [OK] to return to the form for editing.
-
Select [Allow Undefined Code] to override the employee settings.
If the Undefined Code is accepted, it will display with a different Background Color and Font. It will also be reported on all succeeding reports as an exception, until either the corresponding Tax Code Record is defined for the Employee, or you continue to override the update prompts.
If for some reason the code used was valid when entered, and later the corresponding Tax Code Record is deleted from the Employee Maintenance Record, It will display with a more urgent Background Color and Font. It will also be reported on all succeeding reports as an exception, until either the corresponding Tax Code Record is defined for the Employee, or you continue to override the update prompts.
If the Tax Line was generated by the System, such as during the auto-generation process, then the next fields are display only. However you may delete the selected line.
In the Table column...
If the Tax code Selected is not associated with a Tax Table, the column is disabled.
-
Enter the tax table to be used for this employee.
-
Click
to select from a list of valid codes.
When entering a manual check or making a check reversal, it may be necessary to access the fields displayed and change the tax amounts shown to accurately reflect the actual tax withheld.
If the Tax Table selected is not defined for the Employee in the Employee Maintenance Record then you will be presented with an error message:

-
Select [OK] to return to the form for editing.
-
Select [Allow Undefined Code] to override the employee settings.
If the Undefined Code is accepted, it will display with a different Background Color and Font. It will also be reported on all succeeding reports as an exception, until either the corresponding Tax Table Record is defined for the Employee, or you continue to override the update prompts.
If for some reason the code used was valid when entered, and later the corresponding Tax Table Record is deleted from the Employee Maintenance Record, It will display with a more urgent Background Color and Font. It will also be reported on all succeeding reports as an exception, until either the corresponding Tax Table Record is defined for the Employee, or you continue to override the update prompts.
If the Tax Line was generated by the System, such as during the auto-generation process, then the next fields are display only. However you may delete the selected line.
In the Taxable column...
Use this field when basing an amount on a percentage of units worked or dollars earned, not for fixed dollar amounts. The taxable basis is displayed for the earning amount or units entered.
-
Enter the number of units worked or dollars earned on which the tax is based.
In the Rate column...
This field is not used for type ‘Tax Table Based’ tax codes. This rate is multiplied by the taxable basis previously entered. The tax amount is displayed in the Amount field.
-
Enter the rate to be used in calculating the tax amount.
In the Amount column...
When the tax is a percentage of units or dollars earned, the amount is automatically displayed based on the taxable units or earning amount and the rate entered above.
-
Enter the tax amount.

If the Taxable Amount or Tax Amount have exceeded or reached a predefined limit, this condition will be indicated by a different Background Color and Font. You will not be allowed to exceed this calculated limit.
When finished entering Tax Information...
-
Click
to save the record. -
Click
to add a new record at the end of the form or to insert a new record at the current location. -
Click
to delete the record selected.
If the Window is closed without saving the record, or you try to navigate away from the current record, the module issues this confirmation prompt:
The Contributions Tab...
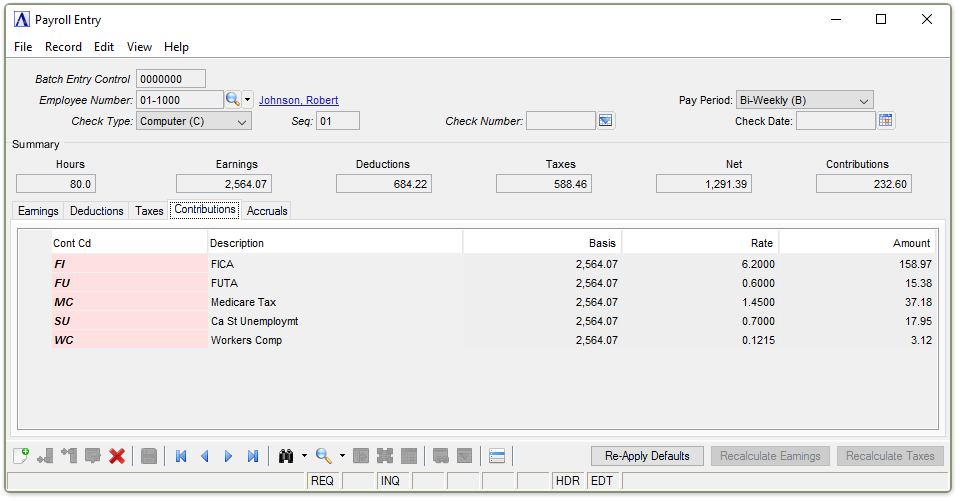
Payroll Entry Contributions tab
This option allows entry and modification of the employer’s tax contribution information such as workers’ compensation, unemployment insurance, etc. The information entered here is used to produce the various payroll reports that display the employer tax contribution information and accumulate tax contribution amounts for federal, state, and local government reports. This option may also be used to record employer tax contribution information for a manual (handwritten) check and negate employer tax contribution amounts when reversing an existing check.
About the Fields
In the Cont Cd column...
-
Enter a valid Contribution code defined for this employee. The description is displayed.
-
Click
to select from a list of valid codes.
NOTE: Refer to the tax code entry procedures under “Entering a Manual Check” in Appendix B for instruction about manual check contribution code entry.
-
Select [OK] to return to the form for editing.
-
Select [Allow Undefined Code] to override the employee settings.
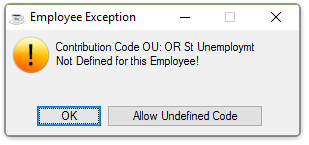
If the Contribution Code selected is not defined for the Employee in the Employee Maintenance Record then you will be presented with an error message, but you have a choice to override it by selecting "Allow Undefined Code".

If the Undefined Code is accepted, it will display with a different Background Color and Font. It will also be reported on all succeeding reports as an exception, until either the corresponding Contribution Code Record is defined for the Employee, or you continue to override the update prompts.

If for some reason the code used was valid when entered, and later the corresponding Contribution Code Record is deleted from the Employee Maintenance Record, It will display with a more urgent Background Color and Font. It will also be reported on all succeeding reports as an exception, until either the corresponding Contribution Code Record is defined for the Employee, or you continue to override the update prompts.
If the Contribution Line was generated by the System, such as during the auto-generation process, then the next fields are display only.
However you may delete the selected line.
In the Basis column...
Use this field when basing an amount on a percentage of units worked or dollars earned, not for fixed dollar amounts.
-
Enter the number of units worked or dollars earned on which the contribution is based.
In the Rate column...
This rate is multiplied by the basis entered above, and the contribution amount is displayed in the Amount field.
-
Enter the rate to be used in calculating the contribution amount.
In the Amount column...
The amount in this field is automatically calculated when the defined contribution code is not based on fixed dollar amounts.
-
Enter the contribution amount.

If the Contribution Basis or Contribution Amount have exceeded or reached a predefined limit, this condition will be indicated by a different Background Color and Font. You will not be allowed to exceed this calculated limit.
When finished entering Contribution Information...
-
Click
to save the record. -
Click
to add a new record at the end of the form or to insert a new record at the current location. -
Click
to delete the record selected.
If the Window is closed without saving the record, or you try to navigate away from the current record, the module issues this confirmation prompt:
The Accruals Tab...
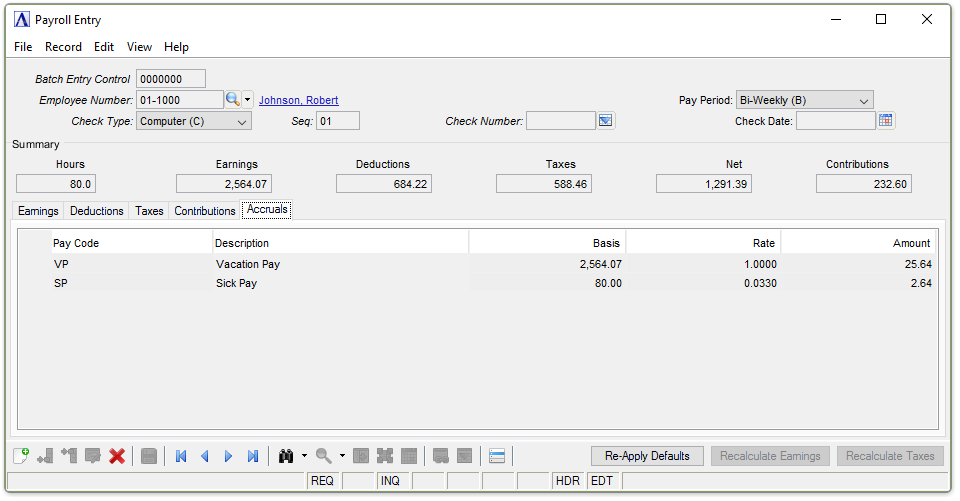
Payroll Entry Accruals tab
This option of the Payroll Entry task allows entry and modification of employee accrual information for earnings such as vacation pay, sick pay, etc. The information entered in this option is used to produce the payroll accrual reports. It is also used to accumulate units or dollar amounts accrued for each employee to display as accrual information through the Pay Code Maintenance task. In addition, this option may also be used to record accrual information for a manual (handwritten) check and reduce accrual amounts when reversing a previously written check.
About the Fields
In the Pay Code column...
Earnings Code, may be displayed as Pay Code on some modules.
-
Enter a valid pay code. A description of the pay code appears in the next column.
-
Click
to select from a list of valid codes.
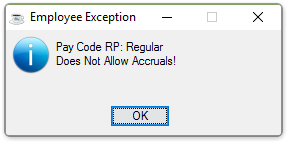
If the Pay Code does not have an Accrual Default Component, its use will not be allowed.
-
Click [OK] to enter a different Pay Code.
If the Pay Code selected is not defined for the Employee in the Employee Maintenance Record then you will be presented with an error message, but you have a choice to override it by selecting [Allow Undefined Code].
-
Select [OK] to return to the form for editing.
-
Select [Allow Undefined Code] to override the employee settings.
If the Undefined Code is accepted, it will display with a different Background Color and Font. It will also be reported on all succeeding reports as an exception, until either the corresponding Earnings Code Record is defined for the Employee, or you continue to override the update prompts.

If for some reason the code used was valid when entered, and later the corresponding Earnings Code Record is deleted from the Employee Maintenance Record, It will display with a more urgent Background Color and Font. It will also be reported on all succeeding reports as an exception, until either the corresponding Earnings Code Record is defined for the Employee, or you continue to override the update prompts.

If the Accrual Line was generated by the System, such as during the auto-generation process, then the next fields are display only.
However you may delete the selected line.
In the Basis column...
Use this field when basing an amount on a percentage of units worked or dollars earned, not for fixed dollar amounts.
-
Enter the number of units worked or dollars earned on which the accrual is based.
In the Rate column...
This field is not used for fixed accrual rates.
-
Enter an accrual rate for calculating the accrual amount.
In the Amount column...
-
The amount in this field is automatically displayed based on the entries in the Basis and Rate fields
-
Enter any fixed accrual amount.
When finished entering Accrual Information:
-
Click
to save the record. -
Click
to add a new record at the end of the form or to insert a new record at the current location. -
Click
to delete the record selected.
If the Window is closed without saving the record, or you try to navigate away from the current record, the module issues this confirmation prompt:
If at any point in the entry of data within the tabs, select the [Re-Apply Defaults] button, which acts like an Auto-Generation Process, but only for this single Employee. If an existing code is already present in a section, it will not be overridden, but if it is missing, it will be added. Deductions, Taxes, Contributions, and Accruals will be recalculated.
Changes to the total of Earnings Dollar Amounts on the Earnings Tab, will also cause the recalculation of Deductions, Taxes, Contributions, and Accruals.
Use the [Recalculate Taxes] button when changes are made to the Earnings Amounts to force a Save and recalculate the subsidiary screens.
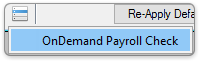
Select the [Display additional options...] button to access the On Demand Check print feature.
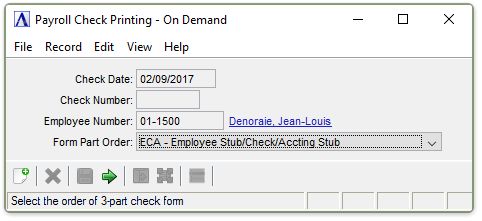
On Demand Check Print
From the Form Part Order dropdown...
Select the option that matches the layout of the Check desired:
-
ECA - Employee Stub on Top, Check in the Middle, Accounting Copy on the Bottom.
-
CEA - Check on the Top, Employee Stub in the Middle, Accounting Copy on the Bottom
-
ACE - Accounting Stub on the Top, Check in the Middle, Employee Stub on the Bottom.
-
AEC - Accounting Stub on the Top, Employee Stub in the Middle, Check on the Bottom.
If this check results in a Continuation Check, this alert is issued:
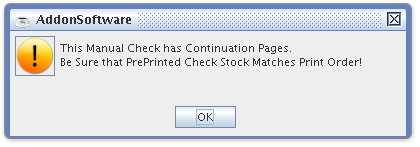
NOTE: All other check printing activities - Duplicate Check, Emailing a check, PayPal transactions, and ACH Direct Deposits are still handled via the normal Checking Printing task.
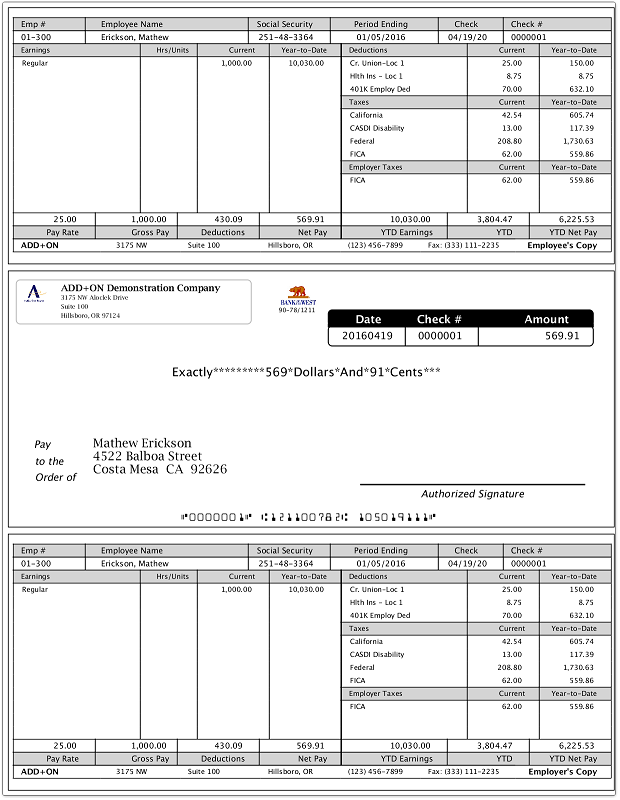
Sample Payroll check
See Output Options
______________________________________________________________________________________
Copyright BASIS International Ltd. AddonSoftware® and Barista® Application Framework are registered trademarks.