![]()
Inquiry System
One of the most powerful, and popular, components of a Barista-built application is the inquiry system. Users can quickly and easily launch inquiries on forms and individual fields to find the data they're looking for, or click on hyperlinks to display full information for a coded field. In addition, applications can tie into the inquiry system with drilldowns and custom queries. The queries themselves are loaded with features for sorting, searching, filtering, and exporting in any of several formats.
Query Types
There are several different ways users can launch queries, some of which are automatically available to the application because of the framework, and others that have been added to the application by developers or even power users.
Form query
All maintenance forms in the application can query the table that's tied to the form. Since maintenance forms display just one record at a time, the form query is a handy way for the user to find the record they want to view or edit. A form query is launched from the binoculars tool button, either at the bottom of the form, or in the MDI toolbar. Pressing <Ctrl+Q> also launches a form query. From the query grid, users can double-click (in a non-hyperlinked cell), single-click in the left margin, or select a row and press <Enter> to dismiss the inquiry and return the selected record back to the main form.
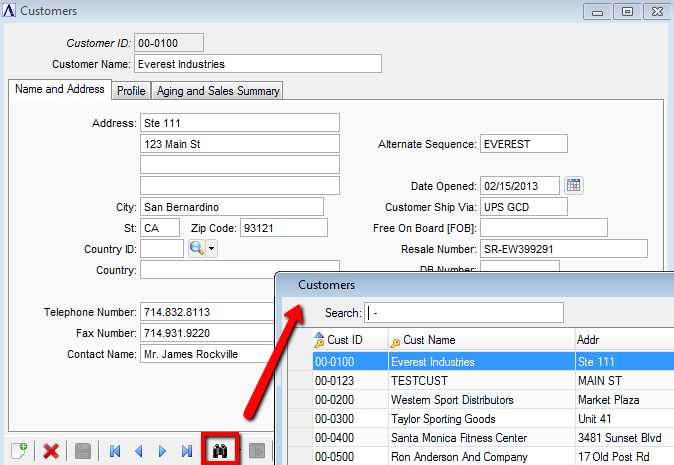
AddonSoftware Customer Master form's table query provides a convenient lookup for customers
Field Query
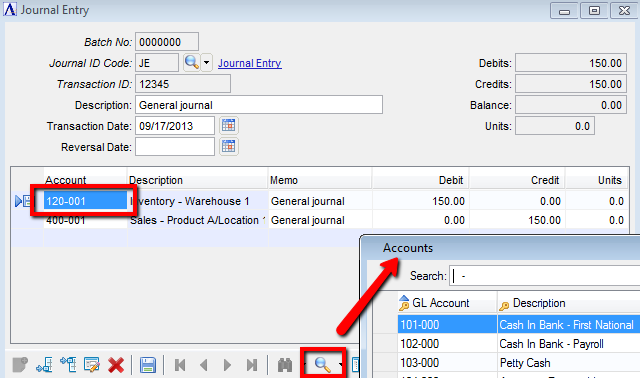
Most applications make use of coded fields (also known as foreign keys), linking a coded value in one table to a record keyed to that code in another table. For example, in AddonSoftware, the Customer Profile tab shows several fields that are carried as codes in the Customer Master table. The remaining information about the coded value is stored in a different table. These "validated fields" appear on forms with a magnifying glass next to them, so users can easily see and select from a list of valid codes. Field queries are launched by clicking the magnifying glass on the form or on the MDI toolbar, or by pressing <Ctrl+F>.
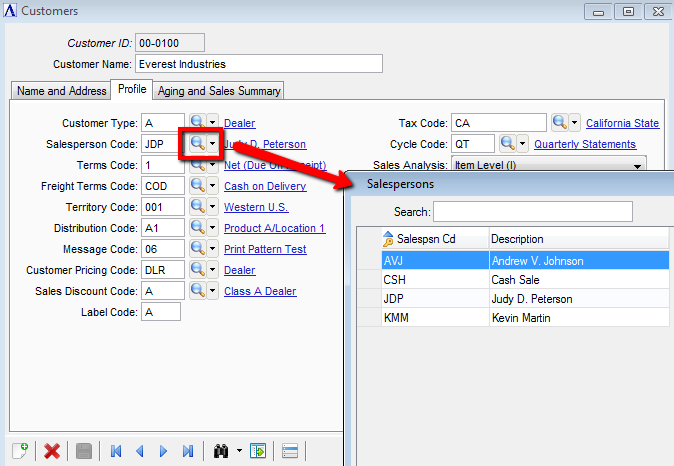
Profile tab of the Customer Master form. Field level queries make using coded values easy
Users can also launch field queries when running a grid form, or when focused in a detail grid on a header/detail form. Rather than displaying a magnifying glass in the actual grid, the magnifying glass on both the form and MDI toolbar will enable whenever focus is in a cell containing a validated field.
In grids, the magnifying glass appears in the toolbar, rather than in the grid cell itself
Drilldowns
Developers may add drilldowns to Barista applications wherever they anticipate that the user will find it helpful to see more information about a field. Drilldowns are by definition "view only," meaning they don't return any data back to the form, unlike form or field queries..
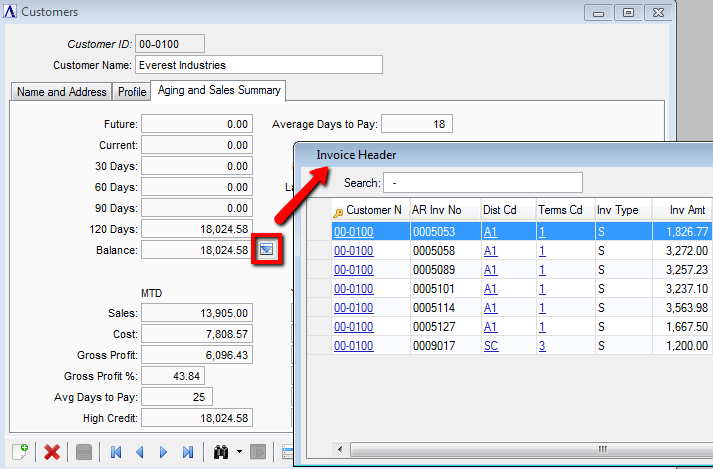
Drilldown on the Balance field shows the unpaid invoices in the balance
Custom Queries
As the name implies, developers can use custom queries throughout an application wherever the need arises, or in place of a regular form or field query. Given adequate security privileges, power users can learn to create and use custom queries as well. When substituted for a field or form query, a custom query launches from the binoculars or magnifying glass. Quite often, users launch a custom query from an option button on a form, or from the Additional Options menu. Custom queries can return data to a form, or be designed like a drilldown to simply view additional information.
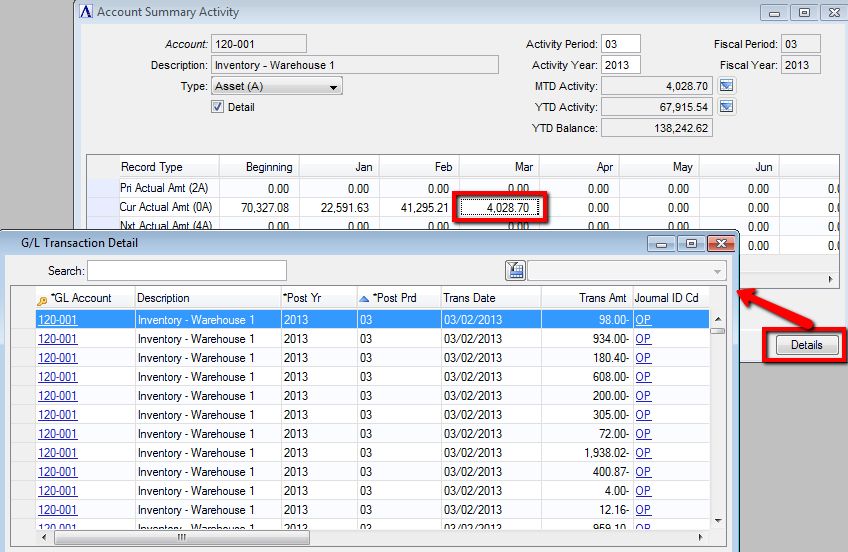
General Ledger Summary Activity form with focus on a period in the grid so that pressing the Details button will launch a custom query displaying the individual transaction amounts
Hyperlinks
Hyperlinks are a departure from the queries already described, but are also a handy tool for application users. When a validated field is used on a form, the description corresponding to the coded value is hyperlinked and appears to the right of the magnifying glass. Notice how the cursor changes when hovering over the hyperlink. Rather than clicking the magnifying glass to run a query of all records in the related table, users can click the hyperlink to launch a read only form showing just the related record. This can be a quick and handy way to verify that the correct code has been selected.
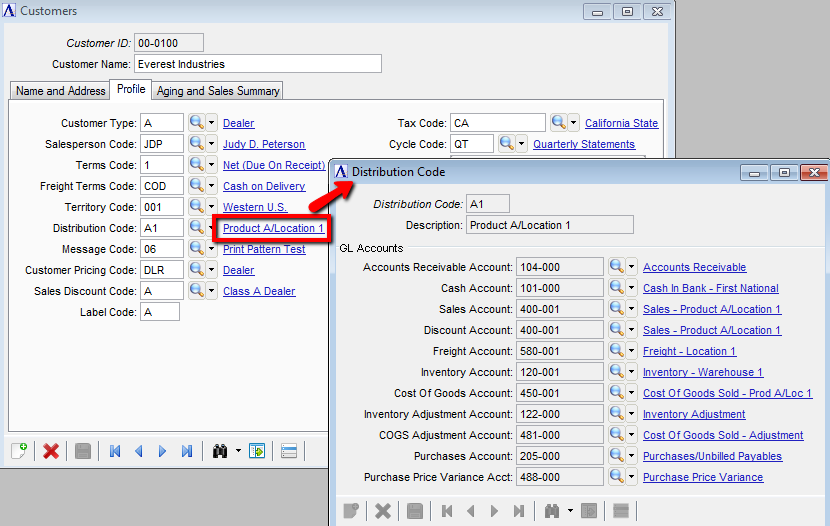
Clicking the linked description launches the Distribution Code form to display the remaining record data
Hyperlinks are available within inquiry grids as well, so related information is always just a click away.
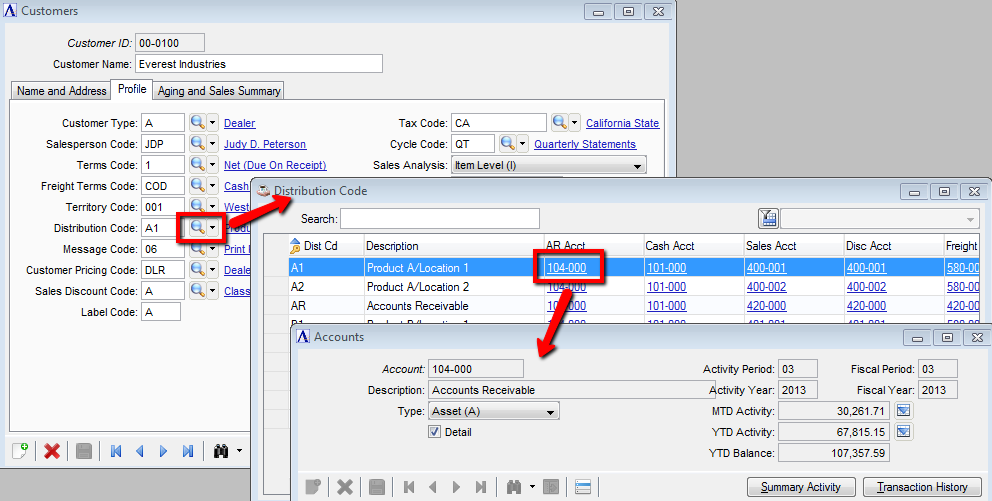
Launching field inquiry on Distribution Codes and hyperlinking to see information for one of the GL accounts
Sorting and Searching
All of the grid based query types (form, field, custom, drilldowns) have a number of tools to help users sort, search, and filter the data. Barista remembers query settings for each user, which means that different users can run the same query, but with their own settings, and also that they needn't re-establish their settings when they run the same query again.
Sorting
Inquiry grids support single or multi-column sorting, in ascending or descending order. Simply click in the desired column heading to toggle between ascending or descending order. The up and down indicators show you the sort direction. Press the <Shift> key while clicking to specify a multi-column sort. A key icon appears in columns that are indexed in the database. For large tables, sorting on these columns is faster than on non-indexed columns. Application developers can create additional indices if users find they are often sorting on a non-indexed column.
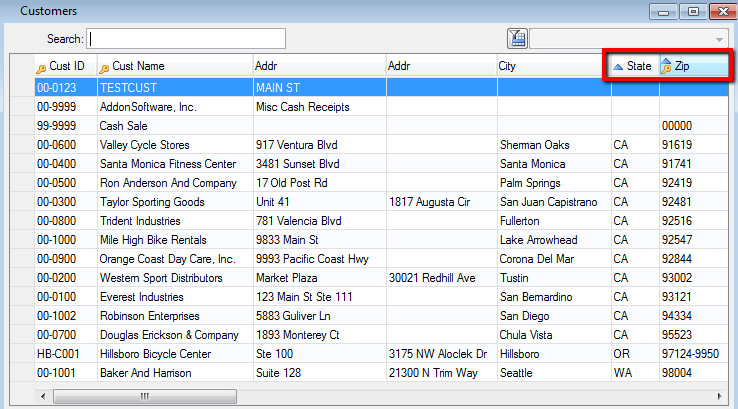
Customer inquiry zip/state sort with a click on State column heading then <Shift>+click on Zip
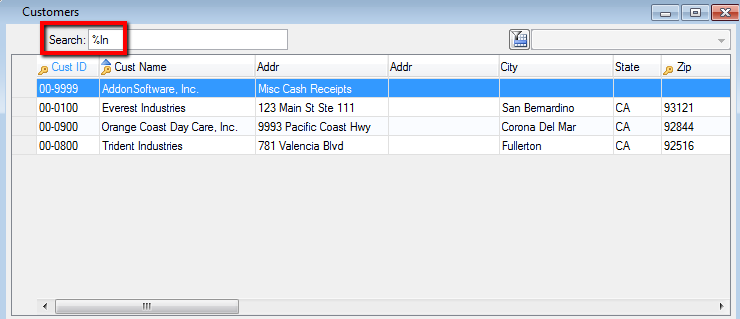
Searching
The Search field provides a convenient way to do simple filtering on the primary sort column. Be sure to select the desired sort order prior to entering data in the Search field. In the example pictured above, since State is the primary sort column, the Search field will be pre-conditioned to accept just two alpha characters. Use the percent symbol (%) when searching to do an approximate or "like" match.
Click in the Cust Name column to establish the sort order
NOTE: Using the % symbol allows matches to "Inc." as well as "Industries."
Custom queries can be configured to allow case-neutral searching on any column, whereas standard form/field queries and drilldowns depend on system configuration. Notice the difference when searching the Cust Name field when case-neutral searching is allowed.
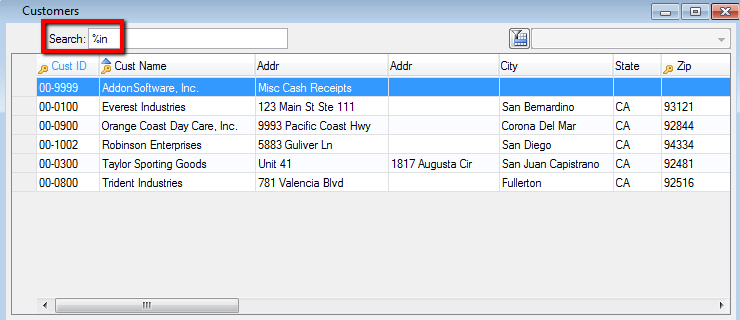
Searching for "in" with “case-neutral searching allowed” will find "in," "In," "IN," and even "iN"
Inquiry Columns
Standard queries, particularly form queries, often contain more information than users want to see. It's also not uncommon for different users to be interested in different columns; one user may want to see mailing addresses, and another a contact name and number. The inquiry system makes it easy to tailor which columns show, and in what order. Launch the Inquiry Columns form with a right-click in the query grid, by clicking the [Additional Options] tool button in the MDI toolbar, or pressing <Ctrl+O>. Hide or show columns by selecting or clearing the checkboxes, and move columns up or down using the buttons, or by dragging and dropping them to the desired position.
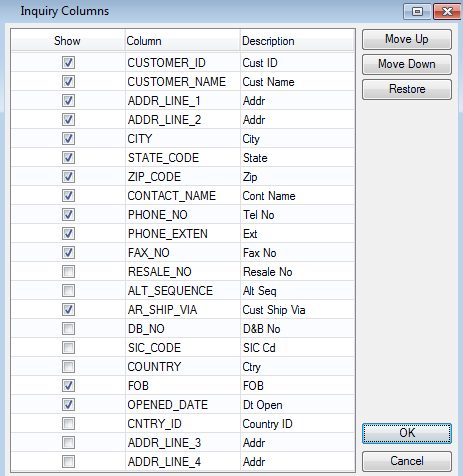
Inquiry Columns form shows address and contact fields grouped together and hides some unnecessary columns
Filtering
The inquiry filtering tool lets users construct more complicated filters across multiple columns and with their choice of AND/OR conjunctions, various operators, and parentheses for grouping. Any number of filters can be defined and saved, so a filter can be quickly recalled when running the query again later, rather than having to reconstruct it every time. Depending on security settings, users may be allowed to save a filter globally so other users have it available, and may even be allowed access to the WHERE clause for direct editing. Toggle the filter tool on or off by clicking the filter button at the top right of the query form.
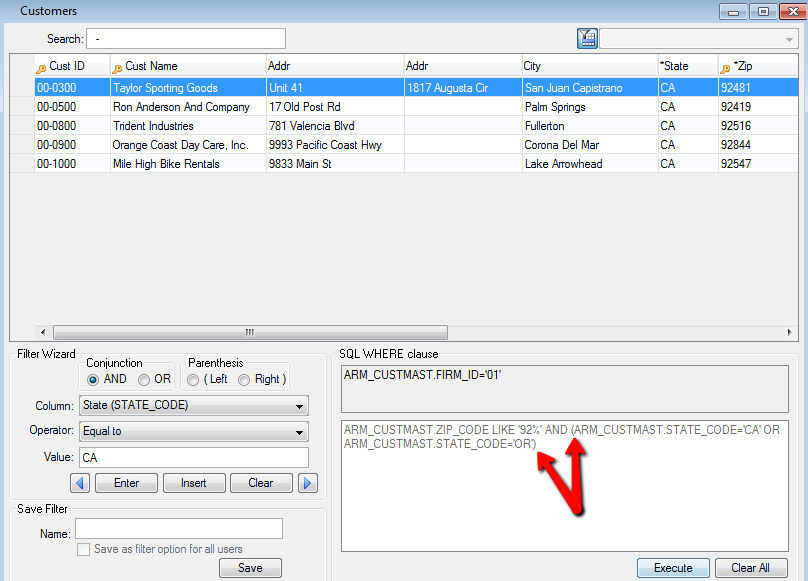
Create a filter by selecting the desired column, operator, and value, along with the desired conjunction. Click the [Enter] button to add each "chunk" of the resulting WHERE clause to the box at the right. When the clause contains all the the desired chunks, press the [Execute] button to run the query using the clause and see the results. Notice in the example below that the default order of query precedence doesn't group the states together, so the record containing the second state is included in the results, even though that record's zip code doesn't match the filtered value.
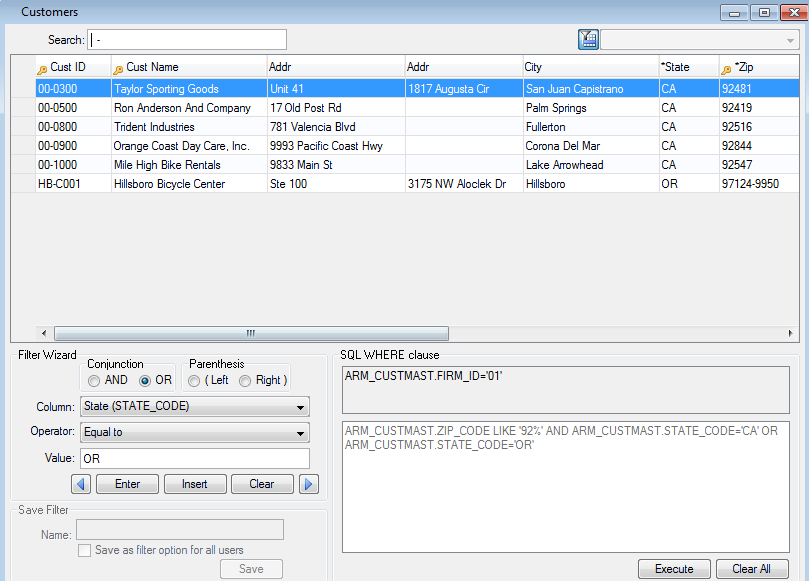
Filters any customer with a zip code that begins with "92" and a state code of "CA" or "OR"
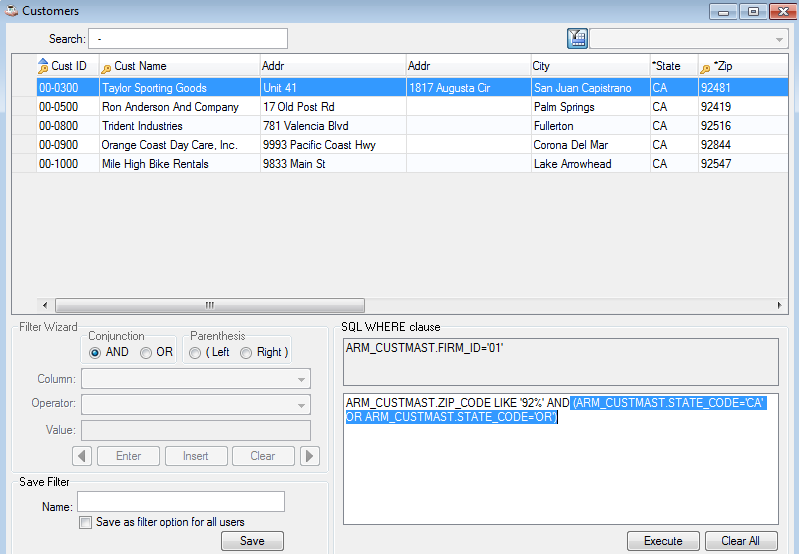
If the query results aren't as expected, it may simply be that some grouping is necessary. Use the left and right arrow buttons to move back and forward through the WHERE clause one chunk at a time. The wizard fields automatically populate with the column, operator, value, etc. of the chunk with the "focus." Then click the Left or Right radio buttons followed by the [Enter] button to add a parenthesis at the desired location.
Adds parentheses to group the state chunks for a different result
Additional chunks can be inserted in the clause, or an errant chunk can be deleted, by using the [<] and [>] arrow buttons in combination with the [Insert] and [Clear] buttons. When pressing the [<] and/or [>] buttons, the corresponding chunk is parsed and the Conjunction, Parenthesis, Column, Operator, and Value fields are populated accordingly. The insertion point is understood to be in front of the currently displayed chunk. When the desired chunk is displayed, press the [Clear] button to remove it from the clause, or the [Insert] button to create the new chunk in front of the one displayed. In the example below, the chunk referencing state 'CA' was cleared, and instead a chunk using state 'WA' was inserted.
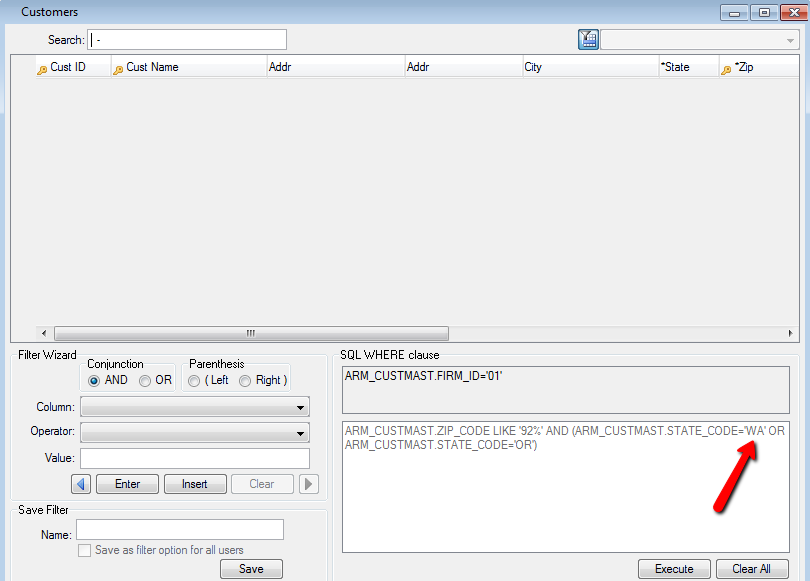
No results changing query from state 'CA' to state 'WA'
The preceding examples are based on a user without the security option to directly edit the WHERE clause. Note that the text in the edit box is visible, but not editable. Users who have been granted edit rights on the WHERE clause box can manipulate the text directly. Even so, the most efficient operation is probably a combination of using the wizard controls to initially construct the clause, and then make minor edits directly in the box if/as needed.
Security settings can be set so users can edit the where clause directly
Saving Filters
Once a filter is created and tested to verify that it produces the desired results, users can give the filter a name and save it for future use. If security settings allow the user to create global filters, the Save as filter for all users checkbox is enabled, and if checked, all users will see the new filter the next time they launch the inquiry. Each saved filter appears in the listbutton at the top right of the filter form. To activate a named filter, simply select it from the list. Select the blank list item to remove filtering. Saved filters can also be deleted by selecting the filter and then pressing the [Delete] button in the MDI toolbar, or <Ctrl+D>.
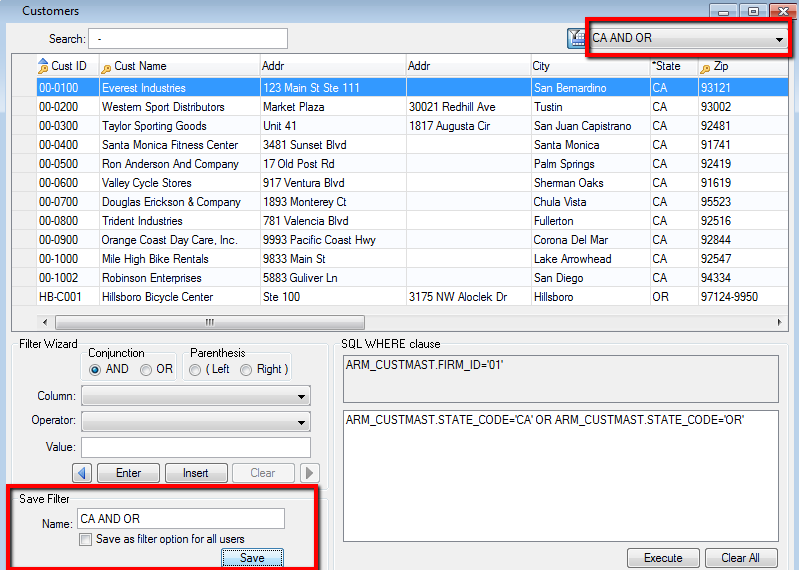
Saved filters appear in the list button at the top of the query form for quick access
Exporting
The obvious follow-up question, given all of these query tools is: "now, how do I get it out?" The answer is a set of export options that permit the user to save some or all of the query results in any several formats, send them to the Document Management system, and even email or fax them.
Right-click in the query grid, or use the [Additional Options] button/menu in the MDI toolbar to access the export options. The first thing to decide is the Data Selection Mode, which lets users control whether they want to export all query records, or only highlighted records .Like most of the other settings, the Data Selection Mode is saved, so doesn't need to be re-selected each time. All of the export options operate on the rows designated by the Data Selection Mode.
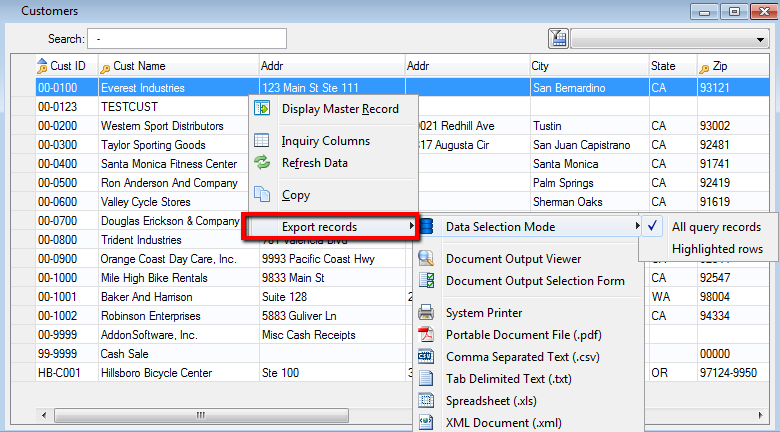
Context menu with export options; choose all or only highlighted records
Document Output Viewer
Exporting to the Document Output Viewer forwards the query rows to the Document Management system, where they are presented as an on-screen .pdf in the DocOut Viewer. From the viewer, users can exercise any of the traditional DocOut options as described in Document Management. If exporting more columns than can fit on a page, additional columns are placed on separate pages. As such, exporting to the viewer is best suited to queries with few columns.
Document Output Selection Form
Rather than bringing up the DocOut Viewer, users can bring up the Document Output Selection Form, where they can specify one or more output formats and modes. The output selection form is convenient because users can specify more than one output type and mode simultaneously. In addition, checking one or more of the + options results in a "quiet save," that is, the query rows are saved to disk without launching the associated application. When emailing or faxing, the user is prompted for info about the sender and recipient. That information along with the document name is added to the Document Processing Queue.
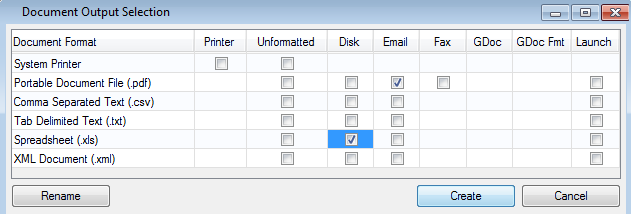
Use the Document Output Selection form to Email or Fax a query, or to do a "quiet" save in one or more formats
System Printer
The System printer option launches a standard printer dialog form showing printers installed on the client machine, and will send a .pdf version of the query rows to the selected printer.
Export and Launch
Select one of the other export options to save the query rows in the specified format and automatically launch the application associated with the file extension. This convenient "one click" export is equivalent to selecting a disk format and also checking the Launch box in the Document Output Selection form.
Copy/Paste
In addition to the Export Records option, users can select the Copy option from the context menu to copy query rows to the clipboard for manual pasting elsewhere. With this option users can decide whether or not to include Table column names, column headings, define how to delimit the columns, and how to identify text.
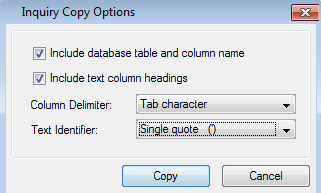
Inquiry Copy Options
______________________________________________________________________________________
Copyright BASIS International Ltd. BARISTA®, AddonSoftware®, BBj®, Visual PRO/5®, PRO/5®, and BBx® are registered trademarks.