Accounts Receivable - Payment Gateway Parameters
Function
The Payment Gateway Parameters task presents a form to fill in the required configuration values for each gateway used for credit card payments.
To access this task...
Select Payment Gateway Parameters from the Parameters menu.
Pre-configured Payment Gateway Parameters
AddonSoftware ships with pre-configured Payment Gateway Parameters for the following supported gateways. All of these gateways can be used with the J2Pay Internal API. Authorize.net and PayFlowPro are the supported Hosted pages.
-
Authorize.net
-
BillPro
-
EasyPay
-
NMI (Network Merchants, Inc.)
-
Payeezy
-
PayFlowPro
The Attributes are pre-defined and should not be changed. The Configuration Values that contain "<*_token>" must be replaced with valid login credentials and/or server name before using the gateway.
Note:
When done testing, and are ready to go live, be sure to change the "testMode" Attribute to "false".
The Configuration Values are stored encrypted on disk, and can only be viewed via this form (see Barista Administration > Maintenance > Configuration Records, and "GATEWAY_AUTH" for the Configuration ID field). Therefore, be sure to set security appropriately. You will need to supply login credentials for any supported gateway you choose to use via the J2Pay Internal API.
To use hosted pages, you will need additional configuration:
-
You must have a publicly accessible IP address
-
You must have a certificate for secure communications (port 443)
Authorize.net
-
Follow instructions at Authorize.net for creating a sandbox (https://developer.authorize.net/hello_world/) for testing.
-
Log into your account, select the Account link, then the Webhooks link to add/edit a webhook.
-
Supply a name of your choice.
-
Construct the Endpoint URL using https://<your_server_name from Payment Gateway Parameters>/<your context path from EM Web Context Configuration (this should be the same as your database name)>/<name of webhookServlet from Payment Gateway Parameters>.
-
Expand the Events tree and select "net.authorize.payment.authcapture.created" under the Payment Events node.
PayFlow Pro
-
Follow instructions to create a PayPal Manager/PayFlow account:
-
Log into your PayPal Manager account using PayFlow credentials.
-
In the Service Summary box, select the Hosted Checkout Pages link.
-
Select the Setup link.
-
Select the fields on the hosted page that you want to show and/or be required.
-
Set the Error, Silent Post, and Silent Post Error URLs using:
-
https://<your_server_name from Payment Gateway Parameters
-
<your context path from EM Web Context Configuration (this should be the same as your database name, but lowercase
-
<name of servlet> from Payment Gateway Parameters (or from Servlet URL Mapping in EM Web Context Configuration)
-
Set "Show confirmation page" to "On a PayPal hosted page."
-
Check the box marked "Void transaction when my server fails to receive data sent by the silent post."
-
Set the "Enable secure token" listbutton to "Yes."
-
Select the Customize link, and choose either layout A or B.
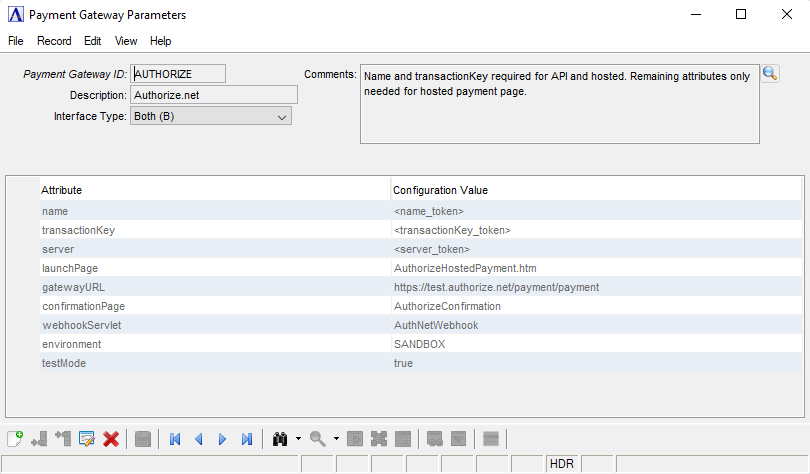
Payment Gateway Parameters
About the Fields
To enable edits to the form select ") .
.
In the Payment Gateway ID field...
-
Enter a valid payment ID.
-
Click the record navigation buttons;
") to view the first record,
to view the first record, ") to view the previous record,
to view the previous record, ") to view the next record, and
to view the next record, and ") to view the last record.
to view the last record. -
Click
") to select from a list of all payment gateway IDs. See Query Functions.
to select from a list of all payment gateway IDs. See Query Functions.
In the Description field...
-
Enter a description, if desired, for the Payment Gateway.
-
For more detailed information, use the Comments field.
From the Interface Type dropdown...
Select the interface type to use:
-
Internal API (A)
-
Hosted Web Page (H)
-
Both (B)
In the Comments field…
-
Enter any comments you want to associate with the Payment Gateway.
-
Edit directly in the form field, or select find
") to launch the comment editor.
to launch the comment editor.
Display additional options...
Selecting ") displays the following options:
displays the following options:
Create Web Context
If you’re testing a hosted page, once you set the payment gateway parameters, select Create Web Context. Go to Enterprise Manager > Web > Context Configuration to manage the created web context.
When finished making entries to the fields...
-
Select
") to save changes.
to save changes.
-
Select
") to clear the form and begin again.
to clear the form and begin again.
-
Select
") to delete the record.
to delete the record.