Accounts Payable - Invoice Entry
Function
This task is used to enter new vendor invoices and adjust previously entered invoices. With Purchase Order module installed, use this task only for invoices without a purchase order assignment such as rent, utilities, etc. To enter some invoice information, to use codes. For information about the use of accounts payable type codes, distribution codes, and payment group codes, refer to the Parameter Maintenance task.
To access this task...
Select Invoice Entry from Accounts Payable main menu.
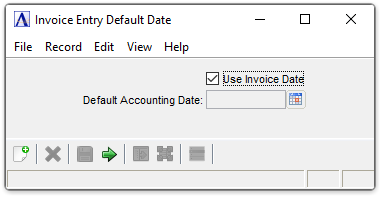
Invoice Entry Default Date
About the Fields
Use Invoice Date checkbox...
-
Leave this checked to use the invoice date as a default for the accounting date. The accounting date is the date the invoice will be posted to the General Ledger (if installed).
In the Default Account Date field...
Uncheck the Use Invoice Date to edit this field.
-
Enter the date for the transaction in mmddyyyy format. This date must fall in an open general ledger period.
-
Click
") to select a date by using the calendar tool.
to select a date by using the calendar tool.
After selecting the desired option...
-
Click
") to accept the selections and run the main form.
to accept the selections and run the main form. -
Click
") to clear the form and begin again.
to clear the form and begin again.
The invoice date defaults to the current date. The default for the due date and discount date is calculated based on terms code for an invoice and invoice date. If using Use Invoice Date above, when the invoice date is changed, the accounting date defaults to match. However, if setting a Default Accounting Date, then the accounting date does not change as the invoice date is changed.
When the General Ledger module is installed, the accounting date of an invoice is used as the transaction date for general ledger postings. Use the same accounting date for a group of invoices so that they are summarized together. It is possibly to override the default accounting date for each invoice and replace it with the date appearing on the invoice in order to generate General Ledger transactions with multiple dates.
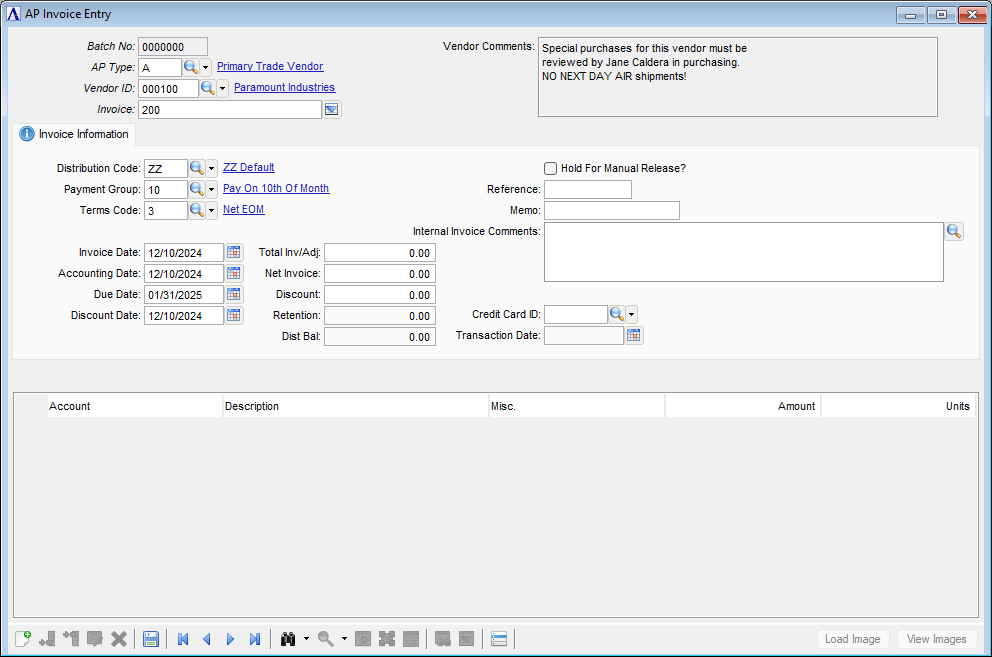
AP Invoice Entry
About the Fields
The Invoice Entry screen is divided into three sections. In the upper section (header) fields, enter the vendor number and name. In the middle section fields, enter information about the invoice terms, dates and invoice amount. In the lower section fields, enter the expense or purchase distribution detail to the general ledger.
In the AP Type field...
-
Enter an alphanumeric code to identify the AP type code.
-
Click
") to select an AP code from a list of existing AP types code records.
to select an AP code from a list of existing AP types code records.
In the Vendor ID field...
-
Enter a valid vendor ID number.
-
click
to select a vendor id from a list of existing id records. -
Click the record navigating buttons;
") to view the first record,
to view the first record, ") to view the previous record,
to view the previous record, ") to view the next record, and
to view the next record, and ") to view the last record.
to view the last record.
In the Invoice field...
-
Enter a valid invoice number.
-
Click
") to select
from a list of invoices for this vendor .
to select
from a list of invoices for this vendor .
In the Distribution Code field...
This field is active when the Multiple Distribution Types field in Parameter Maintenance is checked.
-
Enter a valid distribution code.
-
Click
to select a distribution code from a list of existing records.
In the Payment Group field...
The payment group provides a way to group invoices for payment selection and is used in the Payment Selection task.
-
Enter a valid payment group code.
-
Click
to select a payment group from a list of existing records.
In the Terms Code field...
-
Enter a valid terms code.
-
Click
to select a terms code from a list of existing records.
Hold for Manual Release? checkbox...
-
Mark the box to withhold the invoice from automatic payment selection.
-
Unmark the box to include the invoice for automatic payment selection.
In the Invoice Date field...
-
Enter the invoice date from the vendor's invoice.
-
Click
to select
a date using the calendar tool. -
Accept the default date.
The default due date and discount dates are calculated from the terms code assigned to the invoice; however, these dates can be individually overridden. Also, if you accepted the date at the first screen, the Accounting Date defaults to Invoice Date.
In the Accounting Date field...
-
Enter an accounting date in mmddyyyy format.
-
Click
to select a date using the calendar tool. -
Accept the default date.
This date is assigned for posting to the general ledger during the Invoice Register Update process.
NOTE:
When the Post to Closed Periods parameter is unchecked, you can override a date that falls in a closed general ledger period.
In the Due Date field...
The invoice due date is used by the Aging Report, the Cash Requirements Report, and the Payment Selection task.
-
Enter the due date in mmddyyyy format.
-
Click
to select a date using the calendar tool. -
Accept the default date based on the invoice date and the terms code.
In the Discount Date field...
-
Enter a date through which the invoice is eligible for a discount in mmddyyyy format.
-
Click
to select a date using the calendar tool. -
Accept the default date based on the invoice date and terms code.
In the Reference field...
A reference such as a shipping document number can be associated with the invoice and printed on the Invoice Register.
-
Enter an optional reference number or comment
In the Memo field...
-
Enter optional descriptive information
When the Print Memo On Check Stub parameter is checked, this memo is printed on the check stub next to the amount paid. In addition, the memo prints on the Invoice Register.
In the Internal Invoice Comments field...
These comments are internal only (don't appear on reports or customer-facing documents), and follow the order all the way through invoicing and into history. They can be changed/amended at any time (even AFTER the invoice goes to history).
-
enter or edit by typing directly into the form field, or click field, or click
(or ctrl + f) to launch the comment editor.
In the Credit Card ID field...
-
If the invoice was paid via credit card, enter the Credit Card ID of the credit card used. The invoice will be updated as paid, and a duplicate invoice created for the credit card vendor that will appear in Payment Selection Entry.
-
Click
to select a Credit Card ID from a list of existing Credit Card IDs.
In the Transaction Date field...
Disabled unless a Credit Card ID has been entered.
-
Enter the date in mmddyyyy format of the credit card transaction paying the invoice.
-
Click
to select a date using the calendar tool.
In the Total Inv/Adj field...
-
Enter the total invoice amount.
-
Accept the default total.
This amount must equal the sum that is distributed to the general ledger. Ensure that the total invoice amount accurately reflects the amount on the invoice, regardless of the receiving record. The Total Invoice Amount and Net Invoice Amount fields are not accessible for adjustments.
In the Net Invoice field...
-
Enter the amount of the invoice eligible for discount, if offered by the vendor.
-
Accept the default total.
This amount is used to calculate the available discount, based on the terms code.
In the Discount field...
-
Enter the amount of the invoice discount, if offered by the vendor.
-
Accept the default total.
In the Retention field...
This field appears only when the Retention Account parameter is checked.
-
Enter the retention amount that is to be withheld from the invoice payment during the payment selection process.
When retention is used, the amount of the retention is posted (credited) to the retention payable account defined in the distribution code that is associated with the invoice, and the standard accounts payable account is posted with the difference.
In the Dist Bal field...
Display only.
-
Displays the undistributed invoice balance.
Invoice Distribution
For each invoice, specify the invoice distribution in the detail section. When the General Ledger module is installed, these distributions consist of debit postings for the invoice and specifying the account(s) for purchase expense, freight, tax, work in process, or inventory purchases. The credit posting to the accounts payable account (assuming the Cash Basis parameter is unchecked) is supplied by the accounts payable distribution code associated with the invoice. This code is either the standard default distribution code of “ ”(when the Multiple Distributions parameter is unchecked) or assigned individually to each invoice (when the Multiple Distributions parameter is checked).
For each detail distribution line, a two-digit line sequence number, general ledger account (when General Ledger is installed), and distribution amount is entered, providing for 99 distributions for each invoice. If the Miscellaneous Entry parameter is checked, a miscellaneous field is also available for a 10-character comment.
There can be one or more distribution lines for each invoice, depending on how the distribution of the invoice amount is made. Enter distributions until the total of the amounts on the distribution lines equals the total invoice amount. The remaining amount of the invoice to be distributed (distribution balance) is shown on the screen as each line is entered.
In the Account field...
This field is active when the GL module is installed.
-
Enter a valid GL account number for the debit distribution.
-
Click
to select a GL account code from a list of existing records. -
Accept the default account assigned to this vendor.
In the Description field...
Display only - displays the GL account name associated with the GL account number entered.
In the Misc. field...
This field is active when the Miscellaneous Entry parameter is checked.
-
Enter additional information about the account.
In the Amount field...
-
Enter the amount of the distribution.
Normally only the debit side of the entry is entered, and the credit side is supplied automatically during the Invoice Register Update from the distribution code associated with the invoice. A positive amount results in a debit posting to the account during the Invoice Register Update process. A negative amount results in a credit posting.
In the Units field...
This field is accessible only when the General Ledger module is installed and the Use Units parameter in General Ledger is checked.
-
Enter the number of units associated with the distribution line.
Units are used to track and report non dollar quantities in the General Ledger module. The units need not balance against a control number in the invoice header.
The Load Image and View Images buttons...
-
Load Image lets you specify one or more images you've scanned to associate with an invoice, and the View Images lets you see what's been linked to the invoice
When finished entering information:
-
Click
") to save the record.
to save the record. -
Click
") to delete
the selected distribution line.
to delete
the selected distribution line. -
Click
to clear
the form and begin again.
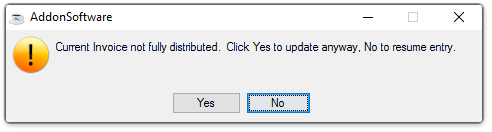
Current Invoice not fully distributed.
-
Click Yes to update anyway.
-
Click No to resume entry.