![]()
">
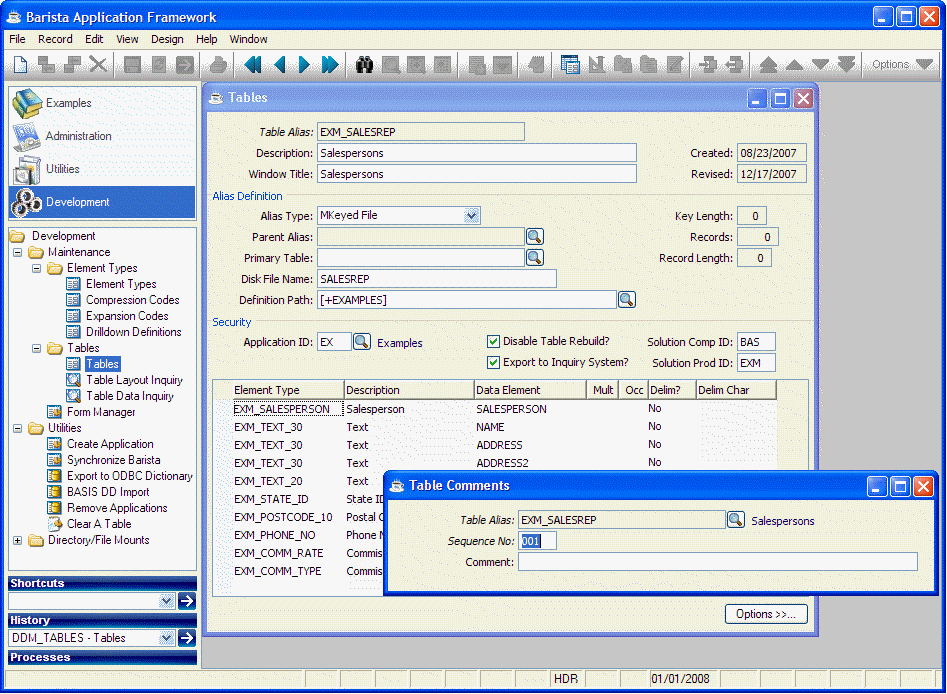
Tables
The Table Maintenance program is used to define aliases for data files as well as records that don't map to data files.
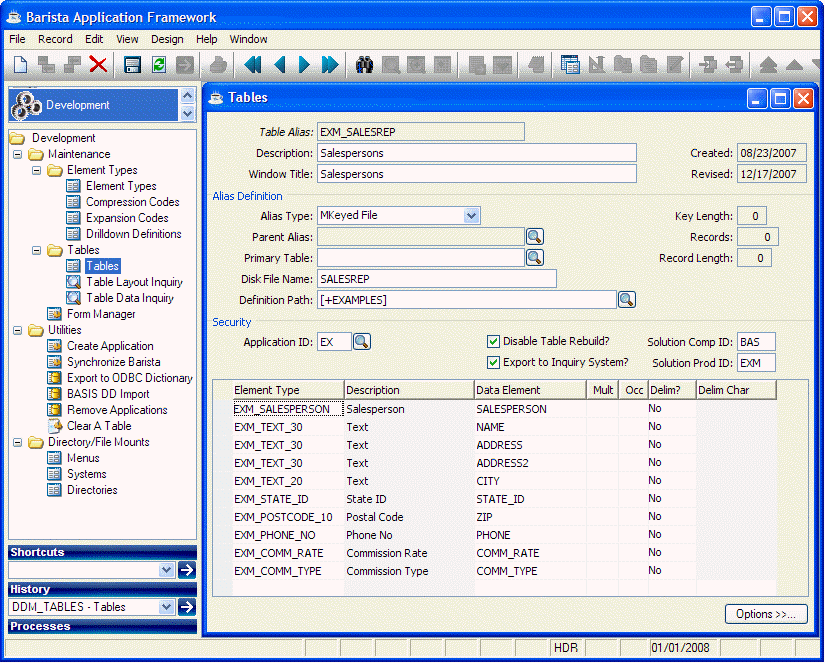
Header
|
Table Alias |
The Table Alias must follow standard identifier naming rules:
To see a list of existing Tables, select ViewèRecord Query from the menu, press Ctrl+Q, or press the |
|
Description |
Enter a short description describing the purpose of this table. |
|
Window Title |
Enter the title to be used on forms generated for this table. |
|
Created |
Displays the date on which this table was first created. |
|
Revised |
Displays the date on which this table was last changed. |
Alias Definition
|
Alias Type |
Alias type is selected from the following list: Mkeyed File
Xkeyed File
Vkeyed File
Single Mkeyed File
Serial File
Direct File
Indexed File
Sort File
String File
Child Alias Indicates that this alias is an alternate view of an existing (parent) alias. If the Child Alias type is selected, "Parent Alias" must be filled in.
Options Entry Indicates that this alias defines data to be entered using an Options Entry Form or an Options Entry Grid; it doesn't write data permanently to a data file.
Reference Indicates this alias is a reference only, or "documentation" record not associated with any disk table.
|
|
Parent Alias |
If defining a "Child Alias" (an alternate view), the "Parent Alias" is the controlling alias that defines the file. |
|
Primary Table |
Not currently used. |
|
Disk File Name |
The base filename. |
|
Table Path |
The path to the file. |
|
Key Length |
Valid key sizes are: Single Mkeyed File 1..120
Direct File 1..64
Sort File 1..64
|
|
Records |
A non-zero number of records must be specified for Direct and Sort Files. |
|
Record Length |
A record length in the range 1..32767 must be specified for Direct, Indexed, and Single Mkeyed files. |
Security
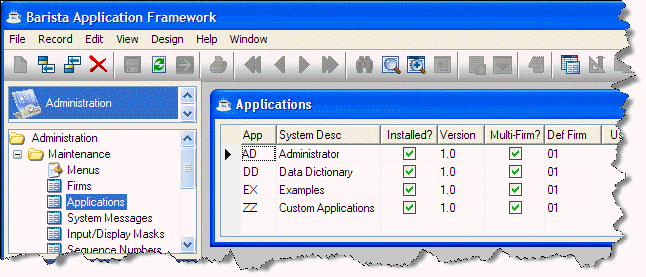
|
System ID |
Enter a two-character Application ID code from this list:
|
|
Restrict Table Rebuild |
Disallows table rebuild. |
|
Export to Inquiry System |
The inquiry system allows ad hoc SQL queries. To disable ad hoc queries for this table, deselect "Export to Inquiry System". |
|
Solution Comp ID |
This alphanumeric code identifies the company that is defining this table. |
|
Solution Prod ID |
This alphanumeric code identifies the primary product that will use this table. For example, an inventory master file is typically used by multiple applications, but its Solution Product ID would typically be the Inventory Control application. |
Element Detail
|
Element Type |
Enter an existing Element Type ID. |
|
Description |
The description is displayed from the Element Type. |
|
Data Element |
Defaults to the same as the Element Type. The Data Element is the actual variable name used in the record and template for table access. This value must be unique within the Element Detail records for a specific table. |
|
Mult |
Mult specifies the multiplier for the length of the Element Type within a field. For example, if an Element Type/Data Element ("RESERVE_TEXT") with a length of 5 bytes is entered, along with a Mult value of 4, the actual field length in the table will be 20 bytes (5 bytes * 4). |
|
Occ |
Occ specifies the number of occurrences for a specfic Element Type/Data Element within a table. For example, if an Element Type/Data Element ("SALES_AMT") with a length of 10 bytes is entered, along with a Occ value of 12, the table will actually contain 12 fields ("SALES_AMT_01"- "SALES_AMT_12"), each with an length of 10 bytes. |
|
Delim? |
Indicates whether this field is fixed-length or delimited. |
|
Delim Char |
If this is a delimited field, select the delimiter character from the list. |
Table Options
To access Table Options, right-click in the form header, select RecordèOptions from the menu, press Ctrl+O, or press the ![]() tool button.
tool button.
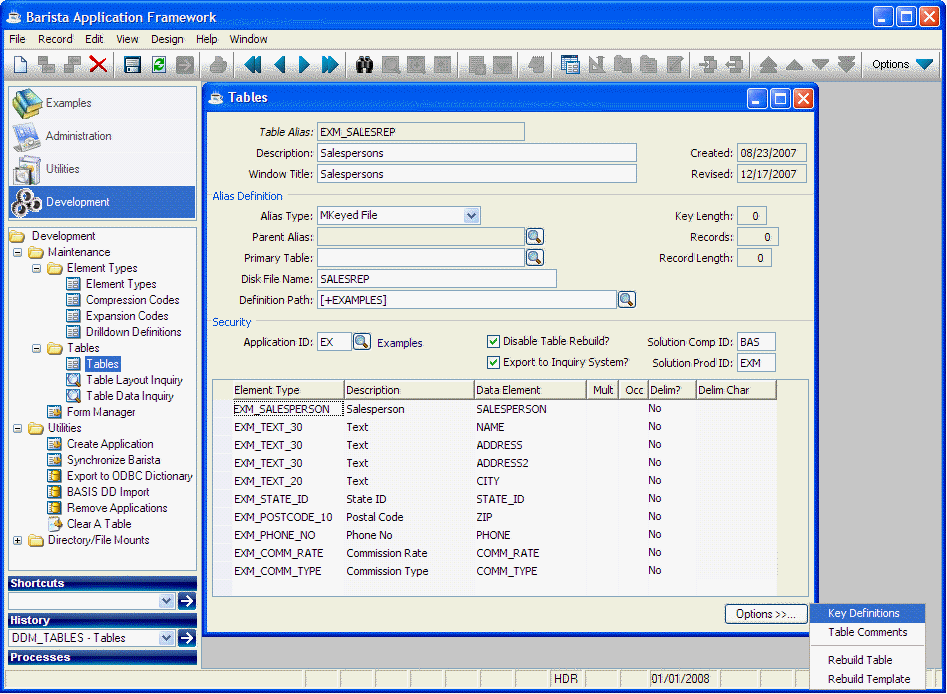
Key Definitions
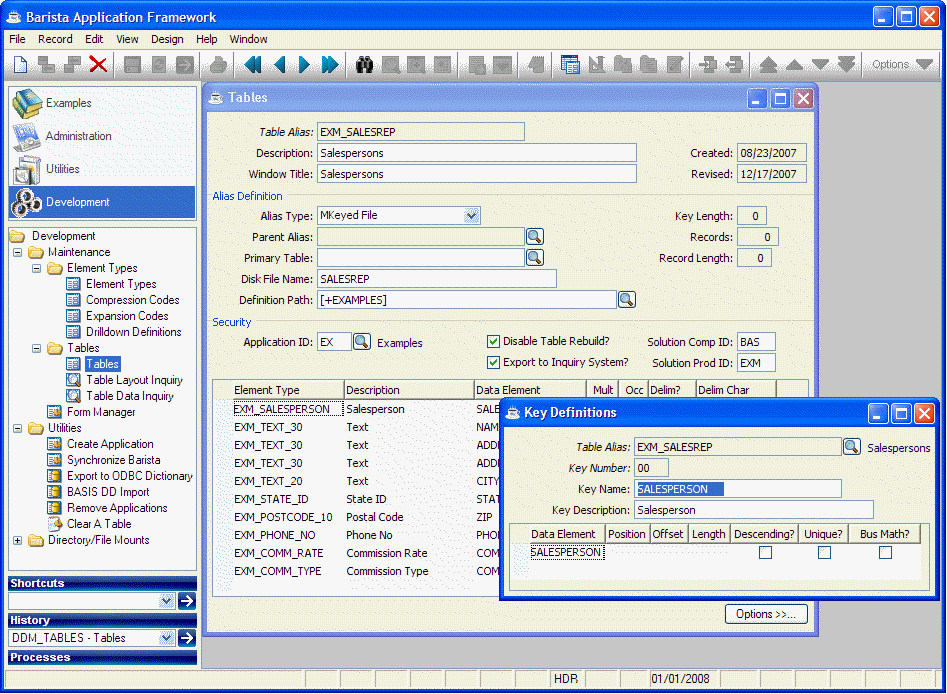
Table Comments
Free-format notes relating to this table.
Rebuild Table
Used to rebuild the table and data file after making changes to the Table Definition.
Rebuild Template
The table template is rebuilt, and the definition is exported to the Inquiry System, if specified in the Security section of Table Maintenance.
Form Manager
The Form Manager is the entry point to the Form Designer. To run the Form Manager, select DesignèForm Manager from the menu bar, press F8, select Form Manager from the Development application menu, or press the ![]() tool button.
tool button.
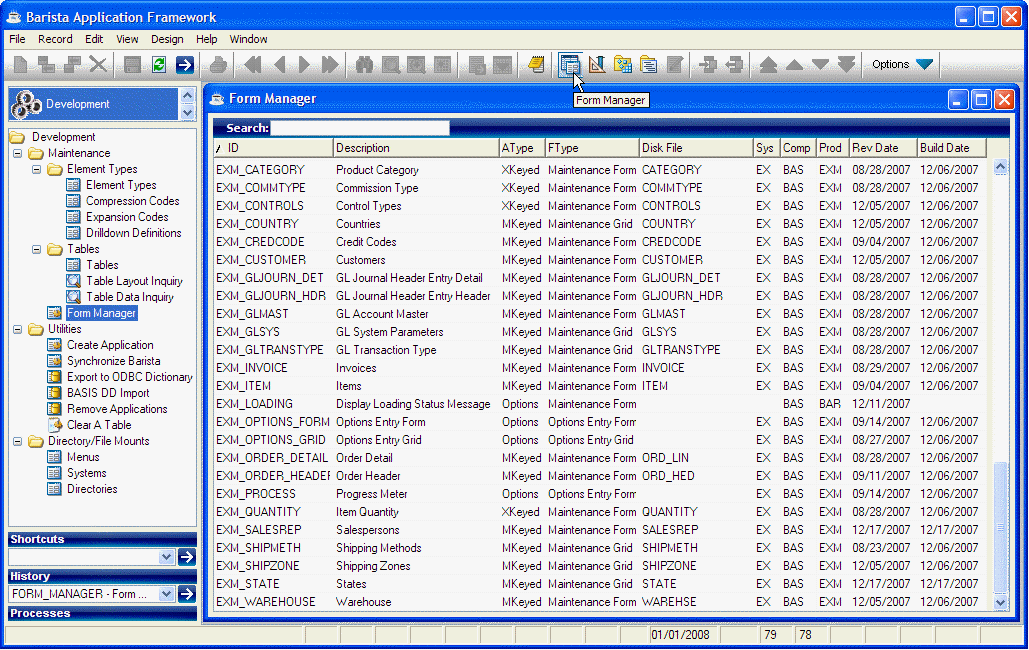
The Form Manager presents a list of Table aliases with the following information:
|
ID |
Table/Alias ID |
|
Description |
Table Description |
|
Atype |
Alias type |
|
Ftype |
Form type |
|
Disk File |
Disk file name |
|
Sys |
System code |
|
Comp |
Company code |
|
Prod |
Product code |
|
Rev Date |
The last time the table or form information was revised |
|
Build Date |
The last time the form was rebuilt |
Build Defaults
To set default values for some form options, select DesignèSet Build Defaults from the menu bar.
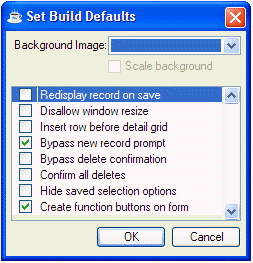
Options selected here act as overrides; they supercede options selected in the Form Designer.
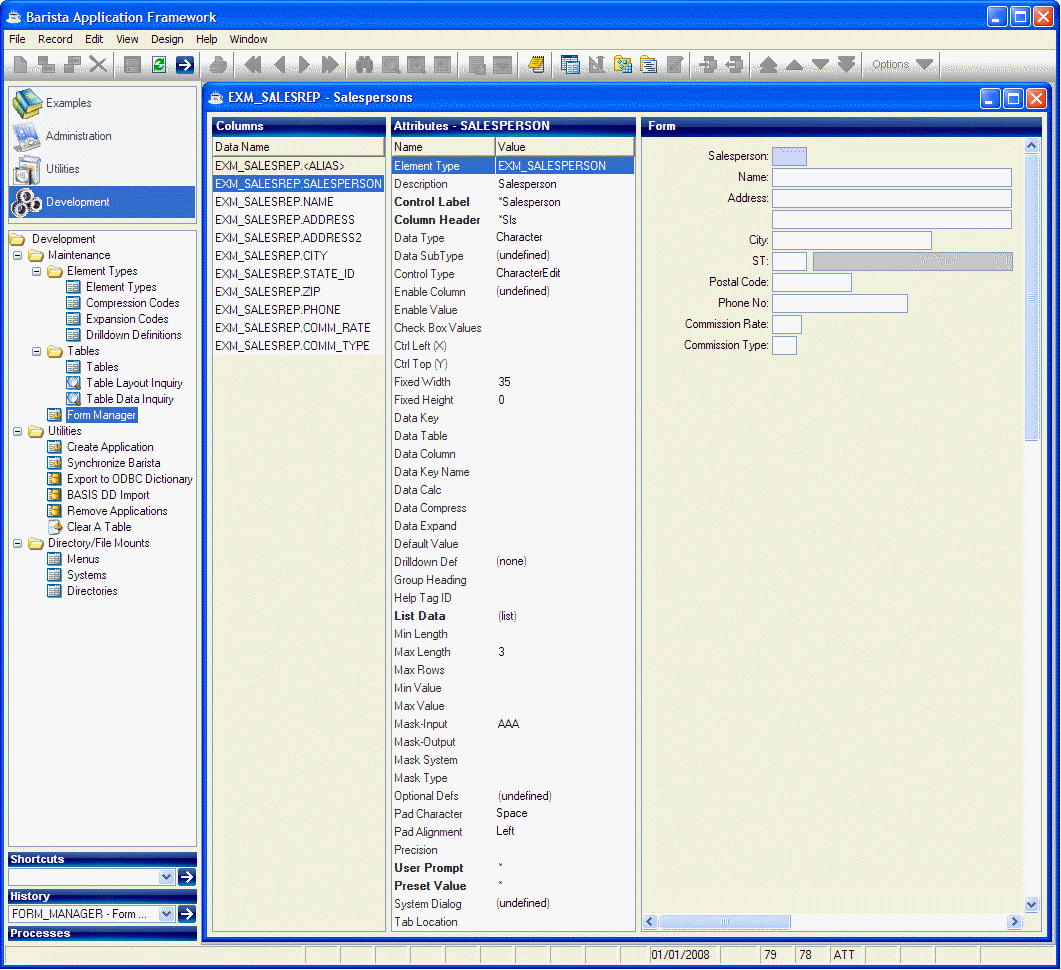
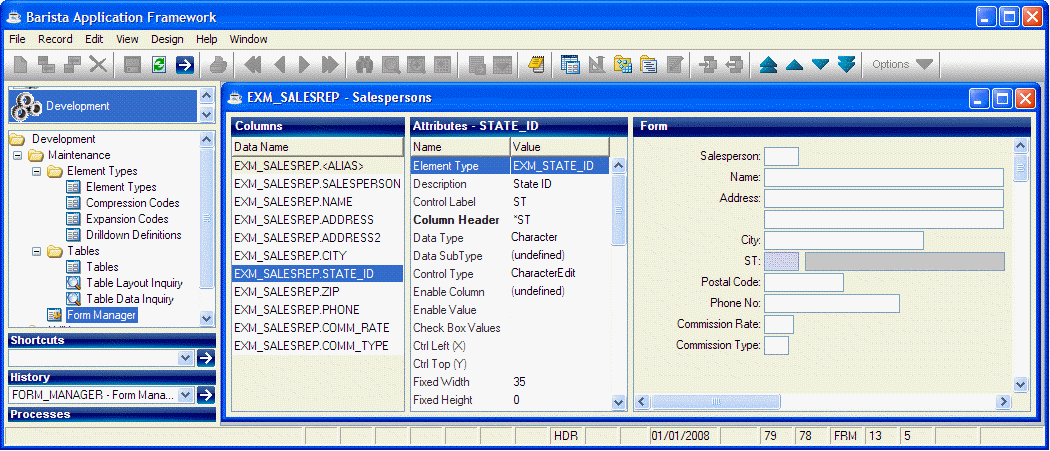
Form Designer
The Form Designer is the central workbench for creating and editing forms. To run the Form Designer, press ENTER or double-click on an alias in the Form Manager list, select DesignèForm Designer from the menu bar, or press the ![]() tool button.
tool button.
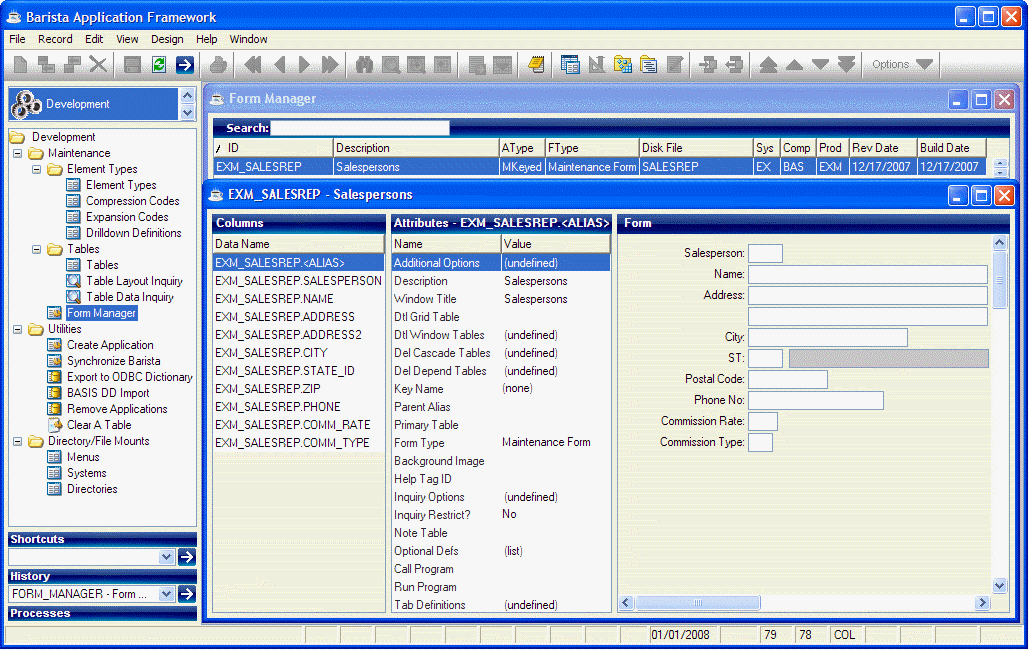
The Form Designer is organized around three panels:
-
Columns shows the individual components that make up the form, including the table alias, the data elements within that table, and optional derived components, described below.
-
Attributes shows the attributes of the currently selected column.
-
Form shows a preview of the form; this is also the form editor.
Columns
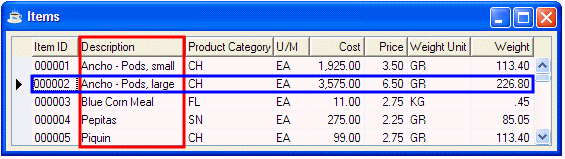
A database table is a set of data elements organized into horizontal rows (records) and vertical columns (fields). In the following sample table, Description is a column and the record for Item 000002 is a row:
 Within the Barista Form Designer, the Columns panel lists the individual table columns. It also includes a reference to the table itself and (optionally) derived elements, described below. A column can be dragged and dropped within the list to move it on the form. Select an item on the Columns panel to view or edit that item's attributes.
Form Attributes
To view or edit overall form attributes, select the ALIASNAME.<<ALIAS>> item at the top of the Columns panel. The following form attributes are available:
|
Add Options |
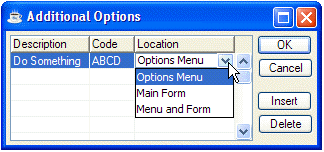
Click here to define program options to be accessed using the Options menu, or to be associated with buttons added to the bottom of the form:
Description The option description will appear on the options menu and/or the button label.
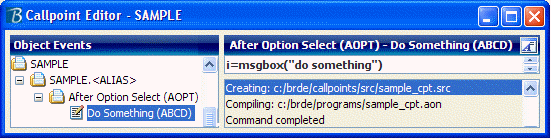
Code A unique callpoint code to identify this option. When the user selects this option, Barista runs the code defined for the "After Option Select" callpoint for this code. For example:
Callpoint code is edited in the Callpoint Editor, described below.
Location Select one of:
|
|
Description |
Enter a description for this form. The description will appear in the Form Manager list. |
|
Window Title |
The Window Title defaults to the same as the Description. |
|
Dtl Grid Table |
If this is a header/detail form, select the table to use in populating a detail grid. |
|
Dtl Window Tables |
Optionally select one or more associated tables. These will be added to the Options tool button. |
|
Del Cascade Tables |
Optionally select one or more associated tables. If any delete cascade tables are specified here, deleting a record from this table will also delete all related records (records with keys that start with the key to this table) from the delete cascade tables. |
|
Del Depend Tables |
Optionally select one or more associated tables. If any delete dependency tables are specified here, any attempt to delete a record from this table will be disallowed if any of the delete dependency tables contain related records (records with keys that start with the key to this table). |
|
Data Key Name |
To view data in other than primary key sequence, select an alternate key here. |
|
Parent Alias |
Imported from the Table. |
|
Primary Table |
Imported from the Table. |
|
Form Type |
The Form Type describes the form's basic structure and behavior. Barista implements four form types.
Maintenance Form. A formatted screen for maintaining a table; it displays a record at a time. The Barista default form presents the data elements in a single column, with labels down the left side. This basic design can be customized using the form editor and enhanced by adding labels, tabs, group boxes, and buttons.
Maintenance Grid. This is also used for maintaining a table, displaying the data in a grid.
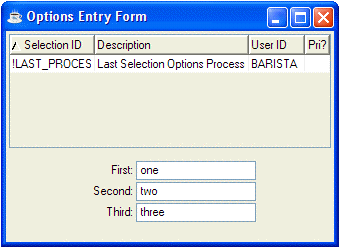
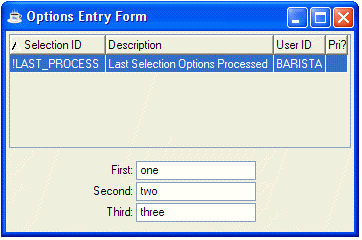
Options Entry Form. An options entry form is used for entering a single page of information and passing it on to a program for processing. The overlay program is typically a report or batch update.
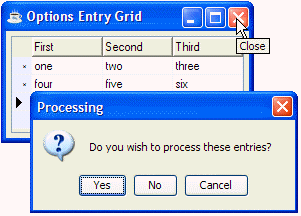
Options Entry Grid. This is used for entering multiple rows of information in a grid, then passing that information over to a report or update program for processing.
|
|
Background Image |
Select an optional background image for the form; for example:
Barista comes with a standard set of images; to install additional background images, copy them to Barista\sys\images\im_back_*.*. |
|
Help Tag ID |
Not yet implemented. |
|
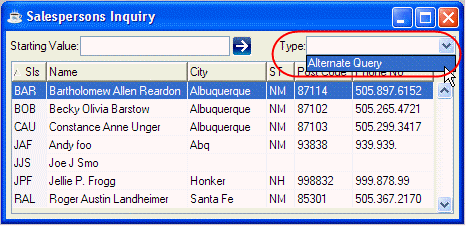
Inquiry Options |
In a Form Maintenance program, Record Query presents a list of records in the table. Alternate query options can be added here. Description A short description of the alternate query option. This will appear in the "Type" dropdown list on the Inquiry form, as shown in the sample below.
Alias The alternate query table.
Column The alternate query column.
|
|
Inquiry Restrict? |
By default, grid-based forms allow the user to sort on any column by clicking in the column header. When this option is selected, grid sorting is restricted to key fields to ensure optimal performance. |
|
Note Table |
Barista provides the option to store notes for any specific record entered for any defined table. To configure this option, the developer must create a table definition with the following key format:
DD_TABLE_ALIAS Specifies the table id for the record being created. NOTE_KEY The maximum length of a record key to be stored in the note table. This allows note records for multiple tables to be store in the same Note Table.
Example: We want to create a single Note Table to store user notes for the following tables: EXM_SALESPERSON Key length = 3
The Note Table would be defined as: DD_TABLE_ALIAS (16*) NOTE_TEXT (512*) |
|
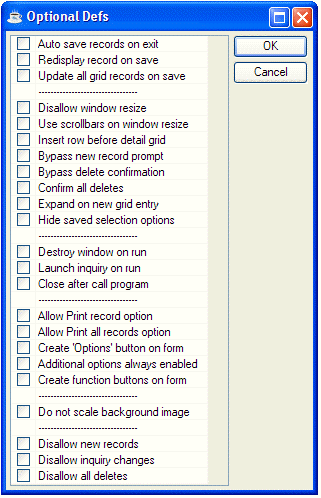
Optional Defs |
Click here to customize the form. The available options are:
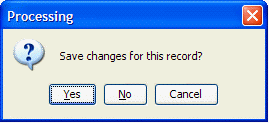
Several of these options can be set automatically using DesignèSet Build Defaults. Auto save records on exit If the user attempts to exit from a program with unsaved changes, the system normally asks if the changes should be saved:
If "Auto save records on exit" is selected, the user doesn't see a confirmation dialog; unsaved changes are automatically saved.
Redisplay record on save After the user saves a modified record, the system normally clears the Maintenance Form and moves input focus to the first field on the form. If "Redisplay record on save" is selected, the form is not cleared, and input focus is unchanged.
Update all grid records on save By default, Barista updates changed rows to the database immediately, as the user moves away from the row. If this option is selected, Barista will hold all changes in memory until the user exits, then it will ask the user if all changes should be updated or discarded.
Disallow window resize Forms are user-resizable by default. If "Disallow window resize" is selected, forms are not user-resizable.
Use scrollbars on window resize By default, scrollbars are never shown when windows are resized. Select this option to show window scrollbars.
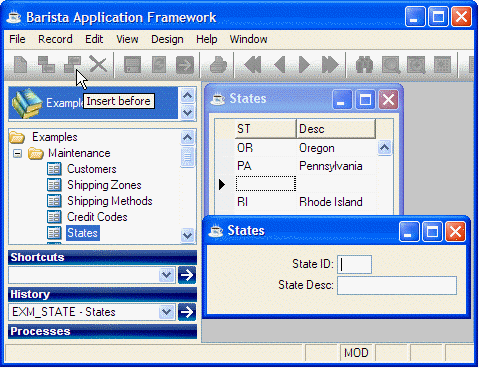
Insert row before detail grid If this is a header/detail form, "Insert row before detail grid" inserts ROW_HEIGHT pixels (default 21) between the header area and the detail grid.
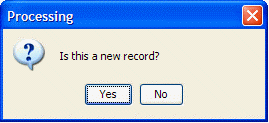
Bypass new record prompt By default, the system confirms the addition of new records with:
If "Bypass new record prompt" is selected, this confirmation message is omitted.
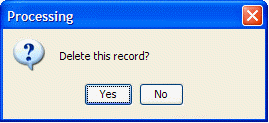
Bypass delete confirmation By default, the system confirms record deletions with:
If "Bypass delete confirmation" is selected, this confirmation message is omitted.
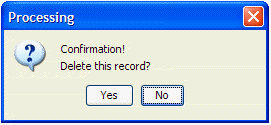
Confirm all deletes In rare cases, when a deletion will have significant consequences, it might be advisable to reconfirm it before proceeding, with a message like the following:
Expand on new grid entry By default, when inserting a row into a Maintenance Grid using the
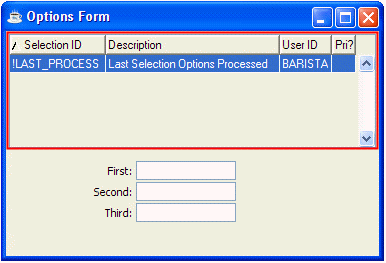
Hide saved selection options By default, Options Entry Forms include a list of saved and recent options, so that users can recall previously used options. If "Hide saved selection options" is selected, this list is omitted:
Destroy window on run By default, the Options Entry Form remains visible after control is passed from the Options Entry Form to the overlay program. If "Destroy window on run" is selected, the Options Entry Form is destroyed when the overlay program is started.
Close after call program By default, the Options Entry Form retains control once the called program is completed. If "Close after call program" is selected, the Options Entry Form will process a normal exit.
Allow Print record option Selecting "Allow Print record option" enables the FileèPrint Current Record menu item and the
Allow Print all records option Selecting "Allow Print all records option" enables the FileèPrint All Records menu item.
Create Options button on form By default, any options defined under "Add Options" can be accessed from the toolbar using the
Additional options always enabled By default, the
Create function buttons on form As the user navigates through a form, either the
Do not scale background image If a background image is selected, by default it is resized when the window is resized. If "Do not scale background image" is specified, the image size is fixed.
Disallow new records By default, if the user enters a key that is not on file, the system assumes that the user is creating a new record. If "Disallow new records" is specified, new records cannot be created; the system generates the following dialog:
Disallow inquiry changes By default, views in the Inquiry System can be modified by a user. This option specfies the table has a preset view that cannot be modified.
Disallow all deletes This option disables the RecordèDelete menu item and the
|
|
Call Program |
Options Entry forms prompt the user to enter some parameters, then press F5 or the
When the user presses F5 or the
rem ' Overlay for Options Entry samples
rem ' If CALLed, share the workspace if tcb(13) then enter
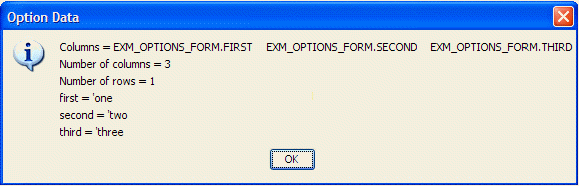
msg$="Columns = "+option!.getOptionColumns()+$0a$ msg$=msg$+"Number of columns = "+str(option!.getNumColumns())+$0a$ msg$=msg$+"Number of rows = "+str(option!.getNumRows())+$0a$ msg$=msg$+"first = '"+option!.getOptionData("first")+"'"+$0a$ msg$=msg$+"second = '"+option!.getOptionData("second")+"'"+$0a$ msg$=msg$+"third = '"+option!.getOptionData("third")+"'"
i=msgbox(msg$,64,"Option Data")
release
This overlay program produces the following dialog:
|
|
Run Program |
|
|
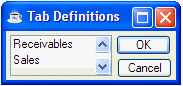
Tab Definitions |
If any tabs have been defined on this form, this brings up an editable list of tab labels, for example:
|


Column Attributes
To view or edit data element column attributes, select an ALIAS.COLUMN item in the Columns panel.
|
Element Type |
Displays the Element Type for this Data Element. To view the Element Type details, right-click on the data element in the form editor and select "Maintain Element Type". |
|
Description |
Displayed from the Element Type record. |
|
Window Label |
This is the label that will be used on a generated "Maintenance Form" or "Options Entry Form". |
|
Column Header |
This is the column header that will be used on a generated "Maintenance Grid" or "Options Entry Grid". |
|
Data Type |
Displayed from the Element Type record. |
|
Data Subtype |
|
|
Control Type |
|
|
Enable Column |
To selectively enable this control based on the value of another column, set "Enable Column" to the column to be checked, and set "Enable Value" to the required value. |
|
Enable Value |
|
|
Check Box Values |
Displayed from the Element Type record. |
|
Ctrl Left (X) |
For Maintenance Forms and Option Entry Forms, these values can be adjusted to fine-tune the placement of a control on the form. The X, Width, and Height attributes are measured in pixels, while the Y attribute is based on logical rows, with the default row height being 21 pixels.
The X and Y values can be specified as relative values (+n or -n). This format is interpreted as n columns (X) or rows (Y) relative to the previous data element. |
|
Ctrl Top (Y) |
|
|
Fixed Width |
|
|
Fixed Height |
|
|
Data Key |
Displayed from the Element Type record. |
|
Data Table |
|
|
Data Column |
|
|
Data Key Name |
|
|
Data Calc |
|
|
Data Compress |
|
|
Data Expand |
|
|
Default Value |
If a value is entered here, it will be used as the default (editable) value for this column. (See also Preset Value.) |
|
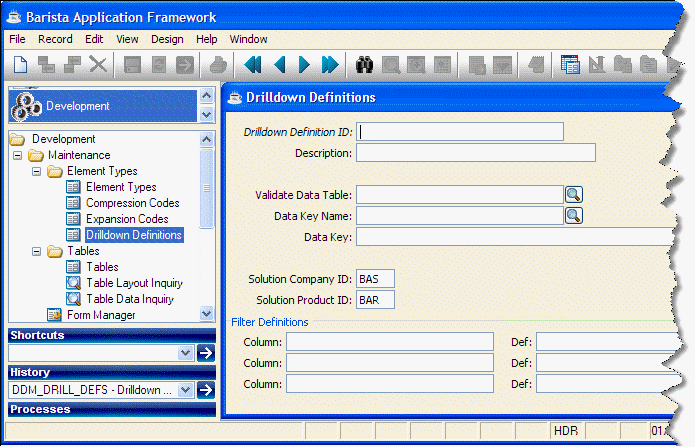
Drilldown Def |
To define a drilldown option for this column, select a drilldown code from the list.
|
|
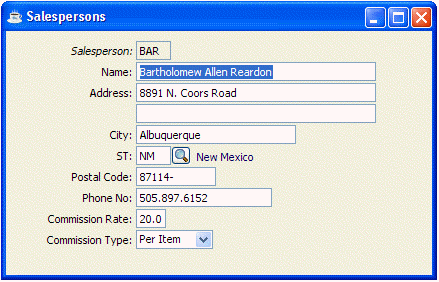
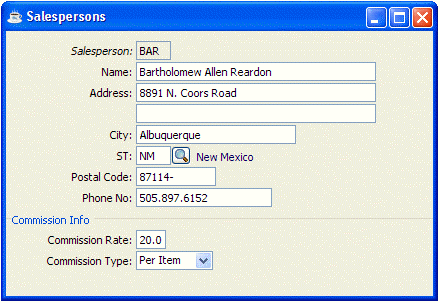
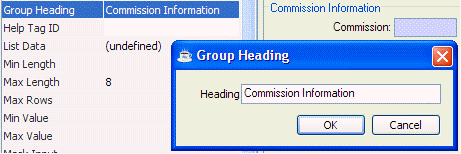
Group Heading |
To insert a section heading, enter a title here. For example, entering a Group Heading of "Commission Info" for the "Commission Rate" column would generate this form layout:
|
|
Help Tag ID |
Not yet implemented. |
|
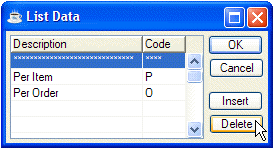
List Data |
For list-oriented controls, enter the list values here. Description This is the value that the user will see on the screen.
Code This is the value that will be stored on disk.
When defining a custom list, the place-holder entry must be deleted:
|
|
Min Length |
To enforce a minimum and/or maximum length for this column, enter the length value(s) here. |
|
Max Length |
|
|
Max Rows |
Displayed from the Element Type record. |
|
Min Value |
To enforce a minimum and/or maximum value for this column, enter the value(s) here. |
|
Max Value |
|
|
Mask-Input |
Displayed from the Element Type record. |
|
Mask-Output |
|
|
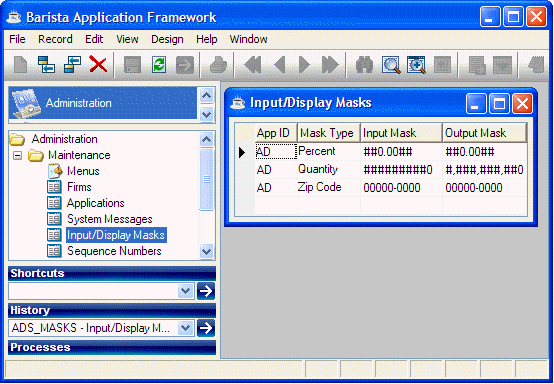
Mask System |
To select a standard mask, enter a System ID and Mask Type code. This resolves to a mask defined in Input/Display Masks:
For masking rules, refer to Numeric Masking. |
|
Mask Type |
|
|
Optional Defs |
Click here to customize the behavior of this column. The available options are: Hide data in maintenance form Omits this column from Maintenance Form and Options Entry Form programs.
Hide data in maintenance grid Omits this column from Maintenance Grids and Options Entry Grid programs.
Hide data in inquiry system Omits this column from inquiry display.
Hide data in all forms Omits this column from all forms.
Hide data in Print All option Omits this column from the Print All output.
Hide data in Print Record option Omits this column from the Print Record output.
Hide corresponding control label Don't show the label for this column on generated Maintenance Form and Options Entry Form programs.
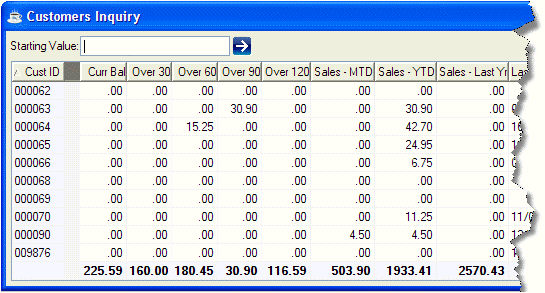
Create total for inquiry column Adds a totals line to the bottom of the Inquiry screen showing the total for all data elements that have this option selected. For example, this can be used to show totals for the various sales figures and accounts receivable balances in the customer table:
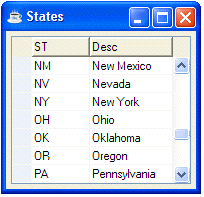
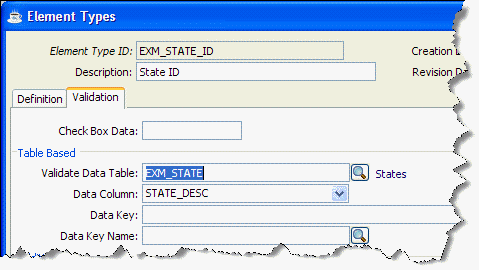
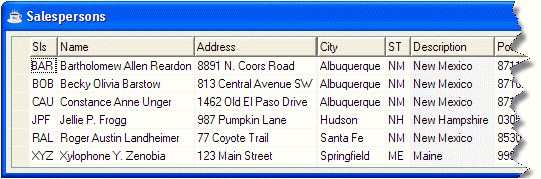
Display description in grid When generating a Maintenance Grid program, this option causes the grid to display the description that corresponds to this code value. This feature assumes that table based validation rules are defined for the element type, for example:
If this option is set for the state code column in the salespersons table, and the table is defined to generate a Maintenance Grid, the resulting form looks like this:
Save contents on conditional disable If this column is conditionally enabled (see Enable Column and Enable Value above), the default behavior is for the contents to be reset to the default value when the column is disabled. If this option is selected, the contents are retained when the column is disabled.
Period/year entry control Used in Addon legacy code to specify if the Data Element should use the Addon period/year parameter settings.
From/to entry control set Used when defining from/to entries in an Options Entry Form. To use this option, a single Data Element is defined in Table Maintenance with two occurrences (Occ):
The "From/to entry control set" option tells Barista to create two controls labeled "Beginning Value" and "Ending Value":
These controls implement validation rules to ensure that the Ending value is greater than or equal to the Beginning value. In this example, the Data Element is named "RANGE". The overlay program retrieves the values using Option!.getOptionData("RANGE_1") and Option!.getOptionData("RANGE_2").
The "Beginning" and "Ending" labels are taken from the barista.ini file; they can be localized or adjusted based on personal preference: FROM_TO_LABEL_BEG=Beginning FROM_TO_LABEL_END=Ending
Null entry='First' or 'Last' This option is used with a From/To entry control set based on a range of values taken from a file. When this option is selected, Barista displays descriptions of "First" and "Last" when the values are blank:
This doesn't have any effect on the values that are returned in Option!.getOptionData(); the application must be designed to correctly interpret the meaning of these blank values.
The "First" and "Last" labels are taken from the barista.ini file; they can be localized or adjusted based on personal preference: FROM_TO_DESC_FST=First FROM_TO_DESC_LST=Last
Null entry='All' This option is only meaningful for data elements that are based on a file lookup. When this option is selected, Barista displays a default description of "All" when the value is blank:
This doesn't have any effect on the value that is returned in Option!.getOptionData(); the application must be designed to correctly interpret the meaning of this blank value.
The "All" string is taken from the barista.ini file; it can be localized or adjusted based on personal preference: FROM_TO_DESC_ALL=All
Limit to variable naming rules Entry will be forced to uppercase. It must start with a letter and must contain only letters, digits, and underscores.
Resize control on window resize On Maintenance Form and Options Entry Form programs, resize the control to use all available space. This option is only valid for the last visible control on the form.
Wildcard data entry Limits entry to the characters specified in the +WILDCARD_CHARS global string. By default, this is: ABCDEFGHIZKLMNOPQRSTUVWXYZ0123456789 ?
Validate entries on save only The default is to validate entry as the user tabs out of the field. Select this option to defer validation until the record is saved.
Control contains external link The entry field is a command or document to be handed over to the system command processor. When this option is set, Barista adds a
Use last valid entry as default For the duration of a program run, the system will use the most recent valid entry as the default value for this column.
Do not resolve STBL reference Overrides the default behavior where Barista attempts to resolve any text within [square brackets] as an STBL.
Grid entry value must be unique When maintaining this column in a grid maintenance program, the value must be unique (i.e. the same value may not appear in the grid more than once).
Display only all cases Sets this column to display-only.
Display only new records only When creating a new record, sets this column to display-only.
Display only existing records only When editing an existing record, sets this column to display-only.
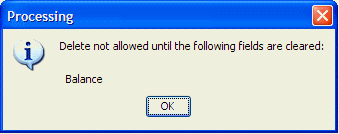
Value must be zero for record delete Disallows delete on any records containing non-zero values in the specified columns. Attempting to delete a record with a non-zero value in this column generates a message like the following:
Password entry control On Maintenance Form and Options Entry Form programs, this column is a password entry field; each input character is echoed as '*'. This option is only meaningful for Character Edit controls.
Spellcheck control Activates spellchecking for this control.
Zero based sequence number control If this is a sequence number control, start counting at zero. By default, sequence numbers start at one.
Assign next sequence on null entry If this is a sequence number control, increment it on null entry.
Multiple language data control Not yet implemented.
|
|
Pad Character |
Displayed from the Element Type record. |
|
Pad Alignment |
|
|
Precision |
|
|
User Prompt |
The user prompt message is displayed in the status bar when the user enters this field. |
|
Preset Value |
If a value is entered here, it will be used as the enforced (display-only) value for this column. (See also Default Value.) |
|
System Dialog |
Displayed from the Element Type record. |
|
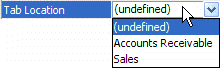
Tab Location |
If any tabs have been defined on this form, this dropdown list shows a list of available tabs; select a tab to move this control, along with all subsequent controls, to it.
|

Form Editor
The Form Editor is the last panel in the Form Designer. It shows a preview of the form and implements various editing features. To move a field, for example, select it and click on ![]() ,
, ![]() ,
, ![]() , or
, or ![]() , or simply drag and drop it to a new location.
, or simply drag and drop it to a new location.
Form Editor Options
Right-clicking in the Form Editor brings up the following options:

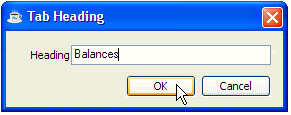
Create New Tab
To add a tab control to the form, or to add a new tab to the existing tab control, select a column, then select this option and enter a tab heading.
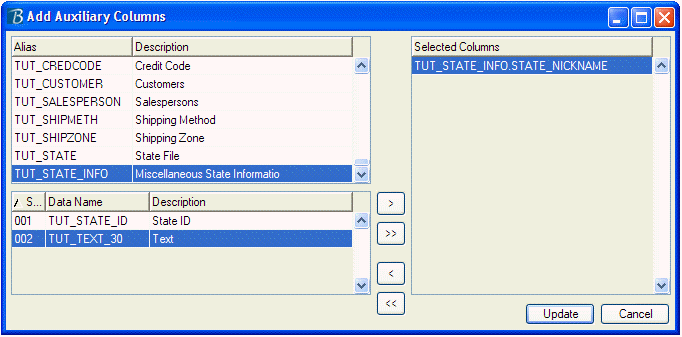
Maintain Auxiliary Columns
To add columns from related tables to the form, select this option (also available via DesignèMaintain Auxiliary Columns) and select the required colums from the list. Auxiliary columns must come from a table having the same key as the form's primary table.
Maintain Derived Data Elements
Derived data elements, as the name implies, are derived from other data elements. To add derived data elements (sometimes called calculated fields), select this option (also available via DesignèMaintain Derived Data Elements). After entering the name of the derived data element, select an element type (which determines its overall behavior), then enter an expression that describes how the element is derived. In the expression, other columns in the table are referenced as [tablenamename.columnname].

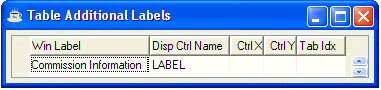
Maintain Auxiliary Labels
To add text labels to the form, select this option (also available via DesignèMaintain Auxiliary Labels) and enter the label text.
Maintain Table
To edit the table for the form, select this option.
Edit Callpoints
To edit callpoint code, select this option. The Callpoint Editor can also be accessed using DesignèEdit Callpoints, the F2 key, or the ![]() tool button.
tool button.
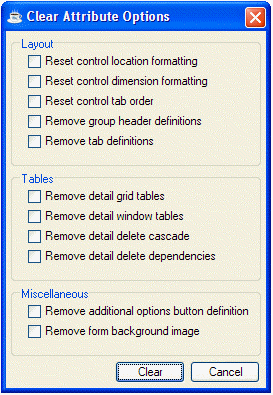
Clear Formatting Attributes
To remove various formatting attributes from the form, select DesignèClear Formatting Attributes from the menu bar, select the attributes to be cleared, and press the Clear button.
Form Editor Control Options
Right-clicking on a GUI control in the Form Editor brings up the following options:
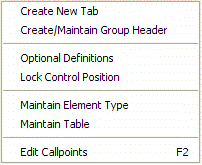
Create New Tab
To add a tab control to the form, or to add a new tab to the existing tab control, select this option and enter a tab heading.
Create/Maintain Group Header
This option is an alternative way to edit the Group Heading attribute.
Optional Definitions
This option is an alternative way to edit the Optional Definitions attributes.
Lock Control Position
Locks the control to its current position and ignores relative formatting rules.
Maintain Element Type
To edit the element type information for the column, select this option.
Maintain Table
To edit the table for the form, select this option.
Edit Callpoints
To edit callpoint code (see below), select this option. The Callpoint Editor can also be accessed using DesignèEdit Callpoints, the F2 key, or the ![]() tool button.
tool button.
Callpoints
The Barista runtime engine takes care of most standard entry, validation and read/write operations automatically. Callpoints can be used to embed call custom code to perform non-standard operations.
During normal processing of entered data, the engine scans the alias attributes, looking for selected callpoint triggers. If a trigger is encountered, the engine calls the specified callpoint routine with a predefined argument list. The callpoint routine performs the necessary operations and returns control to the runtime engine.
Callpoints can also be used to prevent a certain process from occurring. For example, a "Before Record Delete" callpoint can be used to determine if a record deletion is allowed. If the developer-defined callpoint code determines that the deletion should be disallowed, it can pass back an "ABORT" status to the runtime engine.
Table Callpoint Codes (Mainline Processing)
|
Description |
Proc Code |
Where Triggered |
Uses |
Allow Abort? |
|
Before Enable Map |
BENA |
Before creating the enable/disable controls string. |
Adding existing controls to the idle controls string. |
|
|
After Enable Map |
AENA |
After creating the enable/disable controls string. |
Enabling/disabling controls outside of normal scope |
|
|
After Form Callbacks |
ACAL |
After settings the event callbacks for all controls on a form. |
Adding aditional events |
|
|
After Window Creation |
AWIN |
After issuing the 'WINDOW' mnemonic. |
Adding new button or entry controls. |
|
|
Before Window Show |
BSHO |
Just prior to showing the built initial screen. |
Adding manual controls or objects. |
|
|
After Window Show |
ASHO |
After completed window is issued a SHOW command. All field arrays have been filled with template data and all applicable fields have been disabled. |
Modifying FLD array contents and adding new buttons or fields. |
|
|
Before New Record |
BREC |
Before the field arrays are cleared of data from the previous record. |
Manipulating FLD array data and enabling/disabling fields. |
|
|
After New Record |
AREC |
After all arrays and controls have been set for a new record. |
Manipulating FLD array data and enabling/disabling fields. |
|
|
After Grid Clear |
AGCL |
After the grid is cleared of all data. |
Special grid display or totaling of entered data within the grid. |
|
|
Before Record Read |
BREA |
Prior to the attempted record read. |
Read key manipulation. |
|
|
After Record Read |
AREA |
After a successful record read. |
Non-standard data retrieval, dynamic field manipulation and field disabling. |
|
|
After Key Build |
AKEY |
After building the key from the contents of the rec$ array. |
Manipulating the key. |
|
|
After Record Array Transfer |
ARAR |
After transferring the read data (rd_file_rec$) into record array (rd_rec_data$[]). |
Non-standard data retrieval and dynamic field manipulation. |
|
|
After Record Display |
ADIS |
After the record or setup has been initially displayed. |
Warning messages for displayed records. |
|
|
After Record Removal |
AREM |
After removal of deleted detail records during save. |
Removal of secondary file information. |
|
|
After Grid Display |
AGDS |
After all detail records are displayed in a grid. |
Special grid display or totaling of entered data within the grid. |
|
|
Before Grid Entry |
BGRD |
Prior to first entry when focusing on a detail grid. |
Grid array manipulation. |
|
|
Before Write Array |
BWAR |
Prior to transferring the contents of the REC$[x] array into the record template (FILE1$) |
Modifying the contents of REC$[x] prior to writing. |
|
|
Before Record Write |
BWRI |
Prior to an attempted record write. |
Non-standard record validation. |
ü |
|
After Record Write |
AWRI |
After a successfully completed record write. Bypassed on write errors. |
Associated record updating. |
|
|
Before Detail Record Save |
BSAV |
Prior to saving a detail record into the detail record array (DREC$[x]) |
Data manipulation |
ü |
|
Before Record Removal |
BREM |
Prior to removal of deleted detail records during save. |
Removal key manipulation. |
ü |
Table Callpoint Codes (Record Delete)
|
Description |
Proc Code |
Where Triggered |
Uses |
Allow Abort? |
|
Before Record Delete Query |
BDEQ |
Prior to delete record prompt. |
Processing to ensure delete is allowed. |
ü |
|
Before Record Delete |
BDEL |
Prior to attempted record deletion. |
Delete key manipulation. |
ü |
|
After Record Delete |
ADEL |
After an attempted or successful record deletion. |
Cascading record deletion. |
|
Table Callpoint Codes (Miscellaneous)
|
Description |
Proc Code |
Where Triggered |
Uses |
Allow Abort? |
|
Before Next Record Key |
BNEK |
Prior to retrieving the key for the next record. |
Read position and key manipulation. Tables with mixed multiple record types. |
|
|
Before Next Record |
BNEX |
Prior to retrieving the next record. |
Read key manipulation. |
|
|
Before Previous Record Key |
BPRK |
Prior to retrieving the key for the previous record. |
Read position and key manipulation. Tables with mixed multiple record types. |
|
|
Before Previous Record |
BPRI |
Prior to retrieving the previous record |
Read key manipulation. |
|
|
Before File Overview |
BOVE |
Prior to calling the standard inquiry system for a file overview. |
Non-standard record prefix manipulation. |
ü |
|
After File Overview |
AOVE |
After calling the standard inquiry system for a file overview. |
Retrieved data manipulation. |
|
|
After Print All Selected |
APRA |
After selecting the "Print All" option from the menu bar. |
Specialized report formats. If a custom output program is called, a status of "ABORT" must be used stop Barista from attempting to print its own version. |
ü |
|
After Print Record Selected |
APRT |
After selecting the "Print Record" option from the menu bar. |
Specialized report formats. If a custom output program is called, a status of "ABORT" must be used stop Barista from attempting to print its own version. |
ü |
|
Before Record Copy |
BRCO |
Prior to the record copy setup. |
Current record manipulation or copy validation checking. |
ü |
|
After Record Copy |
ARCO |
After a successful record copy. |
Copied record manipulation. |
|
|
After Grid Exit |
AGRD |
After a user tabs out of a detail grid. |
Extra grid validation or totaling of entered data within the grid. |
|
|
Before Program Exit |
BEND |
Prior to exiting the program. All associated windows for the program have already been closed. |
Erasing temporary files and setting processing flags. |
ü |
|
After Window Resize |
ASIZ |
After receiving a window resize event. |
Resizing added tabs and child windows. |
|
Column/Field Callpoint Codes
|
Description |
Proc Code |
Where Triggered |
Uses |
Allow Abort? |
|
After Field Input |
AINP |
After losing focus and performing base validation (length/field type). |
Non-standard field validation. |
|
|
After Field Inquiry |
AINQ |
After calling the standard inquiry system for a field inquiry. |
Retrieved data manipulation. |
|
|
After Control Modification |
AMOD |
After receiving a modified event for a BBjSlider or BBjInputE/N/DSpinner, |
Using the current modified contents of a field for subsequent data or display manipulation. |
|
|
After Field Validation |
AVAL |
After performing ALL defined validation. |
Using the validated contents of a field for subsequent data manipulation. |
|
|
Before Drill Down |
BDRL |
Prior to displaying drill down inquiry |
Filter manipulation. |
ü |
|
Before Field Input |
BINP |
When a specific control gains focus. |
Non-standard field defaults. |
|
|
Before Field Inquiry |
BINQ |
Prior to calling the standard inquiry system for a field inquiry. |
Non-standard record prefix manipulation. |
ü |
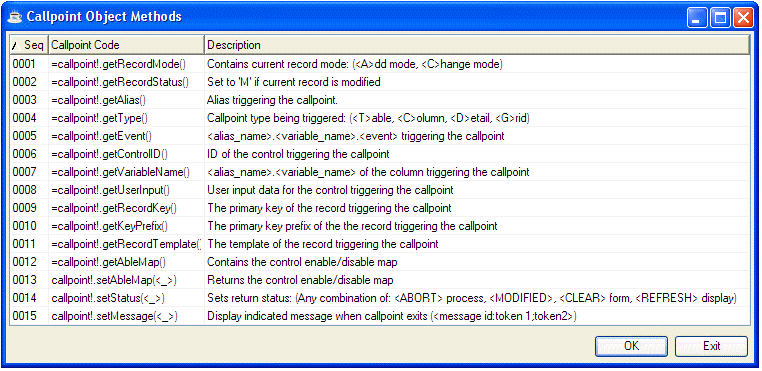
The Callpoint! Object
The developer can include any BBj code in a callpoint routine, but most callpoints will make use of the Callpoint! object, which provides access to commonly used information. For a list of available methods, refer to Callpoint Object Methods (CMTH), below.
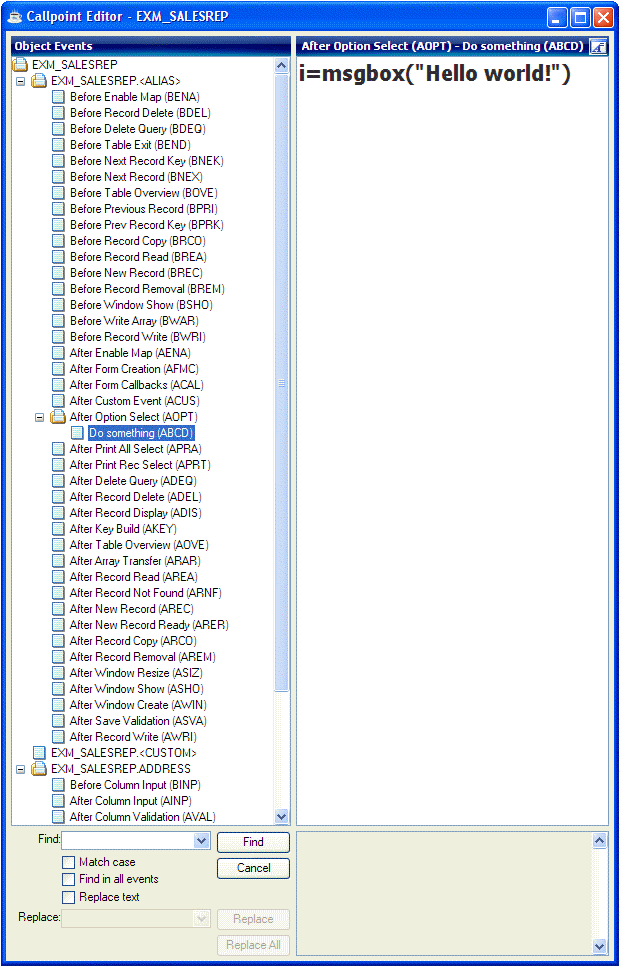
Callpoint Editor
The Callpoint Editor is a text editor for entering BBj program code to be executed at a particular point during the form execution. To use the Callpoint Editor, select DesignèEdit Callpoints, press the F2 key, or click the ![]() tool button. The Callpoint Editor includes:
tool button. The Callpoint Editor includes:
-
the ability to increase or decrease the indent level for a block of code using the
 and
and  tool buttons.
 -
search and replace options;
-
a font selector to change the preferred display font; and
-
a right-click menu for selecting common code blocks from a list.
The following sample callpoint code might be invoked in response to the user selecting a particular option using the ![]() tool button:
tool button:
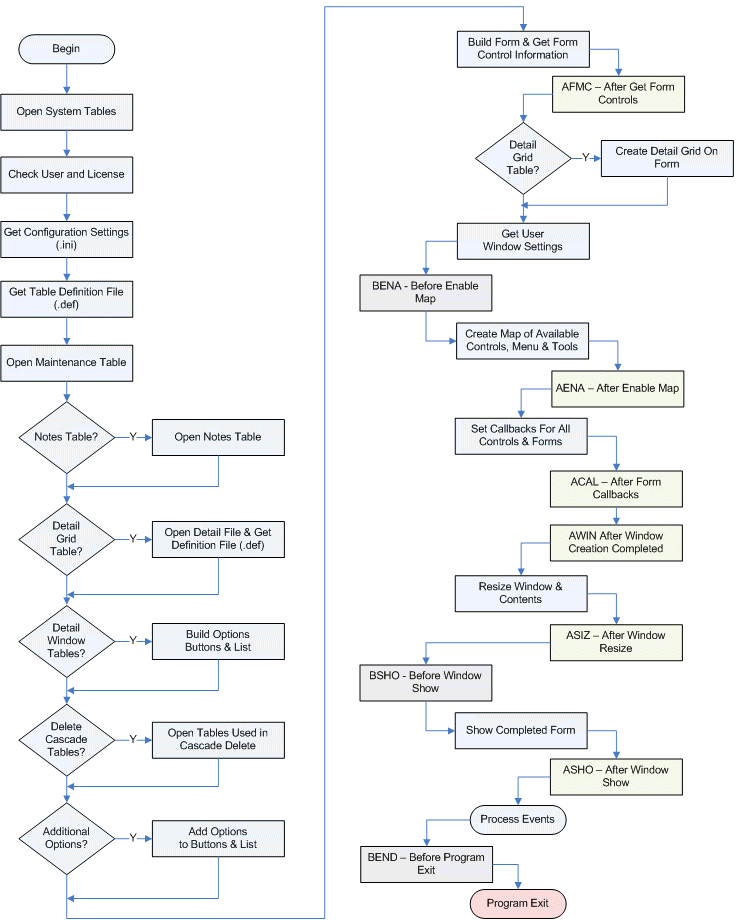
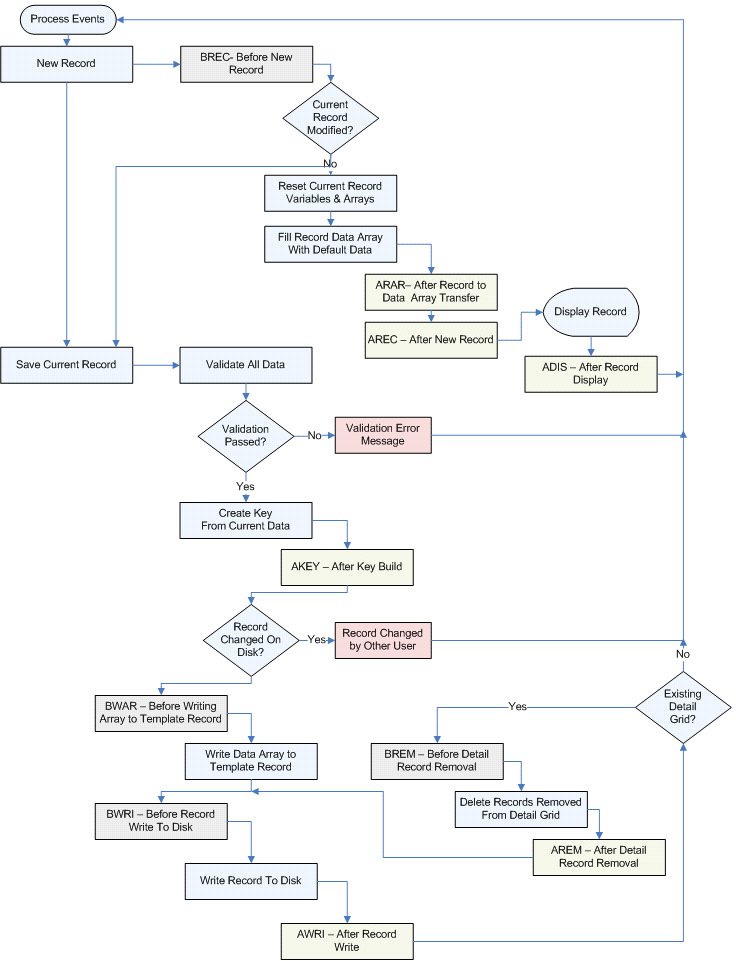
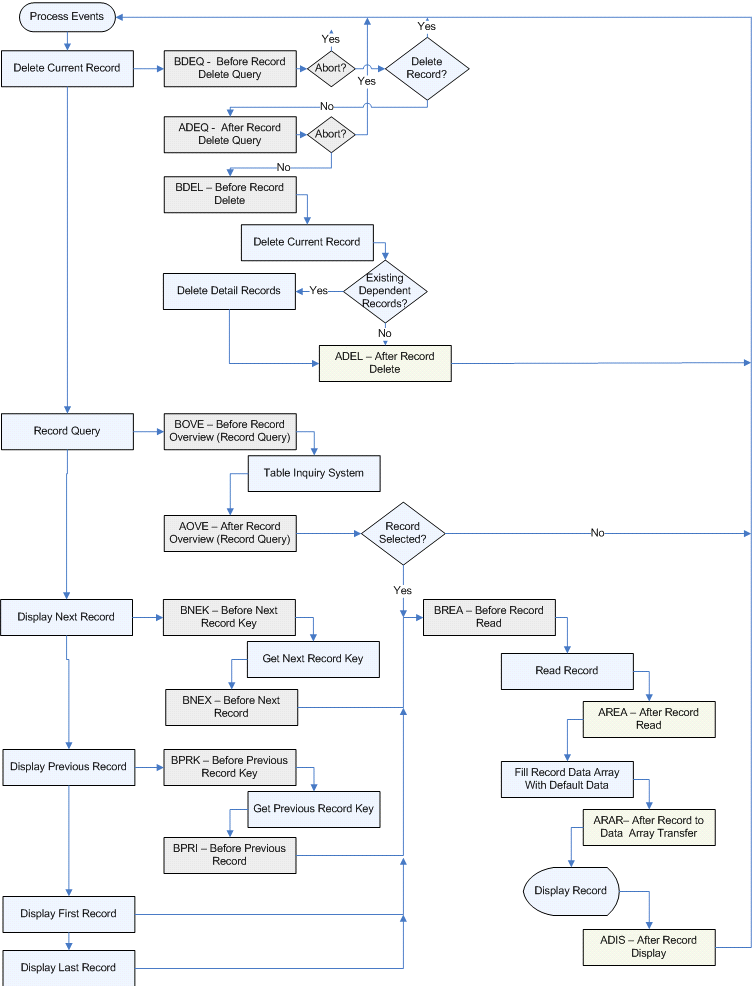
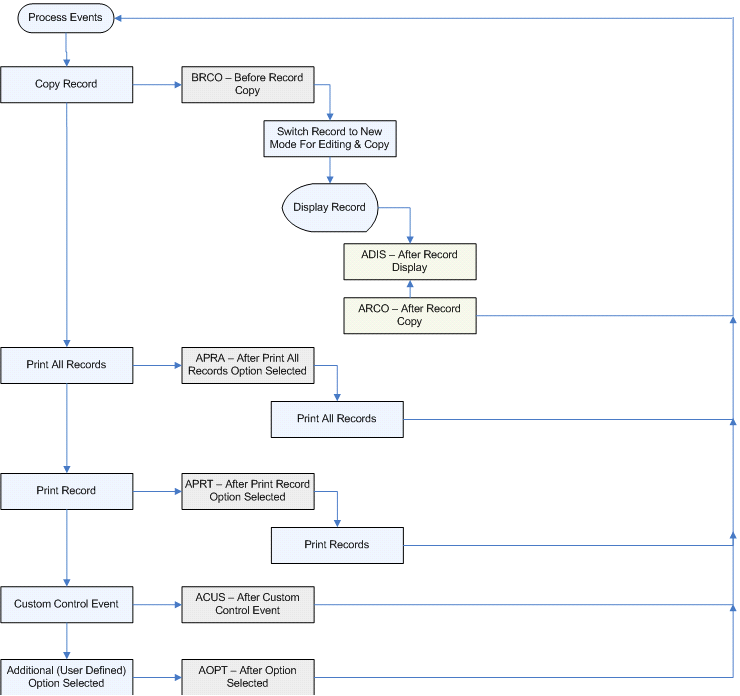
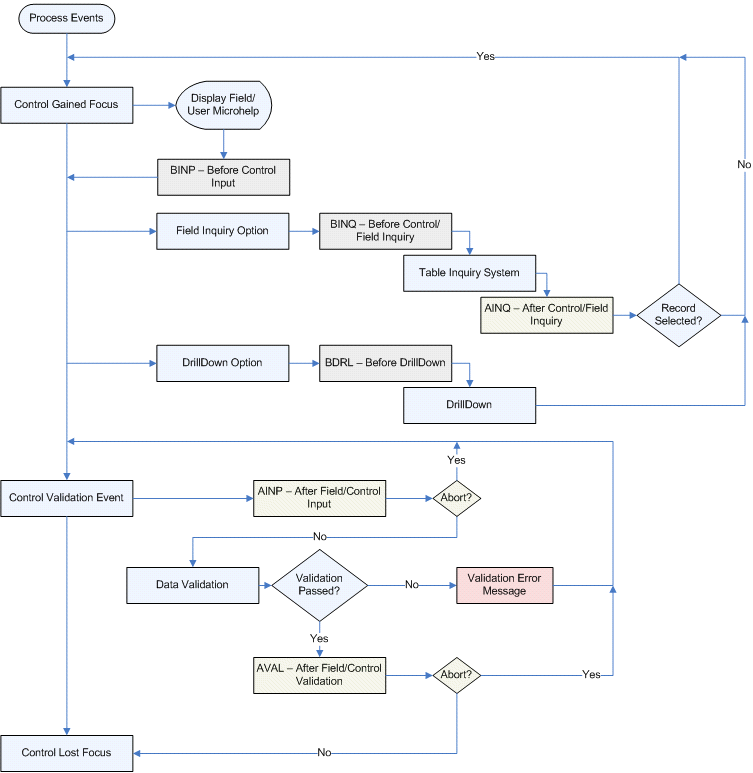
Flow Diagrams
The following diagrams show where callpoint code is executed within the execution of a Barista form.
Form Maintenance Flow Overview
Form Maintenance Flow Create or Update Record
Form Maintenance Flow Delete, Query, Next, Previous, First, Last
Form Maintenance Flow Copy, Print, and Custom Options
Grid Maintenance Flow Overview
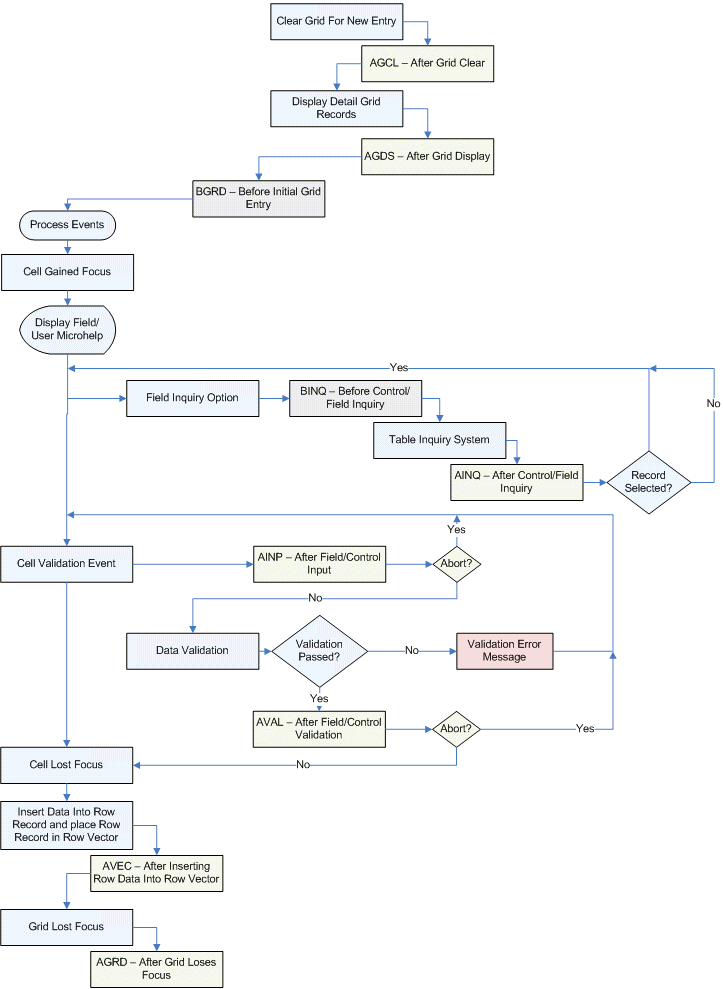
Column Entry Flow Detail
Callpoint Code Fragments
For easy access to commonly used code fragments, click the ![]() tool button or right-click in the Callpoint Editor to see the following list of callpoint code categories:
tool button or right-click in the Callpoint Editor to see the following list of callpoint code categories:
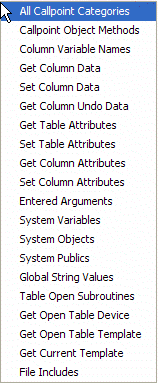
Callpoint Object Methods (CMTH)
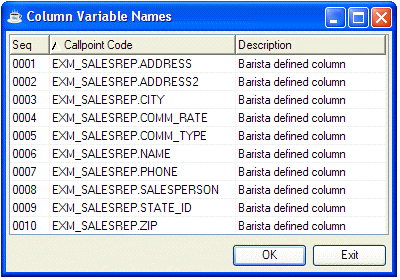
Column Variable Names (COLS)
A list of all data elements in the table, in the format ALIAS.DATA_ELEMENT. For example:
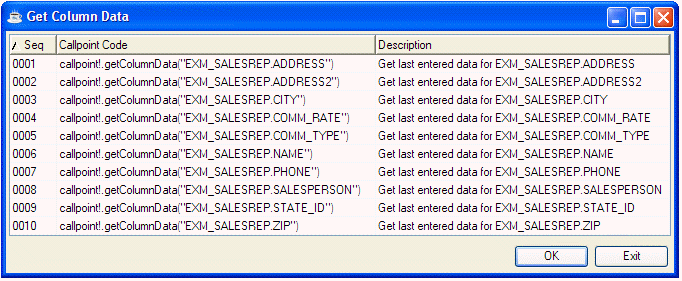
Get Column Data (GETC)
The code used to retrieve column data for a particular field, in the format:
callpoint!.getColumnData("fieldname")
For example:
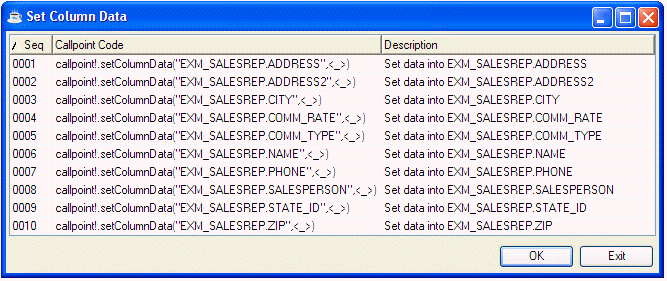
Set Column Data (SETC)
The code used to update column data for a particular field, in the format:
callpoint!.setColumnData("fieldname",value)
For example:
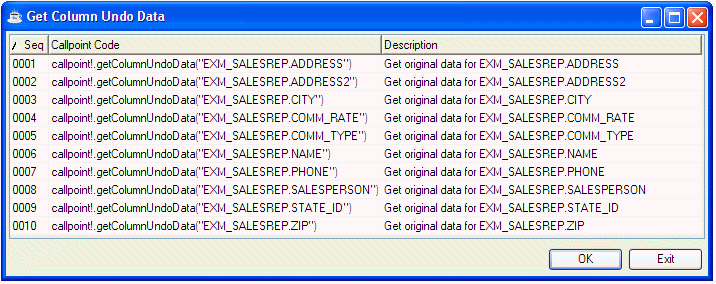
Get Column Undo Data (GETU)
The code used to retrieve the original value of a particular field, in the format:
callpoint!.getColumnUndoData("fieldname")
For example:
Get Table Attributes (GTAV)
The code used to retrieve a table attribute, in the format:
callpoint!.getTableAttribute("code")
For example:
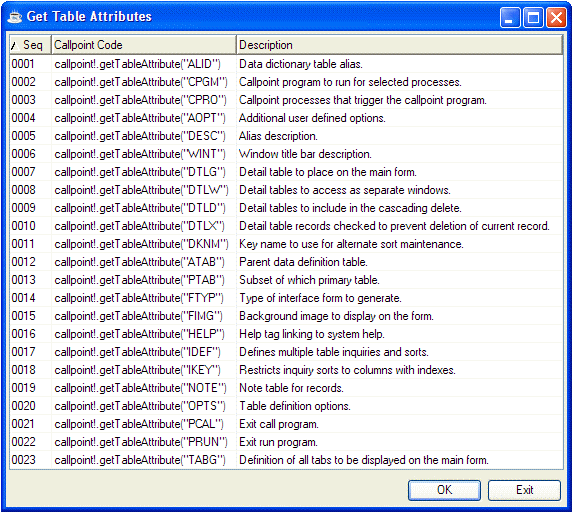
For a complete list of table attribute codes, see Table Attribute Codes.
Set Table Attributes (STAV)
The code used to update a table attribute, in the format:
callpoint!.setTableAttribute("code","value")
For example:

For a complete list of table attribute codes, see Table Attribute Codes.
Get Column Attributes (GCAV)
The code used to retrieve a column attribute, in the format:
callpoint!.getTableColumnAttribute("fieldname","code")
For example:
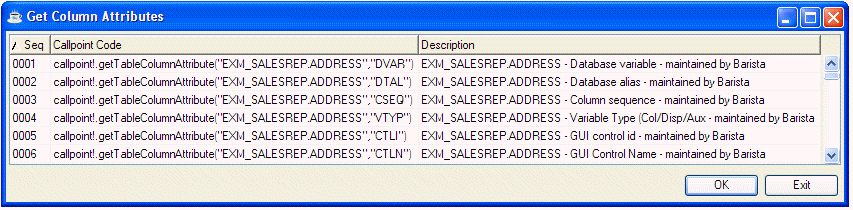
For a complete list of column attribute codes, see Column Attribute Codes.
Set Column Attributes (SCAV)
The code used to retrieve a column attribute, in the format:
callpoint!.getTableColumnAttribute("fieldname","code")
For example:
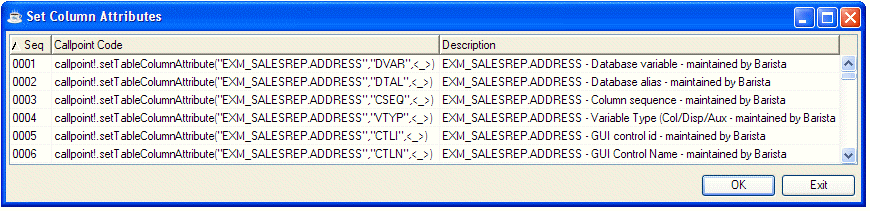
For a complete list of column attribute codes, see Column Attribute Codes.
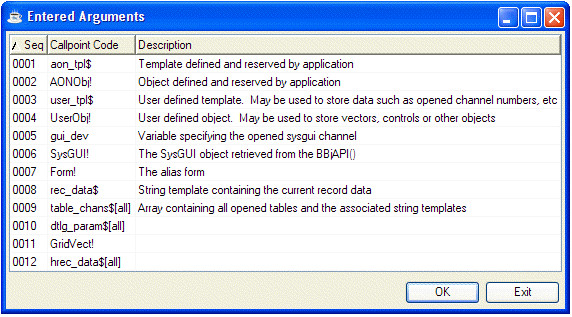
Entered Arguments (ENTA)
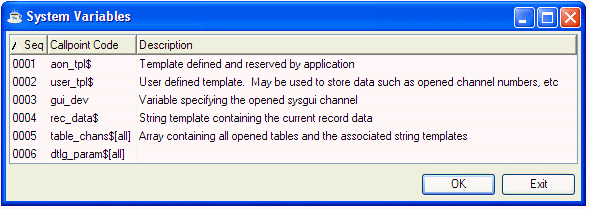
System Variables (SVAR)
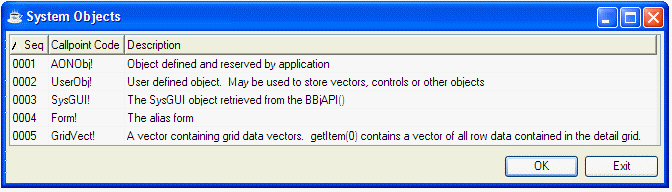
System Objects (SOBJ)
Global String Values (STBL)
|
Seq# |
Callpoint Code |
Description |
|
0001 |
stbl("+ADDATA") |
Data location for application Administrator files |
|
0002 |
stbl("+APDATA") |
Data location for application Accounts Payable files |
|
0003 |
stbl("+ARDATA") |
Data location for application Accounts Receivable files |
|
0004 |
stbl("+BACKGROUND_CTL") |
(19990) |
|
0005 |
stbl("+BLOCK_CTL") |
Starting control number sequence for block controls (19000) |
|
0006 |
stbl("+BLOCK_TEXT_CTL") |
Starting control number sequence for block text controls (19500) |
|
0007 |
stbl("+BMDATA") |
Data location for application Bill of Material files |
|
0008 |
stbl("+BUTTON_CTL") |
Starting control number sequence for options button controls (20000) |
|
0009 |
stbl("+CHILD_WIN") |
(1100) |
|
0010 |
stbl("+CRDATA") |
Data location for application Customer Relations files |
|
0011 |
stbl("+CUSTOM_CTL") |
(25000) |
|
0012 |
stbl("+DATE_FORMAT") |
(MDY) |
|
0013 |
stbl("+DATE_GRID") |
(%Mz%Dz%Yl) |
|
0014 |
stbl("+DATE_MASK") |
(%Mz/%Dz/%Yl) |
|
0015 |
stbl("+DBNAME") |
(Barista) |
|
0016 |
stbl("+DDDATA") |
Data location for application Data Dictionary files |
|
0017 |
stbl("+DIR_ADM") |
Location of Barista administrative files |
|
0018 |
stbl("+DIR_BWU") |
Location of Barista Web Utility files |
|
0019 |
stbl("+DIR_CFG") |
(sys/config/enu/) |
|
0020 |
stbl("+DIR_CPT") |
|
|
0021 |
stbl("+DIR_DAT") |
|
|
0022 |
stbl("+DIR_DDB") |
(bbdict/) |
|
0023 |
stbl("+DIR_DEF") |
Location of Barista definition files (def/enu/) |
|
0024 |
stbl("+DIR_FRM") |
Location of Barista files (arc/enu/) |
|
0025 |
stbl("+DIR_IMG") |
Location of Barista image files (sys/images/) |
|
0026 |
stbl("+DIR_PGM") |
Location of programs files () |
|
0027 |
stbl("+DIR_SYP") |
Location of Barista programs files (sys/prog/) |
|
0028 |
stbl("+DIR_SYS") |
Location of Barista system forms (sys/base/enu/) |
|
0029 |
stbl("+DIR_USR") |
(settings/enu/) |
|
0030 |
stbl("+DIR_WRK") |
Location of Barista work files (workarea/) |
|
0031 |
stbl("+DISPLAY_CTL") |
Starting control number sequence for secondary data display controls (4000) |
|
0032 |
stbl("+DOC_DIR_CSV") |
Document warehouse folder for Comma Separated Value text files (.csv) (documents/) |
|
0033 |
stbl("+DOC_DIR_HTM") |
Document warehouse folder for HTML text files (.htm) (documents/) |
|
0034 |
stbl("+DOC_DIR_PDF") |
Document warehouse folder for Portable Document File text files (.pdf) (documents/) |
|
0035 |
stbl("+DOC_DIR_TXT") |
Document warehouse folder for Tab Delimited text files (.txt) (documents/) |
|
0036 |
stbl("+DOC_DIR_XML") |
Document warehouse folder for XML text files (.xml) (documents/) |
|
0037 |
stbl("+DOC_FONT_FIXED") |
Default font name for non-proportional output in the Document Output Display (Courier New) |
|
0038 |
stbl("+DOC_FONT_PROP") |
Default font name for proportional output in the Document Output Display (Arial) |
|
0039 |
stbl("+DOC_FONT_SIZE") |
Default font size for output in the Document Output Display (07) |
|
0040 |
stbl("+ENTRY_CTL") |
Starting control number sequence for entry controls (3000) |
|
0041 |
stbl("+FIELD_DELIM") |
($0D0A$) |
|
0042 |
stbl("+FILE_ADD") |
Location of callpoint addins definition file (sys/config/enu/barista.cpt) |
|
0043 |
stbl("+FILE_CFG") |
Location of application configuration file (sys/config/enu/barista.cfg) |
|
0044 |
stbl("+FILE_CPT") |
Location of callpoint stub program (sys/lib/callpoint_base.src) |
|
0045 |
stbl("+FILE_HLP") |
Location of help system (help/barista.chm) |
|
0046 |
stbl("+FILE_MEN") |
Location of menu system file (sys/config/enu/barista.men) |
|
0047 |
stbl("+FILE_SET") |
Location of user window settings file (sys/config/enu/barista.ini) |
|
0048 |
stbl("+FILE_TPM") |
Location of data dictionary definition file |
|
0049 |
stbl("+FILE_USR") |
(sys/config/enu/barista.usr) |
|
0050 |
stbl("+GEDATA") |
|
|
0051 |
stbl("+GLDATA") |
Data location for application General Ledger files |
|
0052 |
stbl("+GRID_CTL") |
(5000) |
|
0053 |
stbl("+GRID_LIST_CTL") |
(7000) |
|
0054 |
stbl("+GUI_DEVICE") |
(X0) |
|
0055 |
stbl("+IMAGE") |
|
|
0056 |
stbl("+IMAGE_CTL") |
(6000) |
|
0057 |
stbl("+IVDATA") |
Data location for application Inventory files |
|
0058 |
stbl("+LANGUAGE_ID") |
(ENU) |
|
0059 |
stbl("+LIDATA") |
Data location for application Licensing files |
|
0060 |
stbl("+MASTER_USER") |
(barista) |
|
0061 |
stbl("+MILESTONE") |
Default milestone for updating progress meters (50) |
|
0062 |
stbl("+MPDATA") |
Data location for application Material Requirements Planning files |
|
0063 |
stbl("+OPDATA") |
Data location for application Order Processing files |
|
0064 |
stbl("+PODATA") |
Data location for application Purchase Order Processing files |
|
0065 |
stbl("+PRDATA") |
Data location for application Payroll files |
|
0066 |
stbl("+PROGRESS_CTL") |
(10010) |
|
0067 |
stbl("+SADATA") |
Data location for application Sales Analysis files |
|
0068 |
stbl("+SFDATA") |
Data location for application Shop Floor Control files |
|
0069 |
stbl("+STATUS_CTL") |
(10000) |
|
0070 |
stbl("+STATUS_IND_CHAR") |
Character used to indicate a 'checked' value in columnar displays (149) |
|
0071 |
stbl("+TAB_CTL") |
(1050) |
|
0072 |
stbl("+USER_ID") |
The current user id (BARISTA) |
|
0073 |
stbl("+TEXT_CTL") |
Starting control number sequence for label controls (2000) |
|
0074 |
stbl("+WILDCARD_CHARS") |
(ABCDEFGHIZKLMNOPQRSTUVWXYZ0123456789 ?) |
|
0075 |
stbl("+WINDOW_RES") |
(1000) |
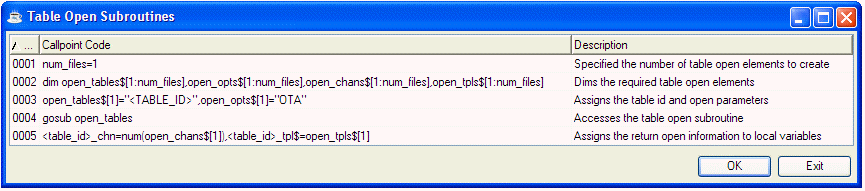
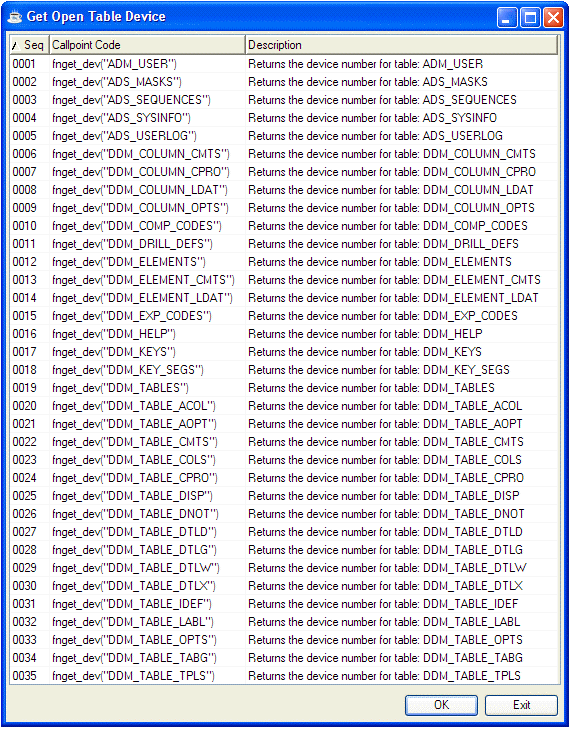
Table Open Subroutines (TBLO)
Get Open Table Device (TDEV)
Returns the channel number of a selected internal control file. For example:
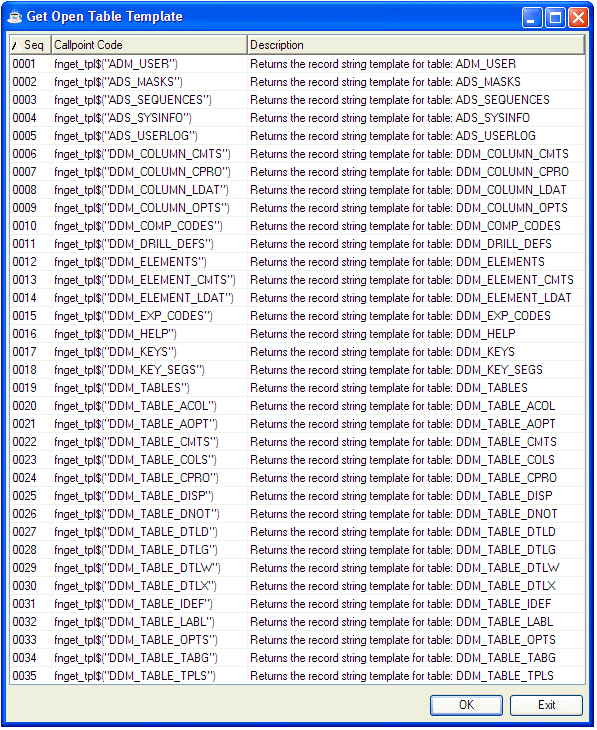
Get Open Table Template (TTPL)
Retrieves the template for a selected internal control file. For example:
Get Current Template (CTPL)
Retrieves the template for this table. For example:

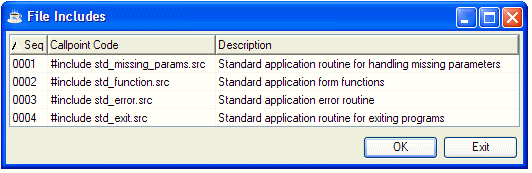
File Includes (INCS)
Menu Designer
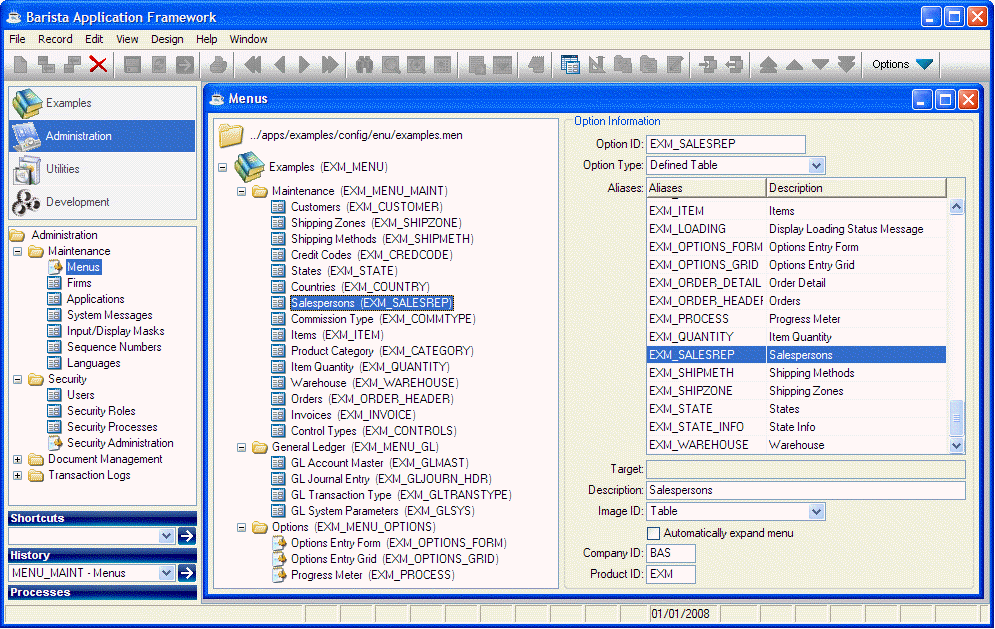
The application menu system is the panel that usually appears on the left side of the MDI window. This is distinct from the Barista menu bar, which appears at the top of the MDI window, above the tool bar. To make a Barista form available to the end user, it must be added to the menu system. This is done in the Menu Designer, which is accessed from the Menus option of Administration Maintenance:
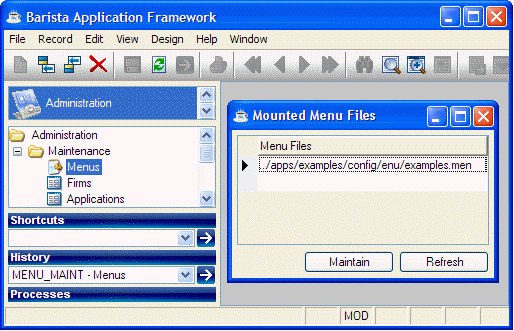
Barista uses multiple menu files when compiling and displaying the application menu system. The Mounted Menu Files form allows addition and deletion of these menu files. The entry order of the menu files on this form dictates the display sequence in the application menu. To refresh the application menu display after maintaining the menu files, press Refresh. To maintain a mounted menu file, select it on the form and press Maintain.
To add a new item to the menu system, either right-click on an existing item, or select an existing item and click the ![]() tool button.
tool button.
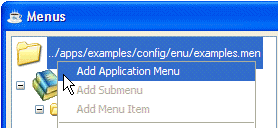
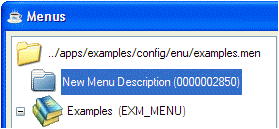
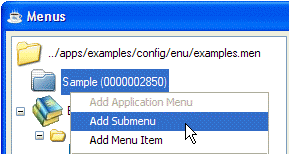
Add Application Menu
To add a new application, right-click on the menu file name and select "Add Application Menu":
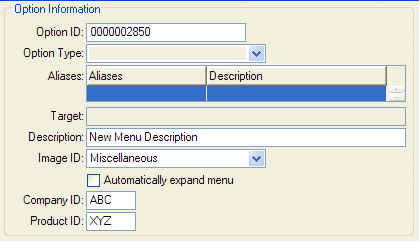
|
Option ID |
The Option ID is a unique reference, up to 20 characters, that identifies a menu system entry. When defining a new Application Menu or Menu Group, just use the default ID (a 10-digit number). |
|
Description |
Enter a short name for the new application. |
|
Image ID |
Select an image from the list. Barista comes with a standard set of images. To install additional images, copy them to barista\sys\images\im_ftype_*.*. |
|
Company ID |
|
|
Product ID |
|
Add Submenu
To add an optional submenu, right-click on the newly added application menu and select "Add Submenu":
|
Option ID |
When defining a new Menu Group, just use the default ID (a 10-digit number). |
|
Description |
Enter a short name for the sub-menu. |
|
Automatically expand menu |
Check this to expand this sub-menu automatically whenever the application menu is opened. |
|
Company ID |
|
|
Product ID |
|
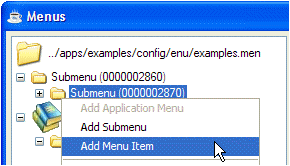
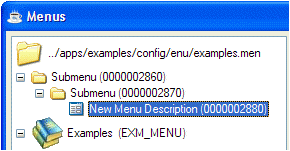
Add Menu Item
To add a menu item, right-click on the application menu or submenu and select "Add Menu Item":
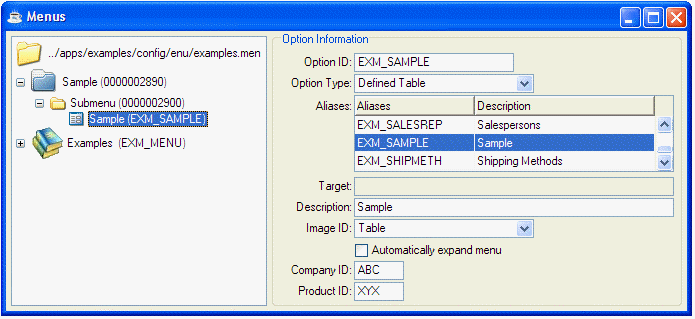
|
Option ID |
The Option ID is a unique reference, up to 20 characters, that identifies a menu system entry. This reference will appear in the Shortcuts and History lists, for example:
|
|
Option Type |
Select one of the following Option Types:
|
|
Target |
If the Option Type is a program, enter the program name here. If the Option Type is a system call, enter the system command here. |
|
Description |
Enter a short name for the menu item. |
|
Image ID |
Select an image from the list. Barista comes with a standard set of images; to install additional menu images, copy them to barista\sys\images\im_mtype_*.*. |
|
Company ID |
|
|
Product ID |
|
Other Options
To move a menu item up or down in the list, select it and either press ALT+UP / ALT+DOWN, or right-click on it and select Move Up or Move Down from the popup menu.
To delete a menu item, select it and press Ctrl+DELETE, press the ![]() tool button, or right-click on it and select Delete from the popup menu.
tool button, or right-click on it and select Delete from the popup menu.
To update the menu system after making changes in the Menu Designer, either right-click or click on the ![]() tool button and select Refresh Menu.
tool button and select Refresh Menu.
______________________________________________________________________________________
Copyright BASIS International Ltd. BARISTA®, AddonSoftware®, BBj®, Visual PRO/5®, PRO/5®, and BBx® are registered trademarks.