 Using the Layout Grid
ResBuilder allows you to display a grid in forms and child windows to make it easier to position controls.
-
In addition to displaying or hiding the grid, you can change the grid size and set the snap to grid or snap to size option.
-
The grid serves as a layout and alignment tool only, and it does not appear in resource file printouts or in applications that utilize the resource file.
Displaying and Hiding the Layout Grid
To display the grid in a form or child window, do the following:
Click the form or child window, then do one of the following:
-
On the Layout menu, select Grid.
-
On the Align toolbar, click Grid.
The grid then appears inside the selected form or child window. To hide the grid, repeat step 1.
Changing the Layout Grid Size
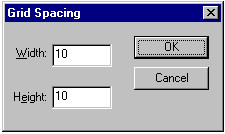
The default grid size is 10 pixels by 10 pixels. To change the grid size, do the following:
1. On the Options menu, select Grid Spacing to display the Grid Spacing dialog:

2. Set the grid width and/or height, as follows:
-
In the Width box, enter the number of pixels for the desired grid width.
-
In the Height box, enter the number of pixels for the desired grid height.
3. Click OK.
Setting Snap-to-Grid
The snap-to-grid option moves the upper left corner of controls to the closest intersection of two gridlines. To set the snap-to-grid option, do one of the following:
-
On the Layout menu, select Snap On.
-
On the Align toolbar, click the Snap On button.
Setting Snap-to-Size
The snap-to-size option enlarges or shrinks controls to fit it to the intersections of gridlines closest to their upper left and lower right boundaries. To set the snap-to-size option, do one of the following:
-
On the Layout menu, select Snap Size On.
-
On the Align toolbar, click the Snap Size On button.