Tree Control Overview
Description
The tree is a control which is laid out in a hierarchical outline format, with the top level of the tree being at the far left of the control, and the child levels spreading to the right. Each tree contains one root node and each node can have 0 or an unlimited number of children. Each child has only one parent. The root node is the only node in the tree that does not have a parent.
A simple tree is as follows:
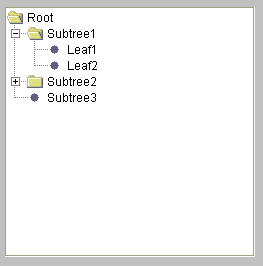
Figure 1
Terms
Node: A unit of a tree. Each node has an icon and label associated with it.
Root: The highest level node in a tree. Each tree has only one root. A root has no parent node. In Figure 1, the node labeled "Root" is the root.
Parent node: A node that has child nodes associated with it. When a node is added to the tree it is associated with a parent node. The child node will appear when the parent node is expanded (opened) and disappear when the parent node is collapsed (closed). In Figure 1, The nodes labeled "Root," "Subtree1," and "Subtree2" are parents. "Root" and "Subtree1" are expanded so their children can be seen. "Subtree2" is collapsed.
Child node: A node that has a parent node. All nodes in the tree except the root node are child nodes. A child node can also be a parent node. In Figure 1, "Subtree1" is a child of "Root" and "Leaf1" is a child of "Subtree1."
Descendants: All nodes below a particular parent node in the tree. Any children of a node's children, and so on, are descendants of a node. In Figure 1, all nodes except "Root" are descendants of "Root."
Leaf node: A node that has no children. In Figure 1, nodes labeled "Leaf1," "Leaf2" and "Subtree3" are leaf nodes. "Subtree2" has children, although they cannot be seen.
Expandable node: By default, if a node does not have any children, it will display as a leaf node. However, a node can be explicitly made as an expandable node so that it will always have the appearance of a parent node, even if it has no children. In Figure 2, "Subtree3" is an expandable node, even though it has no children. In Figure 1, "Subtree3" is not an expandable node.
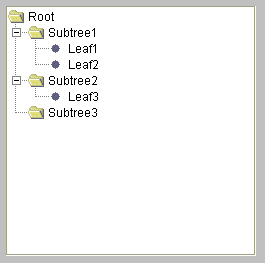
Figure 2
Tree Controls in BBj only use the BBj Object Syntax and methods. They cannot be manipulated with mnemonics or sendmsg functions. Ctrl functions that are used on all GUI controls can also be used. For detailed information on tree methods, see the BBjTree Methods section of the documentation. For information on the addTree() method, see BBjWindow Methods.
Initializing Trees:
A root must be set before any other nodes are added to the tree. The following code will create and initialize a tree.
|
Adding and Inserting Nodes:
Once a root has been made, nodes can be added to parent nodes. The first node must be added to the root node.
|
Adding Expandable Nodes:
Replacing the following line from above:
|
with
|
will create the tree in Figure 2.
Nodes can also be inserted at specific indices and removed.
Expanding and Collapsing Nodes:
Expandable nodes can be expanded and collapsed (opened and closed) by the user when they click on the +/- symbol to the left of the folder or double-click on the folder icon. Nodes can also be expanded and collapsed programmatically. The following line of code will make the node labeled "Subtree2" in Figure 1, look like the node labeled "Subtree2" in Figure 2:
|
Node Contents:
The text label of a node can be changed programmatically. To set the text in "Leaf1" in Figure 2 to "New Text" use the following line of code:
|
Node Editing:
Tree nodes can also be edited by the user, if editing is set in a tree. A user can put the nodes into edit mode by triple-clicking on the node text. By default, a tree is not editable. To allow editing, add the following line of code:
|
Node Icons:
The icons used to distinguish the different types of nodes can be set. The default appearance is dependant upon the operating system used (Figures 1 and 2 are from Windows). In order to change the icon used for expanded nodes to "newIcon.bmp" use the following line of code:
|
Tree Scrolling:
The size and location of the tree can be set with:
|
However, the number of nodes may make the internal size of the tree larger than the area given to the control. If this occurs, scrollbars will appear on the right and/or bottom of the control. Figure 3 shows a vertical scrollbar as it appears.
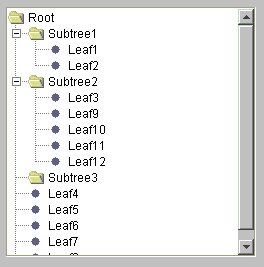
Figure 3
Tree Events:
Tree events are sent by BBj and can be handled using read record or callbacks. All tree events are notify events. For more information on tree notify events, see Tree Control Notify Events. For more information on callbacks, see Tree Callbacks.