BBxServlet Tutorial
This guide will take you through the process of creating and deploying a BBxServlet.
Creating a New BBxServlet
To create a new BBxServlet, you must:
-
Create a BBj source file for the servlet
-
Register the BBxServlet through one of the following:
-
The Enterprise Manager
-
The BBjAPI
-
Creating the BBxServlet Source File
For reference, see both the simple and complex servlets in the Example Servlets section below. You can copy either example into a BBj source code file, or create your own from scratch.
The BBj source code file must meet the following requirements:
-
It must have a custom class to represent your implementation of the servlet
-
The custom class must have a custom method to service the servlet
-
The method can be named anything you like, although both examples use the name "service"
-
The method must return void
-
The method must take a BBxServletContext as its only argument
-
Tip:
When writing the code for your servlet, remember that through the BBxServletContext object, you have access to BBxServletRequest, BBxServletResponse, BBxWebSession, BBjJettyContext, and the BBjAPI.
Migrating a BBjspServlet
If you are migrating a BBjspServlet to a BBxServlet, you will find that the overall structure of your code will carry over without much modification. The most important thing to do is change the object and method names to their BBxServlet equivalents. See the table below for a list of conversions:
| BBjspServlet | BBxServlet |
|---|---|
| BBjspServletContext | BBxServletContext |
| BBjspWebRequest | BBxServletRequest |
| BBjspWebResponse | BBxServletResponse |
| BBjspWebSession | BBxWebSession |
Registering the Servlet
In order for your BBxServlet to be accessible, you must register it with a context. The context you register your servlet with will determine the URL mapping that you use to access your servlet. To learn more about contexts, see the Advantage Article Don't Put All of Your Jetty Eggs in One Context.
BBxServlet Configuration Settings
When you register your servlet, you must specify the following:
-
The custom class name you used for your servlet in the source file
-
In the examples below, this is ExampleServlet or TestingServlet
-
-
The method name for the custom method that services your servlet
-
In the examples below, this is service
-
-
The absolute path to the source file of your servlet
-
A URL mapping that you will use to access the servlet
-
This may be anything you like, but must abide by standard URL formatting rules
-
You will access your servlet by appending the URL mapping to the URL of the context you register your servlet in
-
-
A status, indicating whether the servlet is enabled
You may also specify the following additional settings:
-
The absolute path to the config file for your servlet to use
-
If not specified, this setting will default to <bbjhome>/cfg/config.bbx
-
-
An SSCP for your servlet
-
The default SSCP is bbj_default
-
-
A Terminal Alias for your servlet
-
A Working Directory for your servlet
-
Additional initialization Parameters for your servlet (accessed via BBxServletContext::getInitParameter when the servlet is running).
Register with the Enterprise Manager
Registering your BBxServlet through the Enterprise Manager is the most user-friendly method.
-
Go to the Web > Context Configuration section of the EM.
-
Select the context you wish to add your servlet to.
-
Scroll down to the BBx Servlets section.

-
Click the Green Plus button to the right of the list of servlets to add a new BBxServlet
-
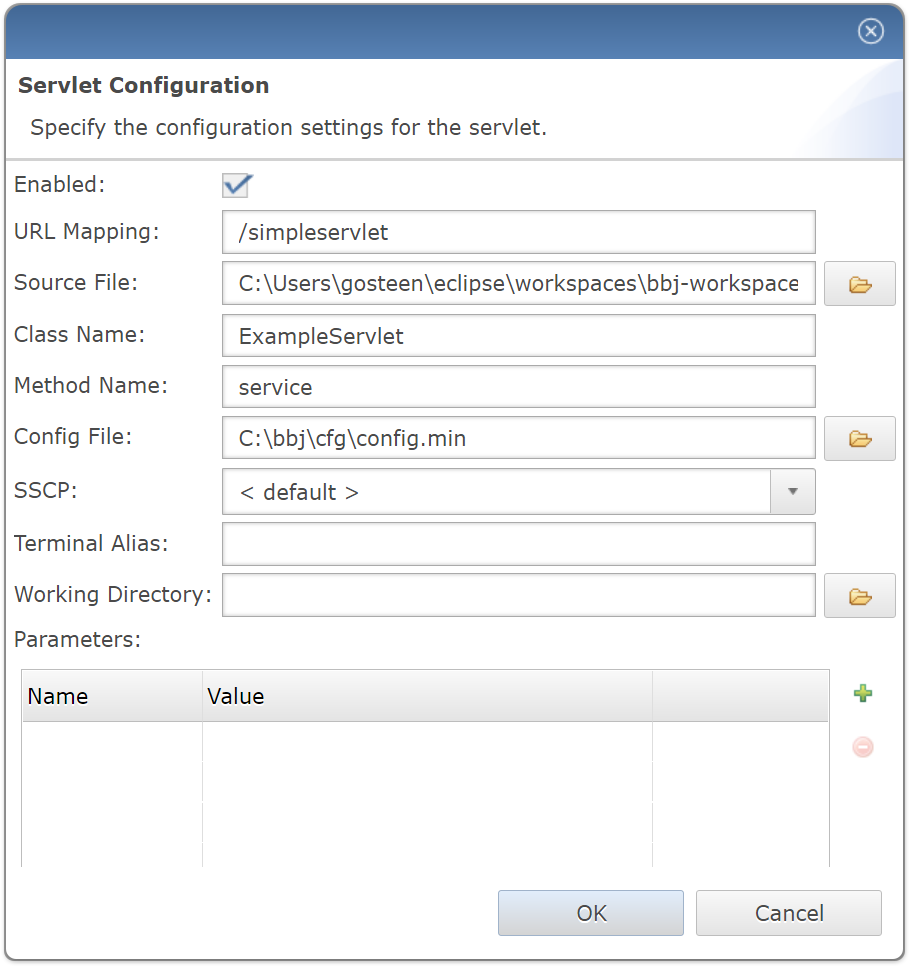
In the Servlet Configuration window, fill in the required fields with the information from your servlet.
See BBxServlet Configuration Settings above for information on the various configuration settings.
-
Click OK when you have filled in all the desired settings for your servlet.
-
Save the context by clicking the Save icon in the top left of the Context Configuration window.
-
Restart the context by clicking the Restart button.
Register with the BBjAPI
Registering your BBxServlet through the BBjAPI is also very straightforward.
-
Start BBjServices.
-
Open up the BBj SysConsole.
-
Use the following commands to register your servlet, replacing the text in angled brackets with the correct information from your servlet.
Remember to use absolute file paths for the paths to the servlet file and config file.
If you want your context path to be the root context (with just a "/" as the base path), put "root" in the CONTEXT_NAME field.
BBjAPI() .getAdmin("<USERNAME>", "<PASSWORD>") .getJettyServerConfig().getCustomContext("<CONTEXT_NAME>") .addBBxServlet("/<URL_MAPPING>", "<PATH_TO_SERVLET_FILE>", "<CLASS_NAME>", "<METHOD_NAME>", "<PATH_TO_CONFIG.BBX>", 1) -
The addBBxServlet method does not encapsulate all of the fields available in the EM, but you are still able to set these fields with the following methods:
BBxServlet::setClassPath(String sscp)
BBxServlet::setTerminalAlias(String alias)
BBxServlet::setWorkingDir(String dir)
BBxServlet::addParameter(String name, String value)
-
Restart the context with the following commands, again replacing the text in angled brackets with the specific information for your servlet:
BBjAPI()
.getAdmin("<USERNAME>", "<PASSWORD>")
.getJettyServer()
.getContext("<CONTEXT_NAME>")
.restart()
Accessing the Servlet
Once your servlet is registered, accessing it is simple! Just direct your browser to the URL mapping you created by combining the URL of your BBjServices host, the context, and your custom BBxServlet mapping. For instance, if you are running BBjServices locally, go to:
localhost:8888/CONTEXT_NAME/URL_MAPPING
Example Servlets
The "Simple BBxServlet" below simply writes some HTML to the BBxServletResponse object, which will be displayed when a user navigates to the URL mapping the servlet is registered to.
|
The "Complex BBxServlet" below can be used to test URL parameters and session operations.
The URL pattern for the servlet is:
http://[HOST]/[URL_MAPPING]?parameterName=parameterValue
The BBxServlet will print out the parameters added after the URL, along with some session information.
The servlet will also carry out one of three special session operations if you specify the special parameter sessionOpt with a value of ADD, REMOVE, or INVALIDATE.
-
The ADD operation adds any parameters in the URL to the session attribute hashmap.
-
The REMOVE operation removes any parameters in the URL from the session attribute hashmap.
-
The INVALIDATE operation invalidates the session cookie in the client browser, creating a new session and setting a new session cookie.
|