Shop Floor Control - Materials Issues Entry
Function
Materials Issues Entry relieves inventory and creates a transaction in the work order field. While materials issues will be generally generated from the materials on the pick list , you can issue any material to any open work order, regardless of whether the material appears on the work order or the pick list, or whether it has been committed to the work order.
=>To access this menu...
Select Materials Issues Entry from the Transaction Processing menu.
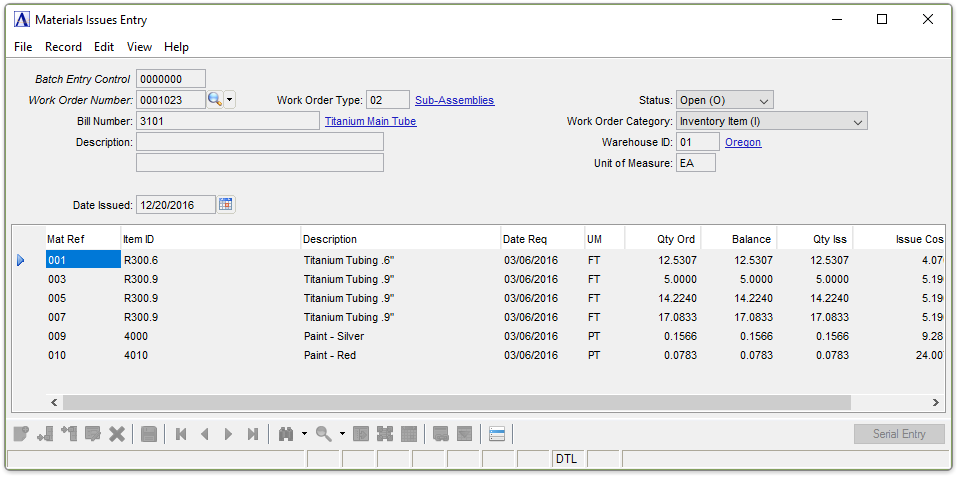
Materials Issues Entry
About the Fields
In the Work Order Number field...
-
Enter the work order number to issue materials.
-
Click
 to select from a list of valid work orders.
 -
Click the record navigating buttons;
 to view the first record,
  to view the previous record,
  to view the next record and
  to view the last address record.
 -
Click
 to begin a new material issue entry.
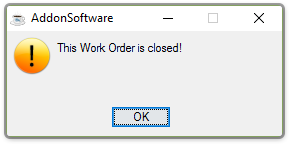
If a closed work order number is selected or entered, the system displays the prompt:
-
Press [OK] to access the Work Order Number field again.
Display only. Shows the number of the bill this work order will produce.
Display only. Shows the description of the bill.
Display only. Shows the date of the previous issue.
In the Work Order Type field...
Display only. Shows the type of production used for creating the bill.
Display only. Shows the status of the work order. Only open work orders can have materials issued.
-
Open (O)
-
Quote (Q)
-
Closed (C)
In the Work Order Category field...
Display only. Shows the category of the work order.
-
Inventory Item (I)
-
Non-Stock Item (N)
-
Recurring/Permanent (R)
Display only. Shows the warehouse from which the materials will be issued.
In the Unit of Measure field...
Display only. Shows the unit of measure .
Entering Items to the Detail Lines
When issuing materials for the first time, all items that entered in the Work Order Entry task, or the items that are associated with the operation sequence that was selected, are listed after selecting [Yes] at the “Was this work order pulled complete ?” prompt, or after you enter a portion to be pulled. If a partial issuance of materials has occurred in the past, these detail lines will display only the remaining materials to be issued. As materials are completely issued they are removed from the list.
Additional items may be added to this list. However, those items will not be updated to the work order and will only be effective for the current issuance. To make a lasting change to the work order it must be done in the Work Order Entry task.
Adding or Changing Materials Issues...
-
Click
 to edit the form.
 -
Click
 to add an additional issue to the list.
 -
Click
 to insert a new issue to the list.
 -
Click
 to delete the entry.
Most of the following fields are displayed for existing items and are explained below for the entering of new items.
In the Mat Ref field...
Optional field. Enter a reference number such as a drawing number. This number will appear on the Closed Work Order Summary Register.
-
Enter a valid item number code.
-
Click
to select from a list of valid item codes.
When entering a lot/serial type inventory item, the Serial Entry button becomes active.
Display only. A description of the item associated with the item ID is displayed.
-
Enter the date that the item is required.
-
Press [Tab] or [Return] to accept the default of today’s date.
Display only. Displays the unit of measure.
Display only. Shows the quantity of the item ordered on the work order.
-
Enter the amount of material that was issued.
This field displays any amount that was issued. If the amount pulled for the order was different from the issue amount, an adjustment is made in this field when responding to the "Was this work order pulled complete?" prompt.
Display only. Shows the cost of a single item.
When finished making entries to the fields…
-
Click
 to save the records
 -
Click
to begin a new work order entry. -
Click
to delete the entry.
Detail lines previously accepted may only have changes made to the Date Required, UM, and Quantity Issued fields.
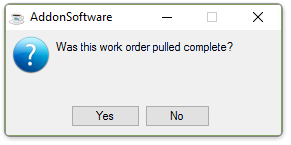
If the work order was pulled completely in its entirety, select [Yes]. The appropriate quantities issued are returned to the detail grid of the Material Issues Entry form.
If the work order was not pulled complete, select [No] and the Material Issues Operation Sequence form displays to allow selecting or unselecting different operations and quantities may be adjusted.
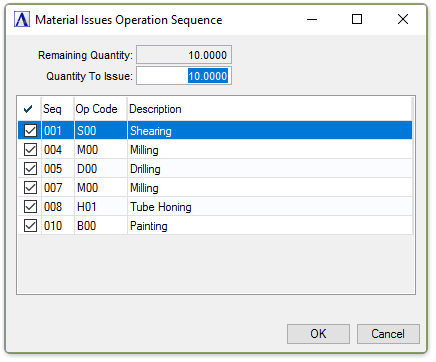
Materials Issues Operation Sequence editor
When finished making entries to the fields…
-
Click [OK] to accept the changes.
-
Click [Cancel] to close the form without changes.
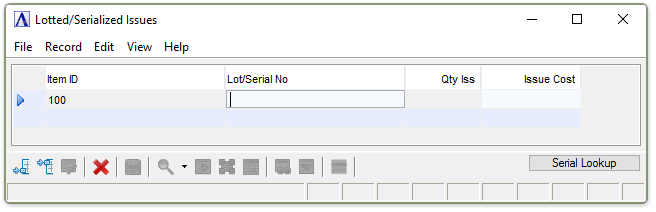
Lotted/Serialized Issues
When reviewing or adding an item that requires lot/serial numbers, the system will access additional lines for that entry. A serial/lot number must be assigned for each item issued.
If serial/lot numbers are not assigned, the update process during the Materials Issue Register task will not run.
The update removes inventory items from stock and issues them to the work order, thus creating work order transactions and applying material costs to the work order.
Lotted/Serialized Issues
Entering Serial/Lot Numbers
Select the Serial Lookup button to display the Inventory Lot Lookup window for the selected item.
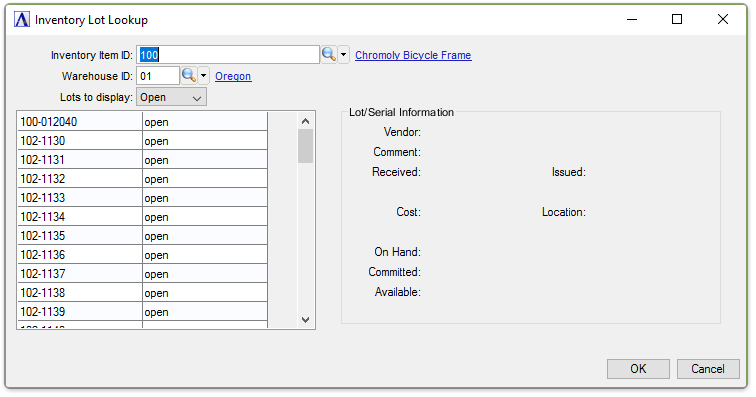
Inventory Lot Lookup
If the sum of serial/lot numbers assigned does not match the number of items issued, the system issues the prompt:

-
Click [OK] button and reselect another location from the Inventory Lot Lookup window.
Selecting a location with quantity available inserts the location into the Lotted/Serialized Issues window.
If insufficient quantities have been selected, the system displays the prompt:

-
Select the [OK] button and continue to make selections from available locations.
When finished making entries to the fields…
-
Click
to save the records. -
Click
to begin a new work order entry. -
Click
to delete the entry.
______________________________________________________________________________________
Copyright BASIS International Ltd. AddonSoftware® and Barista® Application Framework are registered trademarks.