Shop Floor Control - About the Work Order Entry Options
The Work Order Entry option menu allows you to work on one work order after another without ever leaving the Work Order Entry task. Once a work order has been accessed, the work order information can be reviewed, changes can be made to the work order, or information may be added and deleted by selecting available options from the menu.
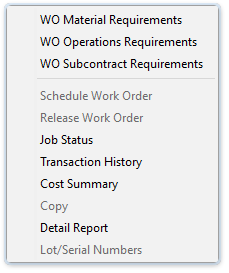
Work Order Entry options menu
Using the Additional Options Key
Selecting  reveals a dropdown of additional functions:
WO Material Requirements
Copy
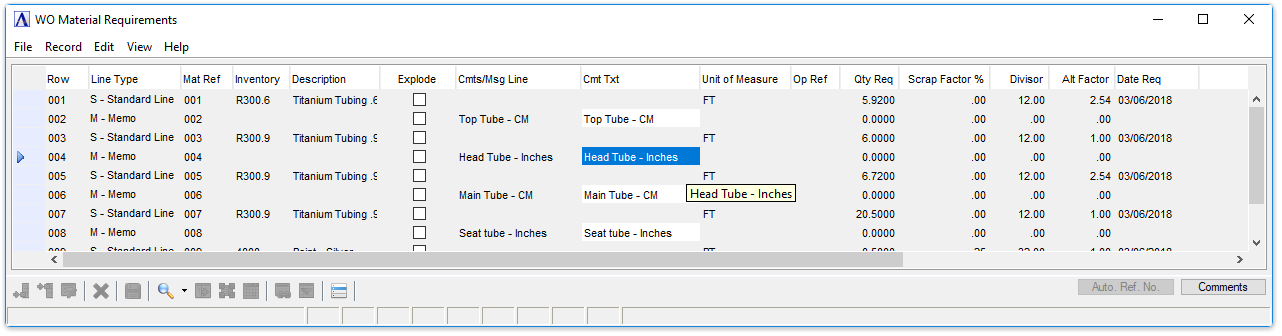
WO Material Requirements
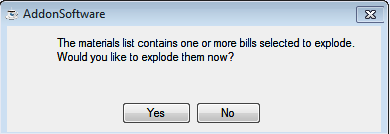
This option allows input of material requirements for category Non-Stock Item (N) work orders, and if the Bill of Materials is not installed, material explosion and commitment for category Inventory Item (I) work orders. If Bill of Materials is installed, then category Inventory Item (I) work orders can be displayed but not have changes made to them. For existing work orders, the WO Material Requirements option screen may be used to view the material requirements information. Material Requirements is not used for category Recurring/Permanent (R) work orders. The Material Requirements grid is automatically displayed when creating an inventory or non-stock work orders. The Explode flag can be checked or unchecked as desired. When the Materials grid is closed, the user is prompted to explode any flagged bills. If any items are exploded, the Materials grid displays, showing the exploded list.
WO Material Requirements
If the item being built contains stocked subassemblies, each stocked subassembly is displayed so that using on-hand stock or building the subassembly from raw materials can be determined. Any phantom bill of materials (non-stocked subassemblies) is automatically exploded. Stocked material requirements cannot be changed.
About the Fields
Adding or Changing Material Requirements
-
Click
 to add an additional requirement to the list.
 -
Click
 to insert a new requirement into the list.
 -
Click
 to edit the form.
Material requirements may be added or changed to an existing work order. When entering requirements for the first time the system walks through the fields in the order of the following instructions. When changing existing work order requirements the system backs through the following fields.
Display only. Provides a sequential row number for identifying which row(s) should be affected when automatically generating Material Reference Numbers for the materials lines. It is not used as a reference number in other forms or documents.
Use this field to assign a line sequence number for each new material item on the bill or to access any existing material line number directly.
-
Select the line type using the dropdown tool:
-
-
Standard Line
-
-
-
Memo
-
NOTE: Up to 999 material items may be created for each bill.
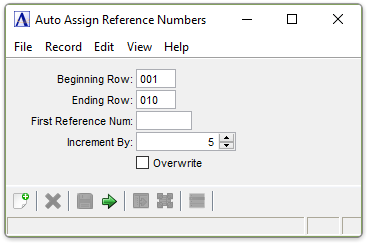
The Material Reference Number is a 6-character alphanumeric field that can be used to correlate the various materials on the work order to a drawing. You can enter any/all reference numbers manually, or generate the numbers using the [Auto. ref. no.] button. The auto-number function lets the user specify the beginning and ending row to number, the first number to use, an increment, and whether or not existing reference numbers should be overwritten. The beginning number is analyzed from right to left to find the first non-numeric character, which, if found, will act as a separator. Everything to the right of the separator is incremented by the user-specified amount. This feature makes it possible to number (or re-number) the entire list, or subsets of the list. Prior to actually creating the numbers, the system will warn if any duplicate numbers exist. Numbering can only proceed if all assigned numbers will be unique. Any/all numbers assigned via the auto-number function can be manually altered, again, so long as no duplicates are created. Once the desired reference numbers are in place, the "lock reference numbers" flag in the Work Order Header should be checked to prevent any further access to the reference numbers.
Auto Assign Reference Numbers
-
Enter a valid inventory item number.
-
Click
 to select from a list of valid inventory item numbers.
 -
Click
 to view the master record for the item number entered.
NOTE: An asterisk indicates this item is a subassembly or a manufactured component .
In the Description field...
Display only. The inventory item description is displayed based on the item number entered.
Explode checkbox...
The checkbox is active for non-stock Planned or Quote work orders only.
- Mark the box to ‘explode’ a material line that contains a bill to reveal all details and answer [Yes] or [No] to confirm.
In the Cmts/Msg Line field...
-
A comment editor pops up automatically upon entering the Cmts/Msg Line field and allows entry of up to 1024 characters and can accept formatting such as line feed and tab characters.
-
The first 60 characters or up to the first line feed, (whichever is less) is stored in the Cmts/Msg Line field.
-
Hover over the column to the right of the Memo/Non-Stock Desc column to see the full text or select the column (double-click or single click and Ctrl-F/magnifying glass), or via the [Comments] button (or Alt-C) to invoke the comments editor.
NOTE: Comments can only be edited when in the Edit mode.
In the Unit of Measure field...
-
Enter the two-character engineering unit of measure for this item.
-
Press [Tab] or [Return] to accept the unit of measure defined in the Inventory Master file.
The Operations Reference is a dropdown list showing the user-defined Operations Reference number (entered in Operations Requirements) along with the corresponding Operations Code and Description. Select the appropriate operation step for the given materials line, if applicable.
-
Enter the quantity of this item required for the work order.
In the Scrap Factor % field...
-
Enter the percentage of material expected scrap.
-
Press [Tab] or [Return] to accept the default number of 0.00.
Entering a scrap factor will increase the units needed to compensate for the anticipated scrap. For instance, if a 3’x 7’ piece is cut from a 4’x 8’ piece of plywood, a scrap factor of 35.37% would be entered. This factor is figured by dividing the sq. feet required by the sq. feet of the original piece and then converting it to a percentage.
21 sq. ft. ÷ 32 sq. ft = .6563 or 65.63% used
100 - 65.63 = 34.37% scrapped
-or-
32 sq. ft. - 21 sq. ft. = 11 sq. ft. scrapped
11 sq. ft. ÷ 32 sq. = .3537 or 34.37%
A divisor may be used when a unit of measure conversions are required. For instance, 36 will convert a material stocked in yards to be used in inches.
-
Enter a number by which the quantity required for this item will be divided, in order to arrive at the adjusted units to be used for this bill.
-
Press [Tab] or [Return] to accept the default number of 1.00.
An alternate factor may be used when a unit of measure conversions are required. For instance, 12 will convert a material stocked in inches to be used in feet.
-
Enter a number by which the quantity required for this item will be multiplied, in order to arrive at the adjusted units to be used for this bill.
-
Press [Tab] or [Return] to accept the default number of 1.00.
In the Date Req field...
-
Enter the date required in MM/DD/YYYY format.
In the IV Unit Cost field...
Display only. Displays the unit cost of the inventory item.
Display only. Shows the actual net quantity of material needed to create the finished product. The formula for determining the units is as follows:
Required x Alternate Factor ÷ (Divisor x ( 100 - scrap ) ÷ Yield %) = Units
In the Prod Unit Cost field...
Display only. Displays the cost per unit of production. (Inventory Unit Cost) * (Units on same WO Material Requirements grid row).
Display only. (WO Schedule Production Quantity) * (Units on same WO Material Requirements grid row).
Display only. Shows the Total Units times the Inventory Unit Cost, which is the same as (WO Schedule Production Quantity) * (Production Unit Cost on same WO Material Requirements grid row).
When finished making entries to the fields…
-
Click
 to save the record.
 -
Click
 to clear the form and begin again.
 -
Click
 to delete the entry.
 -
Click the "Close Window" button to return to the Shop Floor Control menu.
WO Operations Requirements
The Operations Requirements option is used for inquiry, addition, change, and deletion of all operations associated with producing any bill of materials item. Within this option you set up the individual operations required, the date the operation is required, the amount of time necessary to set up assembly , how many pieces will be created per hour and how many hours it will take to create a piece, and the length of time until this piece can move on to the next operation. The Operation Requirements grid is automatically displayed when creating non-stock or recurring work orders.
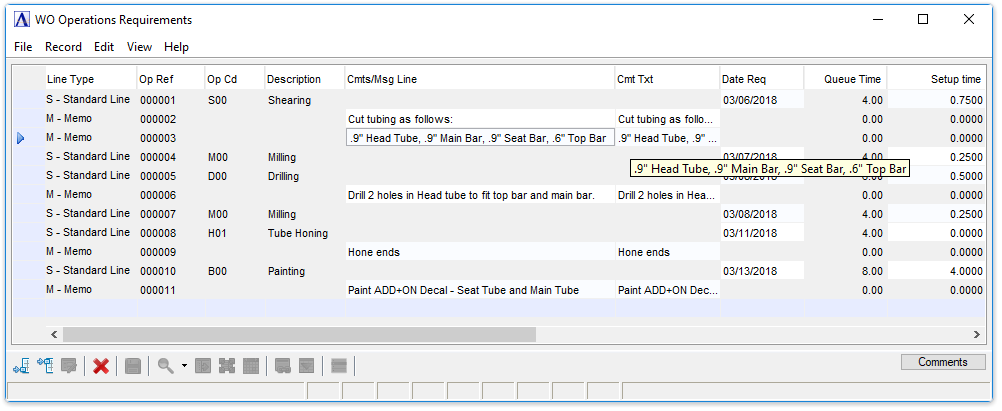
WO Operations Requirements
Adding or Changing Operations Requirements
Operation requirements may be added or edited to an existing work order or requirements form. When entering requirements for the first time the system walks through the fields in the order of the following instructions. When changing existing work order requirements, the system backs through the following fields.
-
Click
to edit the form. -
Click
to add an additional requirement to the list. -
Click
to insert a new requirement into the list.
Use this field to assign a line sequence number to each operation line on the bill or to access any existing operation line number directly.
-
Select the line type using the dropdown tool:
-
-
Standard Line
-
Memo
-
-
Press [Tab] or [Return] to accept the default Line Type.
NOTE: Up to 999 operation lines may be created for each work order.
In the Op Ref field...
The Operations Reference field is a 6 character field that lets you assign a unique number to each operation step for the Work Order. For quick entry, the field is zero-filled – operators only need to enter the minimum significant digits (e.g. Key in 1 instead of 000001). This reference number is prepended to the Operations Code and Description in the Materials and Subcontracts grids so it's easy to choose the appropriate operation step for a specific Materials or Subcontracts line.
-
Enter a valid operation code.
-
Click
to select from a list of valid operation codes. -
Click
to view the master record for the operation code entered.
In the Description field…
Display only. Displays the description for the operation code entered.
In the Cmts/Msg Line field...
-
A comment editor pops up automatically upon entering the Cmts/Msg Line field and allows entry of up to 1024 characters and can accept formatting such as line feed and tab characters.
-
The first 60 characters or up to the first line feed, (whichever is less) is stored in the Cmts/Msg Line field.
-
Hover over the column to the right of the Memo/Non-Stock Desc column to see the full text or select the column (double-click or single click and Ctrl-F/magnifying glass), or via the [Comments] button (or Alt-C) to invoke the comments editor.
NOTE: Comments can only be edited when in the Edit mode.
-
Enter the date the operation is required.
-
Press [Tab] or [Return] to accept the current date.
Display only. Shows the average amount of time material will wait in line for the operation.
Queue time is defined as the amount of time that a job waits prior to the start of the operation. It will be used to determine the date required for the completion of the operation. The queue time displayed is from the Work Order Operation Codes; or the Bill of Materials Masters file if installed.
-
Enter the amount of time needed to set up the assembly of the entire lot.
-
Press [Tab] or [Return] to accept the default. The default is from the Operations Master File; or the Bill of Materials Master File if installed.
The following formulas describe the anticipated hours and costs needed to complete the work order:
| Run Time | = (Hours per Piece/Pieces per Hour) |
| Hours Each | = (Setup Hours/Production Qty) plus Run Time |
| Cost Each | = Hours Each times (Direct Labor Rate times 1 plus (Overhead Factor/100)) |
| Hours Total | = Setup Hours plus (Run Time times Production Qty) |
| Cost Total | = Hours Total times (Direct Labor Rate times 1 plus (Overhead Factor/100)) |
-
Enter how many pieces per hour can be created.
-
Press [Tab] or [Return] to accept the default. The default is whatever amount has been set up in the Operation Code task.
In the Hours Per Piece field...
-
Enter the number of hours needed to create the piece.
-
Press [Tab] or [Return] to accept the default.
The default is 1.00 if there is an entry in the Piece/Hr field.
-
Enter the amount of time needed to move to the next process.
-
Press [Tab] or [Return] to accept the default.
Move time is used by the scheduling system to allow for time between operations. It may represent cooling time, drying time, or any time required before an item can be physically moved. The default is whatever time has been set up in the Operation Codes maintenance task; or the Bill of Materials Master File if installed.
Display only. The top figure shows the amount of the cost applied to this operation for each item; the bottom figure shows the total cost of the operation for the entire work order.
In the Tot Std Cst field...
Display only. Hours Total times (Direct Labor Rate times 1 plus (Overhead Factor/100))
In the Run Time In Hrs field...
Display only. (Hours per Piece/Pieces per Hour)
In the Tot Time Req In Hrs field...
Display only. Setup Hours plus (Run Time times Production Qty)
When finished making entries to the fields…
-
Click
to save the record. -
Click
to begin a new entry. -
Click
to delete the entry.
______________________________________________________________________________________
Copyright BASIS International Ltd. AddonSoftware® and Barista® Application Framework are registered trademarks.