Purchase Order Processing - Purchase Order Invoice Entry
Function
Use this task to invoice standard purchase orders once orders are filled and the shipped quantity of the order items is known.
The invoice entry may be used to enter a direct or one-time invoice without first creating a purchase order.
=> To access this task...
Select Purchase Order Invoice Entry from the Purchase Order Processing main menu.
When accessing this task the field for entering a default accounting date appears:
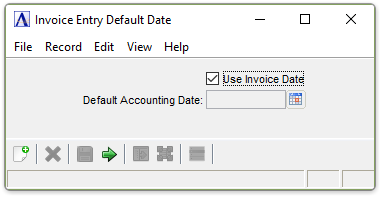
Invoice Entry Default Date
Use Invoice Date checkbox...
-
Mark the box to use the invoice date.
-
Unmark the box and enter the default date for accounting.
In the Default Accounting Date field...
Active only if Use Invoice Date is unchecked. The entered date applies to all invoices processed in this batch.
-
The default date is today's date.
-
Click
 to select a date by using the calendar tool.
 -
Press
 to commit the dates to this batch of entries.
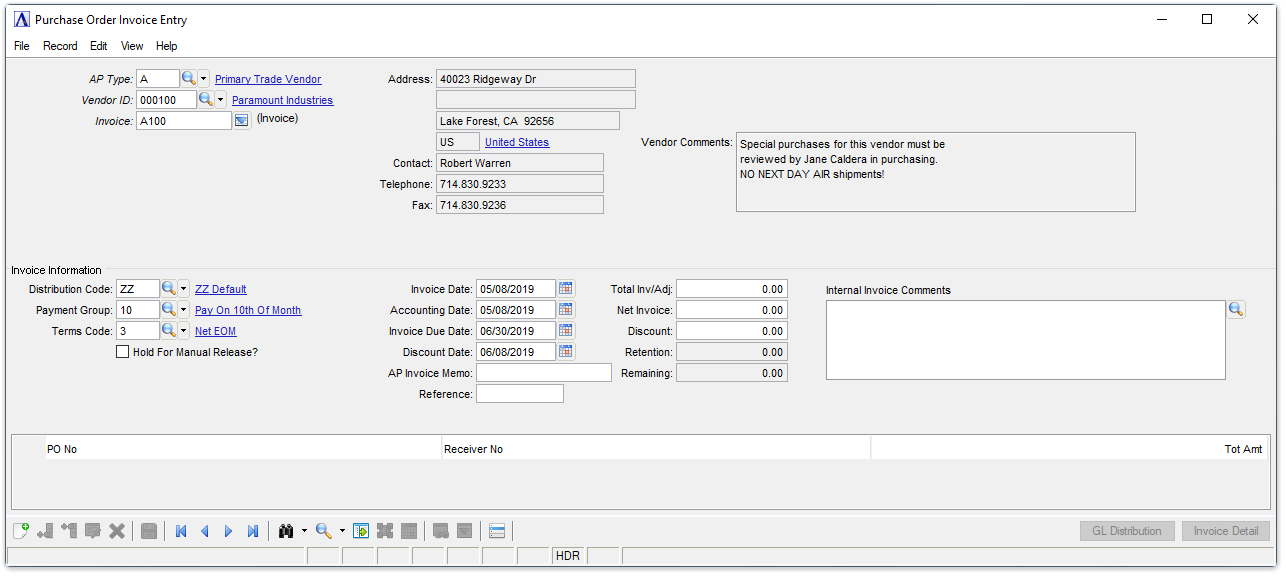
Purchase Order Invoice Entry
About the Fields
The Invoice Entry screen is divided into two sections. The upper section (header) fields contain vendor information, including name, address, contact, etc. In most cases, this information is automatically retrieved from the Accounts Receivable customer masterfile after selecting a vendor. The lower section fields contain default codes set up in the Purchase Order Inquiry and Maintenance tasks. These codes can be overridden if desired. Depending on the type of invoice selected, the fields appearing in this section can change. This section is also used for displaying the detail line entry fields.
-
Enter a valid accounts payable type.
-
Click
 to select from a list of accounts payable types.
-
Enter a valid vendor number.
-
Click
to select from a list of vendor numbers.
Vendor information is displayed after a vendor is selected. If the Display Vendor Comments field in the Parameter Maintenance System Parameters option is checked, vendor comments are automatically displayed.
-
Enter a valid invoice number.
-
Click
 to display all invoices associated with the displayed vendor
Display only. Shows the information for the vendor.
Display only. Shows the name of the contact entered in the Accounts Payable Vendor Maintenance task.
Display only. Shows the telephone number entered in the Accounts Payable Vendor Maintenance task.
Display only. Shows the fax number entered in the Accounts Payable Vendor Maintenance task.
Invoice Information
In the Distribution Code field...
-
Enter a valid distribution code.
-
Click
to select from a list of distribution codes.
-
Enter a valid payment group.
-
Click
to select from a list of payment groups.
-
Enter a valid terms code.
-
Click
to select from a list of terms codes.
Hold For Manual Release? checkbox...
-
Mark the box to withhold this invoice from automatic payment selection.
-
Mark the box to release the invoice for automatic payment selection.
NOTE: Before an invoice can be paid, any hold status must be removed.
-
Enter a date for the invoice.
-
Click
to select a date by using the calendar tool.
In the Accounting Date field...
-
Enter an accounting date for the invoice.
-
Click
to select a date by using the calendar tool.
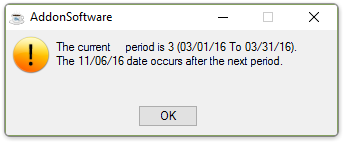
If entering a date outside of the current period, the system displays the prompt:
-
Click [OK] to return to the Accounting Date field.
In the Invoice Due Date field...
-
Enter a due date for the invoice.
-
Click
to select a date by using the calendar tool.
-
Enter a discount date for the invoice.
-
Click
to select a date by using the calendar tool.
In the AP Invoice Memo field...
-
Enter 1 to 10 characters of optional reference information.
-
Press [Tab] to leave blank.
In the Reference field...
-
Enter up to 16 characters of optional memo information.
-
Press [Tab] to leave blank.
-
Enter the amount of the invoice.
-
Enter the net amount of the invoice.
The net invoice amount is the dollar value of the invoice that can be discounted after subtracting freight, shipping, and so forth.
-
Enter the amount of any discount to apply on the net invoice amount.
Display only unless the Retention Account checkbox is marked in Accounts Payable Application Parameters. Amount that is to be withheld from the invoice payment during the payment selection process in Accounts Payable. See Help for the Accounts Payable module for more on retention. .
Display only. Amount remaining.
Purchase Order Detail
Individual purchase orders may be invoiced from the Purchase Order Selection section by entering a purchase order number in the PO No. field. Multiple purchase orders can appear on the same invoice. The Remaining field displays the total amount left to distribute as purchase orders are added.
The Purchase Order Detail section is optional and may be skipped if the invoice contains charges other than from a purchase order. To skip entry into the purchase order grid, press the [F7] key to move out of the grid and activate the [GL Distribution] button.
Note: Using the mouse will not exit the grid unless at least one valid purchase order has been entered. Press [F7] if no purchase orders are entered.
-
Enter a valid purchase order number.
-
Click
to select from a list of purchase order numbers.
Optional field. A receiver number for this purchase order. If left blank, all receivers for the purchase order are invoiced.
Display only. Amount for the specified receiver(s).
When finished making entries to the fields...
-
Click
 to save the records listed in the grid.
 -
Click
 to delete the current purchase order.
Invoice Detail Grid
The Invoice Detail grid enables you to enter items to the invoice not contained on an original purchase order, to delete specific receiver line items, or to adjust costs. View an invoice from the grid by selecting the [Invoice Detail] button. The grid is initially populated with the rows from the receivers selected in the main form. Charges that are listed on the invoice, but not contained on original purchase order(s), may be added here as other-type lines. Rows may be deleted from the grid to limit the invoice to particular receiver lines. Unit costs may be changed to reflect the actual cost which appears on the invoice. See Appendix B - Landed Cost.
Note: The total of any rows you manually add to the Invoice Detail grid will appear as a row on the main form. This row will have blank PO No and Receiver No cells.
Changes are reflected in the Remaining field.
-
To view the invoice from the Purchase Order Details grid, click the [Invoice Detail] button or from the PO Invoice Entry header, select [Invoice Detail] from the Additional options list.
PO Invoice Detail
In the PO No field...
Display only. Displays the PO number(s) of the receiver line(s) selected for invoicing.
Display only. Displays the PO line numbers of the receiver line(s) selected for invoicing.
Display only. Displays receiver numbers for the specific items if any.
In the PO Line Cd field...
Display only except for manually-added rows. Displays the PO line code associated with each system-generated row. Enter an other-type line code for rows you manually add to the grid in order to capture charges that are listed on the invoice, but that are not already entered into AddonSoftware via the purchase order or receiver.
In the Memo/Non-Stock Desc field...
Display only except for manually-added rows. Displays the memo or non-stock description (if any) associated with each system-generated row. Use the field to notate manually-added rows.
Display only. Shows the quantity received.
-
Enter the cost per unit.
-
Press [Tab] to accept the default cost.
Display only. Shows the to cost received.
When done making selections...
-
Click
to save the record. -
Click
to delete the selected grid row.
General Ledger Distribution Detail
If the General Ledger module is installed, any difference between the invoice total and the sum of the line item extensions must be allocated to the General Ledger. The general ledger distribution section provides a means to allocate differences.
NOTE: The general ledger distribution section does not appear if the General Ledger module is not installed and interfaced to the Purchase Order Processing module or if accounts payable is run on a cash basis.
The Remaining field displays the difference between distribution lines and the invoice amount. There can be one or more distribution lines for each invoice, depending on how the distribution of the invoice amount is made. Continue distribution until the Remaining field equals zero.
-
Click on the [GL Distribution] button or
 and select GL Distribution from the dropdown list to access the GL Distribution entry window.
NOTE: The GL Distribution option is not available from within the Purchase Order Detail grid. Use the F7 key to exit the grid.
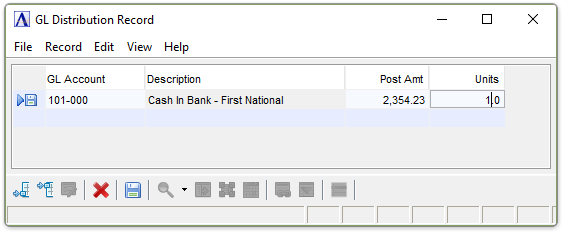
GL Distribution Record
-
Enter a valid general ledger account number.
-
Click
to select from a list of general ledger account numbers.
Display only. Shows the description assigned the account number in the General Ledger Account Maintenance task.
-
Enter the amount of the distribution.
-
Enter the units for the distribution.
-
Press [Tab] to accept the default.
When done making selections...
-
Click
to save the record. -
Click
to delete the selected grid row.
______________________________________________________________________________________
Copyright BASIS International Ltd. AddonSoftware® and Barista® Application Framework are registered trademarks.