Accounts Receivable - Simple Invoice Entry
Function
The AR Invoice Entry task provides simple invoicing functions in the Accounts Receivable module when billing integrated with the Inventory Control module is not required. Detailed line items may be entered in the body of the invoice, each having a separate general ledger revenue account, service date, description, quantity, price, and extension.
=> To access this task...
Select Simple Invoice Entry from the Accounts Receivable main menu.
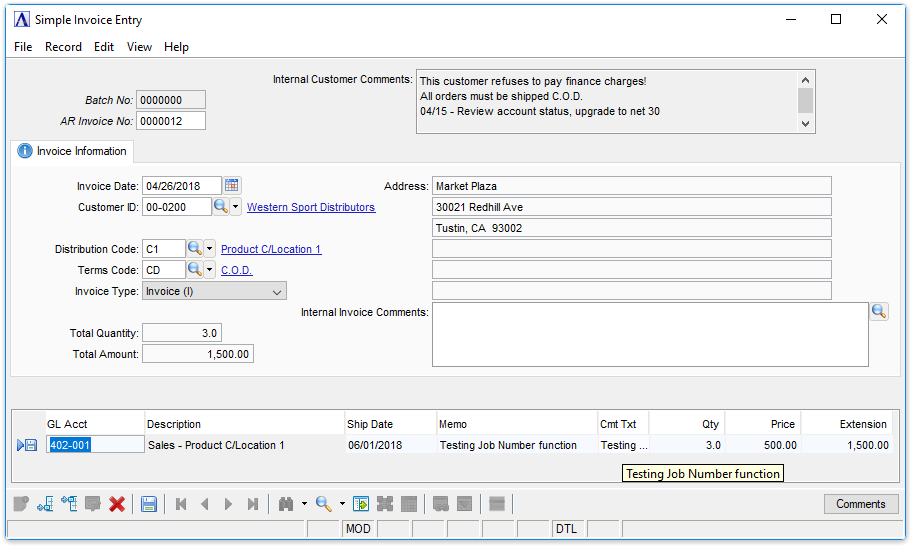
AR Invoice Entry
About the Fields
To enable edits to a saved form select  .
.
In the Batch No. field...
Display only. A default batch number is assigned to each invoice entry.
In the AR Invoice No. field...
-
Enter a seven-digit invoice number.
-
Select the [Tab] key to assign the next invoice number.
When the invoice number already exists but has not yet been updated, the invoice heading information is displayed. The invoice can be added to, modified or deleted. Deleting a transaction in the entry file deletes the detail and retains the header with a Voided status. This allows voids to show on the register for tracking purposes.
In the Internal Customer Comments field...
These comments are internal only (don't appear on reports or customer-facing documents), and follow the invoice all the way into history. They can be changed/amended at any time (even AFTER the invoice goes to history).
-
Enter or edit by typing directly into the form field, or click
 (or Ctrl-F) to launch the comment editor.
In the Invoice Date field...
This date is used to specify the general ledger posting date for the invoice.
-
Enter the date of the invoice
-
Click
 to select a date using the calendar tool.
NOTE: Having progressed to this field, the heading information must be completed before deleting the entry.
In the Customer ID field...
-
Enter a valid customer number
-
Click
to select from a list of valid customer numbers.
The customer name associated with the customer number displays to the right of the Customer ID field and is linked to the Customer Master file.
In the Address fields...
Display only. Shows the address of the customer associated with the customer number.
In the Distribution Code field...
-
Enter a valid distribution code.
-
Click
to select from a list of valid distribution codes.
This code is used to specify the Accounts Receivable account when the invoice is updated and postings to the general ledger are created. (Refer to Distribution Code maintenance task in the Accounts Receivable Maintenance section for additional information.) The description of the distribution code is displayed.
In the Terms Code field...
-
Enter a valid terms code for the invoice. (Refer to Accounts Receivable Terms Code Maintenance.)
-
Click
to select from a list of valid terms codes.
The description of the terms code is displayed.
From the Invoice Type dropdown...
-
Select Invoice (I), Adjustment (A), or Voided Invoice (V) using the dropdown tool.
In the Total Quantity field...
Display only. Shows the quantity totals for entries made in the bottom of the form.
In the Total Amount field...
Display only. Shows the dollar totals for entries made in the bottom of the form.
In the Internal Invoice Comments field...
These comments are internal only (don't appear on reports or customer-facing documents), and follow the invoice into history. They can be changed/amended at any time (even AFTER the invoice goes to history).
-
Enter or edit by typing directly into the form field, or click
(or Ctrl-F) to launch the comment editor.
Invoice Line Item Maintenance
After the heading information has been entered, the line items or “body” of the invoice is entered.
In the GL Acct field...
(Active when the General Ledger module is installed.)
-
Enter a valid general ledger number that (usually) represents the revenue posting account for this detail line.
-
Click
to select from a list of valid GL Account codes. -
Press the [Tab] key to accept the default GL Account associated with the distribution code.
In the Description field...
Display only. Displays the description of the account number entered.
In the Ship Date field...
Optional entry. This date has no effect on the general ledger posting for the invoice.
-
Enter the date of service or delivery of the product.
In the Memo/Cmts Txt field...
-
A comment editor pops up automatically upon entering the Cmts/Msg Line field and allows entry of up to 1024 characters and can accept formatting such as line feed and tab characters.
-
The first 60 characters or up to the first line feed, (whichever is less) is stored in the Cmts/Msg Line field.
-
Hover over the column to the right of the Memo/Non-Stock Desc column to see the full text or select the column (double-click or single click and Ctrl-F/magnifying glass), or via the [Comments] button (or Alt-C) to invoke the comments editor.
NOTE: Comments can only be edited when in the Edit mode.
In the Qty field...
Optional entry.
-
Enter the quantity for the invoice detail line, if applicable. The default is zero.
Example: Enter the number of hours if this is a labor charge that is billed per hour.
In the Price field...
Optional entry.
-
Enter the price per unit for the invoice detail line, if applicable. The default is zero.
Example: Enter the price per hour when it represents a labor charge that is billed by the hour.
In the Extension field...
Display only. Displays the product of Qty times Price.
When finished making entries to the fields…
-
Click
 to the left of the invoice line item -or- at the bottom of the form to save the entry.
 -
Click
 to insert a new entry.
 -
Click
 to insert an entry between existing entries.
 -
Click
 to remove an entry.
 -
Click
 to clear the form and begin again.
______________________________________________________________________________________
Copyright BASIS International Ltd. AddonSoftware® and Barista® Application Framework are registered trademarks.