Accounts Receivable - Customers
Function
The Customers maintenance task allows for the entry of new customers, maintenance of existing customers. There are four tabs on this form - Name and Address, Profile, Aging and Sales Summary, and Comments. There is an Additional options dropdown list of additional functions available from this form as well.
=> To access this task...
Select Customers from the Inquiry and Maintenance menu.
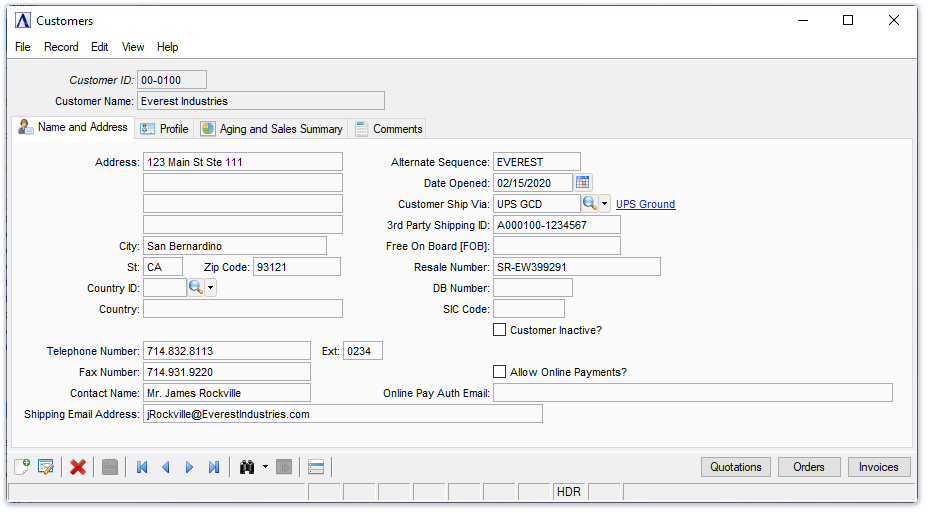
Customers maintenance form
About the Customer maintenance options
The Customer maintenance option screen (Customer Master) allows you to work on one customer after another without ever leaving the Customer maintenance task. Once a customer record is accessed, you can make adjustments. When you select a tab from the Customer master file, a set of fields prompts requiring your attention appear on the screen. After you have made changes, click  .
.
About the Fields
To enable edits to the form select  .
.
In the Customer ID field...
-
Enter the valid customer number.
-
Click
 to select a customer ID from a list of existing active code records. To view a list of all records including inactive records, see Query Functions.
 -
Click the record navigating buttons;
 to view the first record,
  to view the previous record,
  to view the next record and
  to view the last record.
In the Customer Name field...
-
Enter the name of the customer.
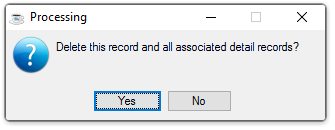
NOTE: To delete a customer, enter the Customer ID and press enter. When the details are displayed click the delete button  . The following screen prompts you to confirm deletion, click [Yes] to delete, [No] to return to the customer maintenance screen.
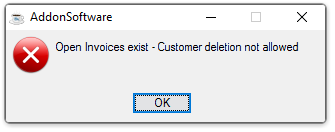
NOTE: A customer record may not be deleted if an AR balance exists.
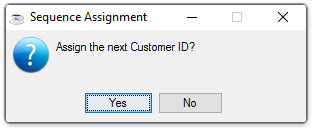
Automatic Customer Numbering
Optional : The Accounts Receivable module can provide for automatic sequential numbering for new customers. This offers a fast, controlled method of assigning numbers for new customers, as in the initial download to the computer.
When pressing [Return] without entering any customer number in the Customer ID field, the system prompts whether to 'Assign next Customer ID' automatically.
-
Click [Yes] to assign customer ID automatically.
-
Click [No] to assign the customer ID manually, and the control returns to the Customer ID field.
Name and Address Tab (Back to top)
Function
The Name and Address tab allows for the inquiry and maintenance of the customer name and address, along with other information used by the Accounts Receivable and Order/Invoice Processing modules. It is also the option to use in removing customers from your system.
When entering a new customer, the fields in this option are blank. When an existing customer is accessed, all address information is displayed.
About the Fields
To enable edits to the form select .
In the Customer Name field...
-
Displays the name associated with the Customer ID entered. If creating a new record, enter a customer name.
In the Address field...
-
Enter up to four lines of customer address information.
In the City field...
-
Enter the name of the city associated with the customer.
In the St field...
-
Enter 2 characters to identify the name of the state associated with the customer.
In the Zip Code field...
-
Enter the customer's zip code.
Either a 5- or 9-digit zip code is requested, depending on how the parameter is set in Accounts Receivable Application Parameters maintenance task.
In the Country ID field...
-
Enter the two character code for the name of the country associated with the customer.
-
Click
 to select from a list of all valid country IDs.
In the Telephone Number field...
-
Enter the customer's telephone number with area code. The punctuation for the area code and prefix are displayed automatically.
In the Ext field...
-
Enter a telephone extension number, if applicable.
In the Fax Number field...
-
Enter a fax phone number, if applicable.
In the Contact Name field...
-
Enter the name of the customer's contact person.
In the Shipping Email Address field...
This is the customer email contact for shipping issues and is used as the default in the Order/Invoice Entry task.
In the Alternate Sequence field...
-
Enter an alternate sequence for the customer.
-
The default system created name is the first 10 characters of the customer name entered.
When using the Record Query button , this sequence is used to locate the customer by name. It is also used to sort customers alphabetically for reports. Generally, it is made up of the first 10 characters of the name; however, any name can be entered. For instance, you may want to enter AT&T for American Telephone and Telegraph.
In the Date Opened field...
-
Enter the date that this customer was originally established.
-
Click
 to display calendar and select date.
 -
Press [Return] to accept the terminal date.
In the Customer Ship Via field...
-
Enter the standard shipping method.
-
Click
to select from a list of all valid Ship Via Codes.
In the 3rd Party Shipping ID field...
This information sets the default used in the Order/Invoice Entry tasks.
In the Free On Board [FOB] field...
-
Enter characters to identify the freight charge description.
In the Resale Number field...
-
Enter the customer's resale identification number.
In the DB Number field...
-
Enter the customer's Dun & Bradstreet identification number.
In the SIC Code field...
-
Enter the Standard Industry Code classification number for the customer.
Customer Inactive? checkbox...
-
Mark the box to render this customer inactive.
-
Unmark the box to indicate that this is an active customer.
Allow Online Payments? checkbox...
-
Mark the box if the customer wants to allow one or more authorized users to pay invoices via a credit card online.
-
Unmark the box to disable this function.
In the Online Pay Auth Email field...
-
Enter the email address of the customer's authorizing agent. This person will receive an email whenever a customer user registers to pay online, and must provide authorization in order for the registration to be completed.
-
-
When entered for the first time, this email address is used to create a Report Control Recipient record for the ARS_CC_CUSTPMT document, and this customer as the recipient. If the email address differs from what is in the Report Control Recipient file, it is shaded and the user can elect to update the Online Pay Auth Email address with the address in the Report Control Recipient record.
-
The Quotations button...
The Sales Order Processing module is required.
- Launches the OP/Quote/Order/Invoice Inquiry grid filtered for quotations.
The Orders button...
Sales Order Processing module is required.
- Launches the OP/Quote/Order/Invoice Inquiry grid filtered for orders.
The Invoices button...
Sales Order Processing module is required.
-
Launches the OP/Quote/Order/Invoice Inquiry grid filtered for invoices.
When finished making entries...
-
Click
to save the entries. -
Click
 to clear entries and begin again.
 -
Click
to remove the customer from the system. When any outstanding accounts receivable balance exists for the customer, the deletion request is ignored.
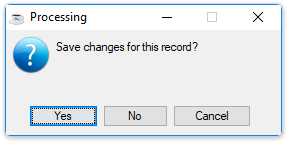
Attempting to leave an unsaved Customer Maintenance window, the module issues this confirmation:
-
Click [Yes] to save the current record and return to Customer ID field in the screen.
-
Click [No] to return to the Customer ID field without saving the current record.
Profile Tab (Back to top)
Function
In addition to the standard name and address information, there are a number of file-verified fields that may be associated with a customer. These codes are generally used throughout the Order/Invoice Processing and Sales Analysis modules. During Order/Invoice Entry, they provide default values that speed the data entry process. The default values may always be overridden for a particular order or invoice.
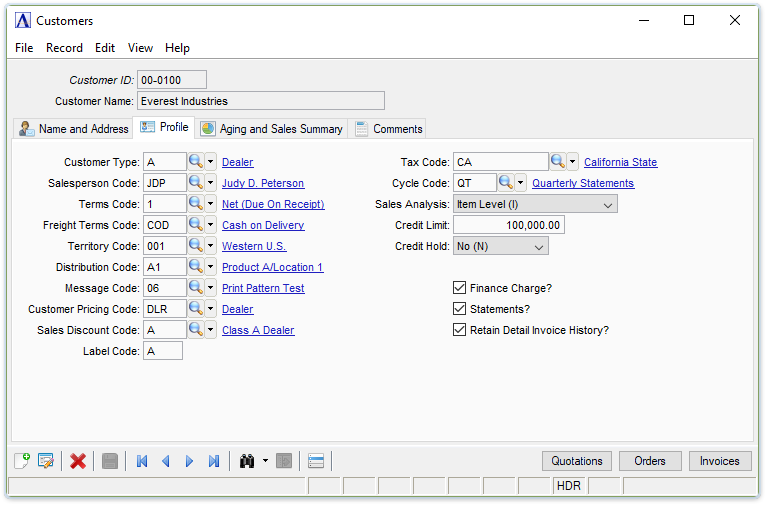
Customer Master - Profile tab
Not all of these fields may be applicable to your business (such as the Territory Code). However, you still must assign a code when setting up a customer. When this is the case, establish a single code (i.e., one named "Standard") to apply to the entire customer base and enter that code for each customer.
You may also find that a file-verified field, when taken literally, may be used for another purpose depending on how it was installed. Study each of these codes and how they affect the module operation before you rule out their use. Familiarity with Order/Invoice Processing and Sales Analysis is helpful in making these determinations.
Example
The Territory Code provides a way to track customer sales by geographic location in the Sales Analysis module. When it is not applicable to your business, you may use the code to track sales by another category, such as customer account type (i.e. wholesale versus retail).
About the Fields
To enable edits to the form select .
In the Customer Type field...
The customer type is used for sales analysis purposes. Each customer must be assigned a customer type, even when all customers are set up to be the same type.
-
Enter a valid customer type as defined in the Customer Type Maintenance task.
-
Click
to select from a list of all valid types.
In the Salesperson Code field...
The salesperson code is used for reporting in this module and in the Order/Invoice Processing and Sales Analysis modules
-
Enter a valid salesperson code as defined in the Salesperson Maintenance task.
-
Click
to select from a list of all valid salespersons.
In the Terms Code field...
-
Enter a valid terms code as defined in the Terms Code Maintenance task.
-
Click
to select from a list of all valid terms codes.
In the Freight Terms Code field...
-
Enter a valid freight terms code.
-
Click
to select from a list of valid codes.
In the Territory Code field...
-
Enter a valid territory code as defined in the Territory Code Maintenance task.
-
Click
to select from a list of all valid territory codes.
In the Distribution Code field...
The distribution code provides the capability to associate a different account for receivable, sales tax, freight and optionally revenue, for each customer.
-
Enter a valid distribution code.
-
Click
to select from a list of all valid distribution codes.
In the Message Code field...
-
Enter an optional standard message code that will appear on the customer's invoice.
-
Click
to select from a list of all valid messages.
In the Customer Pricing Code field...
The customer pricing code, in conjunction with an inventory item class code, identifies a quantity break table that is used to calculate prices during order and invoice entry. When the Sales Order Processing module is not installed, this field is not applicable and may be left blank.
-
Enter a valid price code as defined in the Price Code Maintenance task.
-
Click
to select from a list of all valid price codes.
In the Sales Discount Code field...
The sales discount code allows you to provide a percentage discount on a customer's entire invoice as entered through the Order/Invoice Processing module. The sales discount is separate from the pricing method used to calculate sales prices on inventory items during the Order/Invoice Entry process.
-
Enter a valid sales discount code as defined in the Sales Discount Code Maintenance task.
-
Click
to select from a list of all valid discounts.
In the Label Code field...
-
Enter a one or two-character code used for selection purposes during Customer Label printing.
In the Tax Code field...
A tax code must be entered even when the customer is reselling merchandise. In this case, you should have a tax code with a zero percent and description of "Resale" or "Non-Taxable."
-
Enter a valid sales tax code for the customer that is used by the Order/Invoice Processing module.
-
Click
to select from a list of all valid codes.
Keep in mind that the tax code only specifies the tax jurisdiction for the customer. The actual application of sales tax during the Order/Invoice Entry process is also determined by the item being sold and order line type that have their own definition of taxability.
In the Cycle Code field...
-
Enter the cycle code for this customer.
-
Press [Return] to select all codes.
-
Click
to select from a list of all valid codes.
From the Sales Analysis dropdown...
-
Product Level to summarize sales analysis for this customer on a product code level.
-
Item Level to retain sales analysis for this customer by inventory item (most detailed).
-
No Sales Analysis to not collect sales analysis data for this customer.
When the Sales Analysis module is installed, this field controls how sales analysis data is collected for this customer. However, the level of sales analysis detail is limited by the settings created in Sales Analysis Parameter Maintenance.
In the Credit Limit field...
This field is only accessible if Credit Management is not installed.
-
Enter the maximum amount of credit to be extended this customer before a hold is placed on their account.
When Credit Management is installed, this field shows the credit limit placed on this customer in the Credit Manager's Review & Release task in Order/Invoice Processing.
From the Credit Hold dropdown...
This field is display only and appears only if the Credit Management system is installed.
-
Select Yes (Y), No (N), or Exempt (E).
A customer may be placed on credit hold for one of several reasons, depending partly on the setting of the Credit Management Parameters. Credit holds may be placed automatically on any new customer or on one who has exceeded a credit limit. The credit manager may also manually apply a credit hold.
Finance Charge? checkbox...
Finance charge calculations are made as a separate process, depending on a number of other accounts receivable criteria.
-
Mark the box to indicate that the customer is eligible for finance charges.
-
Unmark the box to indicate that the customer is not eligible for finance charges.
Statements? checkbox...
-
Mark the box to indicate that this customer is eligible to receive accounts receivable statements.
-
Unmark the box to indicate that this customer is not eligible to receive statements.
Other selection criteria are available at the time the statements are actually printed.
Retain Detail Invoice History? box...
-
Mark the box to indicate that the invoice history is to be retained.
-
Unmark box to indicate that the invoice history is not to be retained.
When done making selections...
-
Click
to save the entries. -
Click
to clear the form and begin again. -
Click
to remove the customer from the system. When any outstanding accounts receivable balance exists for the customer, the deletion request is ignored.
Aging and Sales Summary Tab (Back to top)
Function
The Aging and Sales Summary tab provides online inquiry into a customer's accounts receivable balance, summarized aging, average days to pay and summarized sales and gross profit information. All fields are display only.
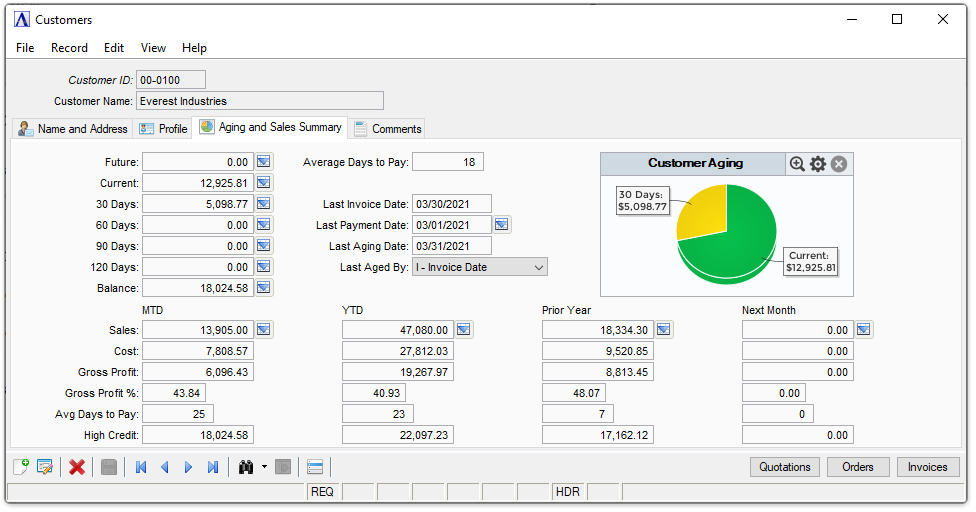
Customer Master - Aging and Sales Summary Tab
About the Fields
To enable edits to the form select .
In the Future field...
Displays the amount of a customer's open invoices with a due date beyond the current period. An amount will normally appear in the future if it is not yet due. The  drilldown uses the last aging fields to return the list of invoices.
In the Current field ...
Displays the amount of a customer's open invoices with a due date from present to 29 days past due. The drilldown uses the last aging fields to return the list of invoices.
In the 30 Days field ...
Displays the amount of a customer's open invoices with a past due date of 30 to 59 days. The drilldown uses the last aging fields to return the list of invoices.
In the 60 Days field ...
Displays the amount of a customer's open invoices with past due dates from 60 to 89 days. The drilldown uses the last aging fields to return the list of invoices.
In the 90 Days field ...
Displays the amount of a customer's open invoices with past due dates from 90 to 119 days. The drilldown uses the last aging fields to return the list of invoices.
In the 120 Days field...
Displays the amount of a customer's open invoices with past due dates over 120 days. The drilldown uses the last aging fields to return the list of invoices.
In the Balance field ...
Displays the total amount due from this customer.
-
Select the
button to display a grid of invoices for the vendor that total the Balance field total. The drilldown has two hyperlinks. The first appears on the Invoice Number. If OP is installed, clicking an OP invoice number launches OP Historical Invoice Inquiry displays the invoice details and/or prints an Historical Invoice. Clicking on an AR Invoice launches Barista's Doc Inquiry, filtered on that invoice number, to display an archived AR invoice. The second appears on the Invoice Balance column. Clicking this column runs another query to show payments against the invoice, if any.
NOTE: All the customer’s aging information is updated when the Age Transactions task is run for the customer, or an Aging Report (with the "Update Customer Aging Summary" option selected) is run for the customer. Individual transactions are added to the aging information by the Cash Receipts Register update, the Simple Invoice Register Update, and the OP Sales Register Update. Be sure to take this into account before making credit or collection decisions for a customer.
In the Average Days to Pay field...
Displays the calculated average number of days this customer took to pay since opening the account. This number is recalculated automatically during the Cash Receipts Update process by using the number of days between the invoice date and the cash receipts date for each of the customer's invoices.
NOTE: The average number of days to pay does not take into account the terms of an invoice. Be sure to remember this when assessing a customer's payment history.
In the Last Invoice Date field...
Displays the date of the last invoice updated to this customer's account by the AR Simple Invoice Register Update or the OP Sales Register Update.
In the Last Payment Date field...
Displays the date of the last payment updated to this customer's account by the AR Cash Receipts Register Update. The drilldown to return the list of invoices and amounts for that payment.
In the Last Aging Date and Last Aged By fields...
Display only. These fields are updated along with the Aged Balance fields when running Age Transactions, or an Aging Report (with the "Update Customer Aging Summary" option selected) for the customer.
In the MTD - Sales, Cost, Gross Profit, Gross Profit , Avg Days to Pay, and High Credit fields...
Displays month-to-date information for each of the categories. The sales figures DO NOT include tax or freight and represents the gross amount of sales before any overall invoice discount is applied. This information is replaced by the next month's figures as a part of the AR Period End Update.
The sales drilldown runs regardless of whether OP is installed, and will show amounts from both AR and OP (if applicable) invoices. The drilldown includes a hyperlink on the invoice number. If OP is installed, clicking an OP invoice number launches OP Historical Invoice Inquiry displays the invoice details and/or prints an Historical Invoice. Clicking on an AR Invoice launches Barista's Doc Inquiry, filtered on that invoice number, to display an archived AR invoice.
In the YTD - Sales, Cost, Gross Profit, Gross Profit , Avg Days to Pay, and High Credit fields...
Displays year-to-date information for each of the categories and includes the month-to-date figures. The sales figures DO NOT include tax or freight and represents the gross amount of sales LESS any sales discount applied. This information is replaced by the next month's figures as a part of the AR Period End Update for the last period of the fiscal year.
The sales drilldown runs regardless of whether OP is installed, and will show amounts from both AR and OP (if applicable) invoices. The drilldown includes a hyperlink on the invoice number. If OP is installed, clicking an OP invoice number launches OP Historical Invoice Inquiry displays the invoice details and/or prints an Historical Invoice. Clicking on an AR Invoice launches Barista's Doc Inquiry, filtered on that invoice number, to display an archived AR invoice.
In the Prior Year - Sales, Cost, Gross Profit, Gross Profit , Avg Days to Pay, and High Credit fields...
Displays prior year information for each of the categories. The sales figures DO NOT include tax or freight and represents the gross amount of sales before any overall invoice discount is applied.. This information is replaced by the year-to-date figures as a part of the AR Period End Update for the last period of the fiscal year.
The sales drilldown runs regardless of whether OP is installed, and will show amounts from both AR and OP (if applicable) invoices. The drilldown includes a hyperlink on the invoice number. If OP is installed, clicking an OP invoice number launches OP Historical Invoice Inquiry displays the invoice details and/or prints an Historical Invoice. Clicking on an AR Invoice launches Barista's Doc Inquiry, filtered on that invoice number, to display an archived AR invoice.
In the Next Month - Sales, Cost, Gross Profit, Gross Profit , Avg Days to Pay, and High Credit fields...
When data for the next month has been entered, these fields display the next month-to-date information for each of the categories. The sales figures DO NOT include tax or freight and represents the gross amount of sales before any overall invoice discount is applied. This information is moved to the MTD column and reset to zero as a part of the AR Period End Update.
The sales drilldown runs regardless of whether OP is installed, and will show amounts from both AR and OP (if applicable) invoices. The drilldown includes a hyperlink on the invoice number. If OP is installed, clicking an OP invoice number launches OP Historical Invoice Inquiry displays the invoice details and/or prints an Historical Invoice. Clicking on an AR Invoice launches Barista's Doc Inquiry, filtered on that invoice number, to display an archived AR invoice.
Comments Tab (Back to top)
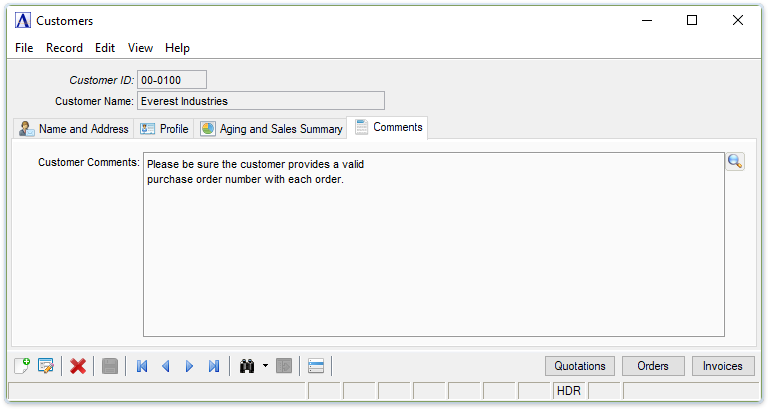
About the Fields
To enable edits to the form select .
In the Customer Comments field...
Enter free-form comments about the customer. These comments are useful in tracking special purchasing or accounting information for a customer.
-
Enter or edit by typing directly into the form field, or click
(or Ctrl-F) to launch the comment editor.
______________________________________________________________________________________
Copyright BASIS International Ltd. AddonSoftware® and Barista® Application Framework are registered trademarks.