Accounts Receivable - Application Parameters
Function
Use this option to set the parameters system wide for the selected company.
=> To access this task...
Select Application Parameters from the Parameters menu.
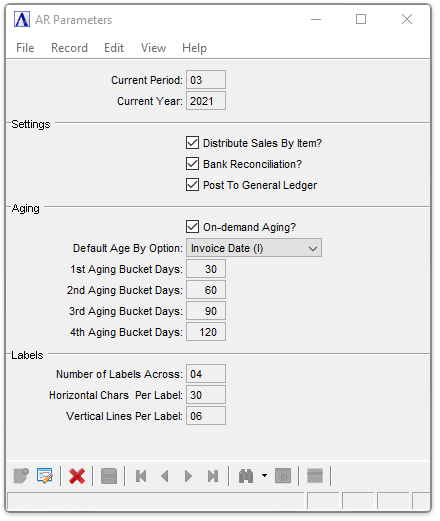
AR Application Parameters
About the Fields
To enable edits to the form select  .
.
In the Current Period field...
-
Enter the current Accounts Receivable period.
Enter a number between 1 and 13, which represents the current period of operation. The period indicator is automatically incremented as part of the Accounts Receivable Period-End process. The current period indicator is independent of the current period indicator in the General Ledger module.
Once a system is operational, you should consult your dealer and discuss the ramifications before making any changes to this field.
In the Current Year field...
-
Enter the current fiscal year.
Use the calendar year in which the first fiscal period ends. It is incremented automatically when the period-end update is run for the last period of the fiscal year.
Distribute Sales By Item? checkbox...
-
Mark the box to indicate general ledger distribution by inventory items.
-
Unmark the box to indicate general ledger distribution by customer.
This parameter allows you to control the method by which general ledger revenue accounts are posted during the invoice update process in the Order/Invoice Processing module. With inventory items (checkbox selected), the revenue account is taken directly from a distribution code associated with each inventory item on the invoice. The distribution code contains all of the necessary inventory detail information. However, with the checkbox blank, the revenue account is taken from the distribution code associated with a customer (which may be overridden at Order/Invoice Entry time). Because the customer distribution code does not contain the necessary inventory detail information, you must also enter general ledger accounts in Item Maintenance. This parameter has no effect on the general ledger postings made during Conversion Invoice processing or Simple Invoice processing.
Bank Reconciliation? checkbox...
-
Mark the box to use bank reconciliation to update deposits.
-
Unmark the box to not use bank reconciliation to update deposits.
Post to General Ledger? checkbox...
-
Mark the box to post to the GL.
-
Unmark the box to not post to the GL.
On-demand Aging? checkbox...
-
Mark the box to allow aging stats to be refreshed on demand from the Customer, Credit Maintenance, Order and Invoice Entry forms.
-
Unmark the box to disable the option.
From the Default Age By Option dropdown...
-
Valid values: I=Invoice Date, D=Due Date.
-
This setting controls the default age-by option in the Aging report, Age Transactions, Statements and On-demand Statement option entry forms, and also determines how an on-demand aging as well as the Cash Receipts, Simple Invoice, and OP Invoice updates set the age-by for a given customer if not already set in the Customer Details table.
In the 1st Aging Bucket Days field...
-
Enter the number of days in the first aging period for aging transactions. It must be greater than zero, and less than the second aging period size.
-
Note: The Age Transactions task needs to be run when an Aging Bucket Size is changed.
In the 2nd Aging Bucket Days field...
-
Enter the number of days in the second aging period for aging transactions. It must greater than the first aging period size, and less than the third aging period size.
-
Note: The Age Transactions task needs to be run when an Aging Bucket Size is changed.
In the 3rd Aging Bucket Days field...
-
Enter the number of days in the third aging period for aging transactions. It must be greater than the second aging period size, and less than the fourth aging period size.
-
Note: The Age Transactions task needs to be run when an Aging Bucket Size is changed.
In the 4th Aging Bucket Days field...
-
Enter the number of days in the fourth aging period for aging transactions. It must be greater than the third aging period size, and less than 1000.
-
Note: The Age Transactions task needs to be run when an Aging Bucket Size is changed.
In the Number of Labels Across field...
-
Enter a number from 1-4 that determines how many mailing labels are printed across the page.
In the Horizontal Chars Per Label field...
-
Enter the number of characters in the width of the label.
This is the number of characters between the start of the first label across and the start of the second label across. Thirty-six (36) characters are standard for 1, 2, and 3 labels up. Thirty (30) characters are standard for 4 labels up.
In the Vertical Lines Per Label field...
-
Enter the number of print lines between the top of the first label and the top of the next label down. Six (6) lines are standard.
When finished making selections...
-
Click
 to save the changes.
 -
Click
 to clear selections and begin again.
______________________________________________________________________________________
Copyright BASIS International Ltd. AddonSoftware® and Barista® Application Framework are registered trademarks.