Accounts Receivable - Aging Report
Function
The Aging Report prints an aged trial balance of customer accounts in either numeric or alphabetic sequence, with the option of displaying detail or summarized information for each customer. This report can also be run to update customer aging information through the selection of checkboxes. To recalculate the aging summary without printing an Aging Report, use the Age AR Transactions task.
=> To access this task...
Select Aging Report from the Accounts Receivable main menu.
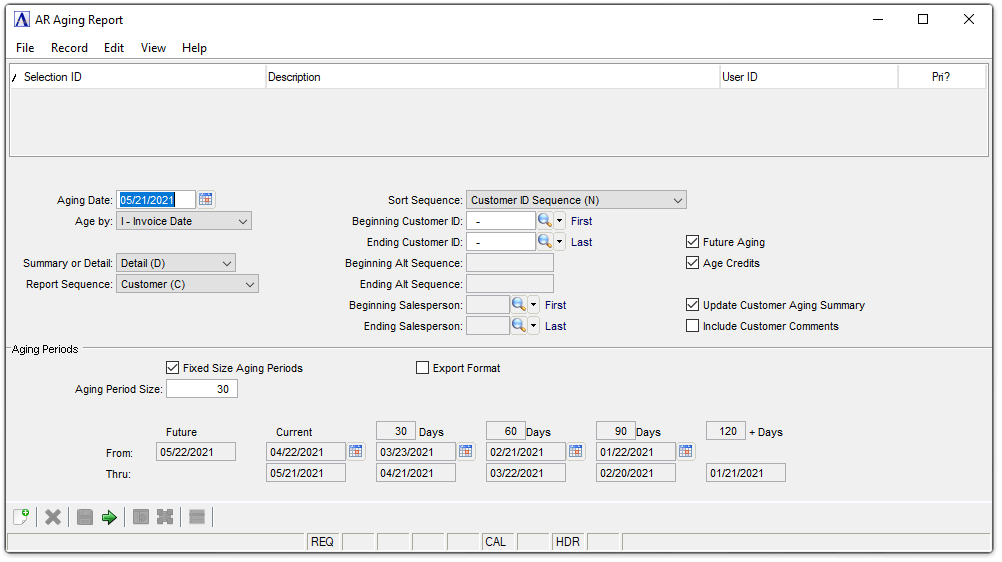
AR Aging Report
About the Fields
In the Aging Date field...
-
Enter the aging date.
-
Click
 to select the date upon which aging is based. Today's date is the default.
From the Age by dropdown...
-
Select D - Due Date to age all invoices based on their due date.
-
Select I - Invoice Date to age all invoices based on their invoice date.
NOTE: When using the aging report to help determine whether or not a customer should be assessed finance charges, pay close attention to the date selected for aging.
From the Summary or Detail dropdown...
-
Select Summary (S) to print a single line for each customer.
-
Select Detail (D) to print all open invoices for each customer.
From the Report Sequence dropdown...
-
Select Customer (C) for a report sorted by customer number.
-
Select Salesperson (S) for a report sorted by salesperson code.
From the Sort Sequence dropdown...
-
Select Alternate Sequence (A) to sort in alphabetical order.
-
Select Customer ID Sequence (N) to sort in numeric sequence by customer number.
In the Beginning/Ending Customer ID field...
Is active when Customer ID Sequence (N) is selected in Sort Sequence step.
-
Enter the first/last customer number to begin/end the report.
-
Press [Enter] to start with the first/last on file.
-
Click
 to select from a list of all valid customers.
In the Beginning/Ending Alt Sequence field...
Is active when Alternate Sequence (A) is selected in Sort Sequence step.
-
Enter the first/last customer letter to begin/end the report.
-
Press [Enter] to start with the first/last on file.
In the Beginning/Ending Salesperson field...
Is active when Salesperson (S) is selected in the Report Sequence step.
-
Enter the first/last salesperson number to begin/end the report.
-
Click
to select from a list of valid salespeople.
Future Aging checkbox...
-
Mark the box to include all invoices and payments regardless of their dates.
-
Unmark the box to exclude any accounts receivable transactions that occurred after the aging date for the report being run, such as a payment received after the end of the period.
NOTE: For an aging report that can be used to balance the accounts receivable general ledger account, select Invoice Date (I) in the Age by field and check the Future Aging field.
Age Credits checkbox...
-
Mark the box to include credit balances on the printed report.
-
Unmark the box to print the report without credit balances.
-
Press [Enter] to leave blank and proceed to the next field.
Update Customer Aging Summary checkbox...
-
Mark the box to update customer aging information. This selection requires using the default aging period sizes set in AR Parameters.
-
Unmark the box to print the report without updating customer information.
-
The Fixed Size Aging Periods checkbox must also be checked in order to select this option
Example
If the current month is June, but you want to print an aging as of February 28, uncheck this box so that the aging displayed under customer maintenance is not changed to reflect February amounts.
Include Customer Comments checkbox...
-
Mark the box to include comments on the report that are associated with the customer.
-
Unmark the box to print the report without customer comments.
-
Press [Enter] to leave blank and proceed to the next field.
Fixed Size Aging Periods checkbox...
-
Mark box to use fixed size for all buckets. The system will automatically calculate the periods using aging date and aging period size.
-
Unmark the box to enter From date and/or Days size for each bucket separately.
In the Aging Period Size field...
-
Enter the number of days for each aging bucket. The number must be at least one (1) and can range up to199 days.
Export Format checkbox...
-
Mark the box to show the printed report in columnar format.
-
Unmark the box to show in non-columnar format.
From date fields...
Disabled when Fixed Size Aging Periods checkbox is checked.
The From Future date field is always disabled, as are all the Thru date fields.
Days size fields...
Disabled when Fixed Size Aging Periods checkbox is checked.
When done making selections...
-
Click
 to proceed with creating the report.
 -
Click
 to clear the form and begin again.
Clicking the New/Clear Form button, the module issues this confirmation:
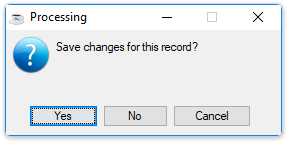
Save Changes
-
Click [Yes] to save the current record and proceed with printing the report.
-
Click [No] to return to the Aging Date field in Aging Report form without printing and saving.
-
Click [Cancel] to return to the current Aging Report screen.
Creating the Report
When the Aging Report is created, the aging summary figures are recalculated for each customer and written to the Customer Master File.

Sample Aging Report
See Output Options.
______________________________________________________________________________________
Copyright BASIS International Ltd. AddonSoftware® and Barista® Application Framework are registered trademarks.