Accounts Payable - Payment Selection Entry
Function
Use this task to select invoices for payment. The first step in paying open invoices is to identify the invoices to be paid. The Aging Report (a list of aged open invoices) can be used to determine which invoices should be paid for each vendor. The Cash Requirements Report provides a projection of invoices coming due.
=> To access this task...
Select Payment Selection Entry from the Accounts Payable main menu.
Payment Selection runs in one of two modes depending on whether or not the Use Payment Authorization checkbox on the Payment Authorization tab of the AP Parameters form is marked.
Not using the Payment Authorization feature
Using the Payment Authorization feature
When not using the Payment Authorization feature, invoice selection toggles highlighted grid rows from New to Selected or vice versa. The Payment Authorization feature adds process flow to the selection process. Rather than simply switching from New to Selected, New invoices are marked Reviewed by a user for whom the Reviews Invoices for Payment checkbox on the User Authorization Levels form is selected. The review process ensures that the invoice is ready to be paid – that it is complete and accurate, and that it has been scanned into the system if specified in the parameters. Next, one or more users flagged as Provides Prelim/Final Approval in the User Authorization Levels form changes the status of Reviewed invoices to Approved. If the parameters specify two signatures for checks over a designated amount, a secondary approval may also be needed. Email can be sent to those responsible for approving and actually printing checks if/as designated in the AP Parameters and User Authorization Levels forms.
Once invoices are Selected (not using Payment Authorization) or fully Approved (using Payment Authorization), the process continues by printing the Select for Payment report and then printing the checks, and running the register and update.
Filtering Invoices
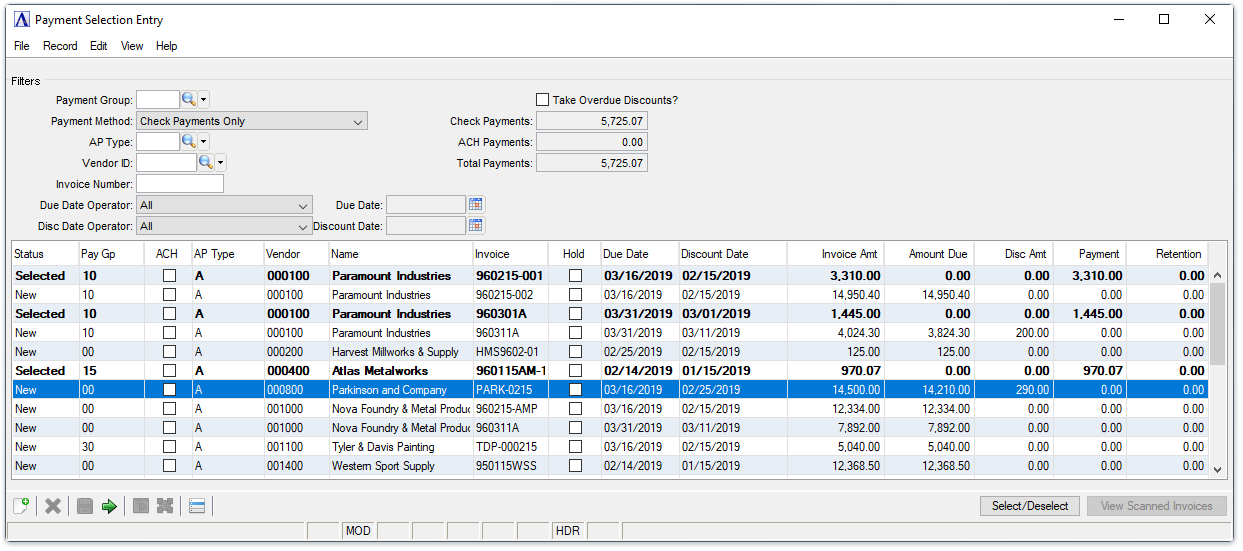
The Payment Selection Entry form contains interactive filters for displaying records from the Open Invoice file. As you leave each filter field, the grid data refreshes in accordance with the filter selections. The grid includes "display only" fields showing the Payment Group, ACH checkbox, AP Type, Vendor ID and Name, Invoice Number, Hold flag, Due Date, Discount Date, Invoice Amount, Amount Due, and Retention Amount. These fields are not editable during Payment Selection, but can be changed by entering an adjustment to the desired invoice in AP Invoice Entry. The payment and discount amounts can be adjusted, and the amount due is automatically recalculated as the original invoice amount minus the discount, payment and retention.
In the Payment Group field...
-
Enter a valid payment group. [Enter] or [Tab] out of the field to display the payment group description and filter the grid results accordingly.
-
Leave empty/unfiltered to view all payment groups.
-
Click
 to select from a list of existing payment groups.
From the Payment Method dropdown...
Display only unless using ACH for Payments.
-
Both Checks and ACH Payments
-
Check Payments Only
-
ACH Payments Only
In the AP Type field...
-
Enter a valid accounts payable type. [Enter] or [Tab] out of the field to display the accounts payable type description and filter the grid results accordingly.
-
Leave empty/unfiltered to view all AP types.
-
Click
to select from a list of existing accounts payable types.
In the Vendor ID field...
If the vendor is on hold a message will display on the screen.
-
Enter a valid vendor number. [Enter] or [Tab] out of the field to display the vendor description and filter the grid results accordingly.
-
Leave empty/unfiltered to view all vendors.
-
Click
to select from a list of existing vendor numbers.
In the Invoice Number field...
-
Enter a full or partial invoice number on which to filter. [Enter] or [Tab] out of the field to filter the grid results.
-
Leave empty/unfiltered to view all invoice numbers
From the Due Date Operator dropdown...
-
Select from the dropdown list: All, Less Than, Equal To, Greater Than, Less Than/Equal To, Greater Than/Equal To, Not Equal.
-
Select All to clear the Due Date filter.
In the Invoice Due Date field...
-
Enter the invoice due date to be included in the selection process in mmddyyyy format.
-
Click
 to select a due date using the calendar tool.
From the Disc Date Operator dropdown...
-
Select from the dropdown list: All, Less Than, Equal To, Greater Than, Less Than/Equal To, Greater Than/Equal To, Not Equal.
-
Select All to clear the Due Date filter.
In the Discount Date field...
-
Enter the discount due date to be included in the selection process in mmddyyyy format.
-
Click
to select a discount date using the calendar tool.
Take Overdue Discounts? checkbox...
-
Mark the box to take all discounts regardless of discount due dates.
-
Unmark the box to take discounts only when the discount date has not yet passed.
In the Check Payments field...
Display only. Displays the total payments being made via printed checks.
In the ACH Payments field...
Display only. Displays the total payments being made via ACH.
In the Total Payments field...
Display only. Displays the total of the selected invoice(s).
When done making filter selections...
-
Highlight one or more desired rows in the grid.
-
-
Left click to select the first row, ctrl-click to select additional single rows.
-
Left click to select the first row, shift-left-click on another row to select all rows in between.
-
Left click and drag over desired rows.
-
Left click to select a row, then ctrl-A to select all rows.
-
-
Collapse highlighting back to a single row by left-clicking any row.
-
Process the highlighted rows.
-
-
If not using Payment Authorization, toggle between New and Selected status in any of the ways listed below. Note that if the highlighted rows contain a mix of New and Selected invoices, the Select/Deselect action will switch New invoices to Selected, and Selected invoices back to New. Selected invoices are displayed in bold font for emphasis.
-
-
Right-click to display the context menu and click Select/Deselect.
-
Click the Select/Deselect option button on the form.
-
Choose Select/Deselect from the Additional Options menu.
-
Type alt-S to toggle Select/Deselect via the keyboard.
-
-
When using the Payment Authorization feature, the options available depend on the status of the highlighted invoices as well as the current user's authorization level.
-
-
Users marked Email Only (no Review/Approve) in the User Authorization Levels form cannot perform any Review or Approval, but they can see the current status of invoices, and View Images of invoices that have been scanned/saved.
-
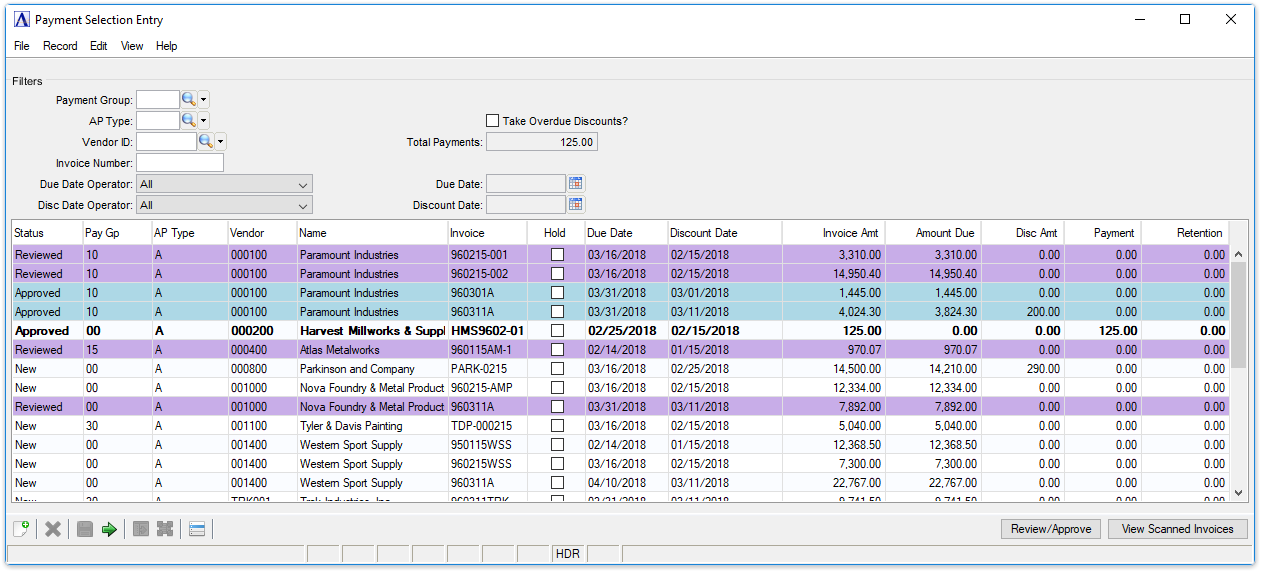
A user who Reviews Invoices for Payment can mark New invoices Reviewed, View Images of scanned invoices, and Undo individual invoices that may have been marked Reviewed in error. Reviewed invoices are displayed using the optional background color specified in the parameters.
-
Users flagged as Provides Prelim/Final Approval can mark Reviewed invoices Approved, View Images of scanned invoices, and Undo individual invoices that may have been Approved or Reviewed in error. When providing approval, other approved invoices for the same vendor are taken into account, and if the total of approved invoices results in a check that exceeds the two-signature threshold specified in the parameters, then the approval is considered preliminary, and another user will also need to process the invoice before it is fully approved. Invoices that are preliminarily approved are displayed using the optional background color specified in the parameters. Fully approved invoices may also display a background color, and are also shown in bold font. Note that invoices may be automatically promoted to fully approved or demoted to preliminarily approved if the user's selection causes the check total for the vendor to go below or above the two-signature threshold.
-
A given user may be flagged as both Reviews Invoices for Payment and Provides Prelim/Final Approval. In this case New invoices can be marked Reviewed, and Reviewed invoices can be set to Approved, but a "jump" directly from New to Approved is not permitted.
-
Regardless of the user's authorization level, the mechanics for processing highlighted rows are the same:
-
-
Right click to select Review/Approve, View Images, or Undo via the context menu
-
Click the Review/Approve or View Images button on the form.
-
Select Review/Approve, View Images, or Undo from the Additional Options menu.
-
Type alt-R to Review/Approve, or alt-V to View Images via the keyboard.
-
-
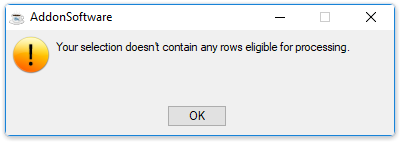
The Review/Approve process pre-passes highlighted rows, and will eliminate any that aren't eligible for action based on the current user's authorization level and the invoice status. For example, if a Reviewer clicks and drags over rows that contain some New, some Reviewed, and some Approved invoices, only the New rows will be processed. If the selection doesn't contain any rows that can be processed, the following message is displayed:
-
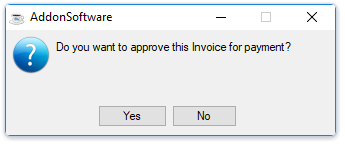
If the selection does contain rows that can be processed, a confirmation dialog specific to the user's authorization level is displayed:
-
Once the desired invoices have been Selected, or marked for Review/Approval when using Payment Authorization, click the green [Run Process] button
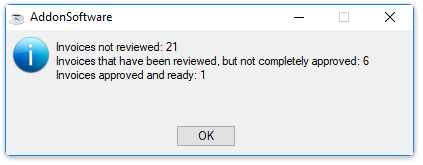
 to update the selections file and close the Payment Selection Entry form. When using Payment Authorization, a summary is presented prior to closing the form:
-
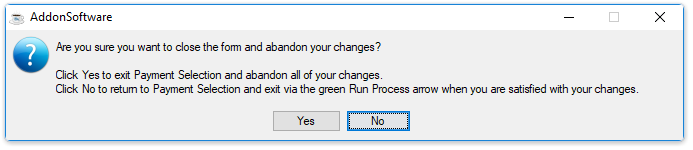
The following warning is presented if you attempt to close the Payment Selection form using the red X and have any unsaved changes, regardless of whether or not you're using Payment Authorization:
-
-
______________________________________________________________________________________
Copyright BASIS International Ltd. AddonSoftware® and Barista® Application Framework are registered trademarks.