Accounts Payable - Application Parameters
Function
The application parameters must be defined as part of the module installation, and generally these are not modified later. The parameters are used throughout the Accounts Payable tasks to control how the module functions. The AP Parameters form has four tabs - Application Parameters, Labels, Payment Authorization and ACH Payments.
Note: If you will be using a single AP Type or Distribution Code, those codes will be required entries on this form, so be sure to set up the desired AP Type and/or Distribution Code before setting up the AP Parameters. Alternatively, set up the AP Parameters initially leaving the Multiple AP Types and Multiple Distributions boxes checked, then return here and uncheck then once you have created the desired AP Type/Distribution codes.
=> To access this task...
Select Application Parameters from the Parameters menu.
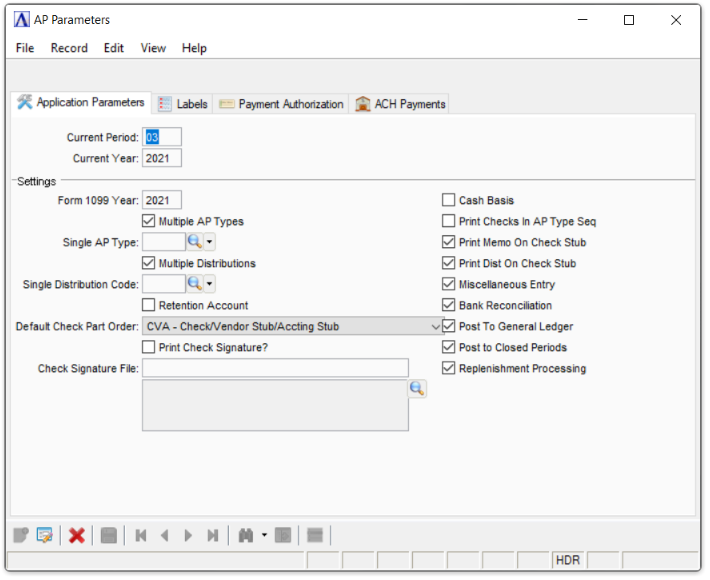
Application Parameters tab
Application Parameters tab
About the Fields
To enable edits to the form select  .
.
In the Current Period field...
-
Enter the current accounts payable period.
This number represents the current fiscal period in which the Accounts Payable module is operating. During the conversion process, it is first set to the accounting period for the Accounts Payable module to begin operation. This number is incremented by the Period End Update task. It is not normally changed after the module is in live operation.
In the Current Year field...
-
Enter the current accounting year for the Accounts Payable module; that is the calendar year when the current fiscal year began.
NOTE: The accounting year is not necessarily the same as the calendar year.
When the General Ledger module is installed, the Accounts Payable current year should coincide with the parameter in the General Ledger module. The only exception occurs when the year-end process has been run for Accounts Payable and not for the General Ledger.
In the Form 1099 Year field...
-
Enter the Form 1099 year which will be used in Form 1099 Data Exporting and closing 1099 forms.
NOTE: The 1099 year is used to determine what bucket check payment amounts should accumulate into when AP Check Register and Manual Check Register updates are run. If it is incorrect, the system cannot create accurate 1099's or include accurate calendar year information in Vendor Detail History.
Multiple A/P Types checkbox...
This parameter provides a way to segregate accounts payable invoices into multiple types used in payment selection and processing. Accounts payable types can be used to indicate separate divisions, departments or categories of vendors.
-
Mark to use multiple accounts payable types.
-
Unmark if categorization for vendors is not required.
NOTE: When this parameter is checked, you may also set a parameter to print accounts payable checks in accounts payable type sequence (refer to the Print Checks in AP Type Seq field).
In the Single AP Type field...
Required when the Multiple A/P Types box is unmarked. Defines the AP Type code to be used.
-
Enter the AP type code.
-
Click
 to select from a list of all valid AP Types.
Multiple Distributions checkbox...
Use this parameter to quickly post invoices to separate accounts payable liability accounts and to post payments to specific cash accounts. This is accomplished by creating multiple accounts payable distribution codes and associating them with each invoice and payment processed by the module
-
Mark to use multiple distributions
-
Unmark if the company has one primary accounts payable liability and cash account.
In the Single Distribution Code field...
Required when the Multiple Distribution box is unmarked. Entry defines the distribution code to be used.
-
Enter the Distribution Code.
-
Click
to select from a list of all valid Distribution Codes.
Retention Account checkbox...
-
If marked, this will activate retention processing which allows withholding payment for a specific amount on a vendor’s invoice, as may be the case in a job cost environment in which the subcontractors on a job are not completely paid until the job is complete.
The amount withheld is called retention. This amount is separated from the primary amount into a retention account when invoices are updated during the Invoice Register update process. The retention amount (if present) is displayed in the Payment Selection and Manual Check tasks and excluded from payment until the original amount of the invoice is paid.
-
Unmark to not use accounts payable retention.
Payment may be withheld for a specific amount on a vendors invoice, as in the case of a job-cost environment where the subcontractors on a job are not completely paid until the job is complete. The amount withheld is called retention. This amount is separated from the primary amount in a retention account when invoices are updated during the Invoice Register update process. The retention amount (if present) is displayed in the Payment Selection and Manual Check tasks and excluded from payment until the original amount of the invoice is paid.
From the Default Check Part Order dropdown...
Controls the default value of the "Form Part Order" ListButton on the AP Check Printing option entry form. User's can still select whatever they want from the ListButton. Checks print in three parts: vendor stub, vendor check, and accounting (in-house) stub.
Use this field to match the printing of the three parts to the parts on the check stock.
Select:
-
VCA - Vendor Stub/Check/Accting Stub
-
CVA - Check/Vendor Stub/ Accting Stub
-
ACV - Accting Stub/Check/Vendor Stub
-
AVC - Accting Stub/Vendor Stub/Check
Print Check Signature? checkbox...
-
Mark to allow electronically signing AP checks when not using Payment Authorization.
-
Unmark to disallow electronically signing AP checks when not using Payment Authorization.
In the Check Signature File field...
Required for AP check signature when Print Check Signature checkbox is marked. Disabled when the checkbox is not marked.
- Click to search and select the appropriate file.
Cash Basis checkbox...
-
Mark if your Accounts Payable is on a cash basis rather than an accrual basis. If you operate the module on a cash basis, the General Ledger is posted only during the Check Register update process. (This is true for both manual and computer printed checks.)
-
Unmark the box to operate Accounts Payable on an accrual basis.
When operating the module on a cash basis and the General Ledger module is installed, the general ledger is posted during the Check Register update process (for both computer printed and manual checks). All the functions of the Accounts Payable module are available for use regardless of the Cash Basis setting.
Print Checks In AP Type Seq checkbox...
Available to be used if you have marked the Multiple AP Types parameter. It is designed to allow printing to separate check stock when there are separate banks for each Accounts Payable Type.
-
Mark the box to print checks in accounts payable type sequence.
-
Unmark the box to print checks in vendor number sequence.
Print Memo On Check Stub checkbox...
-
When marked, allows an invoice memo to print on both the Vendor and Accounting (in-house) check stubs.
-
Unmark the box to omit printing of the invoice memo.
Print Dist On Check Stub checkbox...
-
When marked, the general ledger expense distribution for the invoice will be printed on the Accounting (in-house) check stub.
-
Unmark the box to omit the expense distribution from the check stub.
Check this parameter when the General Ledger module is installed and you want to print distribution on checks. If the General Ledger is not installed, or not interfaced with AP, this field is defaulted to unchecked and cannot be changed.
Miscellaneous Entry checkbox...
-
Mark the box to allow a 10-character entry to each distribution in the Invoice Entry and Manual Check Entry tasks.
-
Unmark the box to disallow a miscellaneous entry.
Bank Reconciliation checkbox...
This field is accessible when the General Ledger module is installed.
-
Mark the box to create postings to the Bank Reconciliation module.
-
Unmark the box if not using the Bank Reconciliation module.
Post to General Ledger checkbox...
-
Mark the box to post AP activities.
-
Unmark the box to not post them..
Post to Closed Periods checkbox...
This field is accessible when the General Ledger module is installed.
-
Mark the box to allow entry of invoices and manual checks with accounting dates that fall within a closed general ledger period.
-
Unmark the box to prevent this type of entry. The module issues a warning message during the Invoice Entry, Manual Check Entry, Check Printing and Recurring Invoice Register updates when accounting dates fall within a closed period.
Replenishment Processing checkbox...
-
Activates the automatic replenishment feature. This will help your purchasing department buy more efficiently, improve sales margins, decrease paper, and reduce inventory levels.
-
Unmark the box to ignore this feature.
The automatic replenishment feature helps the purchasing department purchase more efficiently, improve sales margins, decrease paper and reduce inventory levels.
Portions of the automatic replenishment feature are set up in several different AddonSoftware modules, because the feature draws information from a variety of sources. When you choose to use automatic replenishment, enter buyer code and stocking vendor information into the Inventory Maintenance, Purchase Order Processing Vendor Maintenance, and Accounts Payable Vendor Maintenance tasks.
When changes to the fields are completed...
-
Click
 to save the Application Parameters settings.
Labels tab
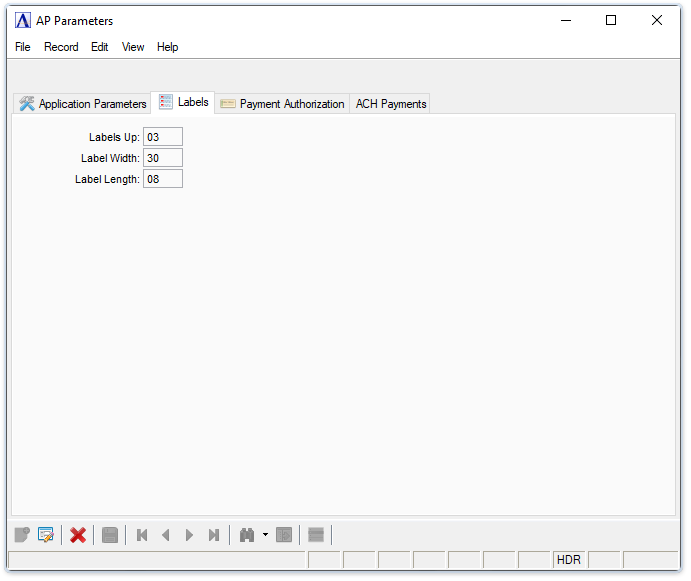
Application Parameters - Labels tab
About the Fields
To enable edits to the form select .
In the Labels Up field...
-
Enter the number of labels to print across the page.
The Labels parameters allow formatting vendor mailing labels to match existing label stock. The Labels Up quantity multiplied by the Labels Width quantity must not exceed 130.
In the Label Width field...
-
Enter the number of characters from the left position of one label to the left position of the next label.
In the Label Length field...
The standard width is ten characters per inch. The Labels Up quantity multiplied by the Labels Width quantity must not exceed 130.
-
Enter the number of lines from the top of one label to the top of the next label. There are six lines per printed inch.
When changes to the fields are completed...
-
Click
to save the Application Parameters settings.
Payment Authorization tab
This form controls whether to use and how to use the Payment Authorization feature. Here, you can specify whether to send notification emails, and whether two signatures are required and at what payment threshold the second signature is needed. It also controls where to store the invoice images, which can include Google Drive and the Barista Document Archive system. The system can require that each invoice has an associated stored image. If so, the system blocks the invoice data entry update if an invoice is missing a stored image. You can also set the background colors to visually identify the approval status of an invoice on the ‘Payment Selection Entry’ form.
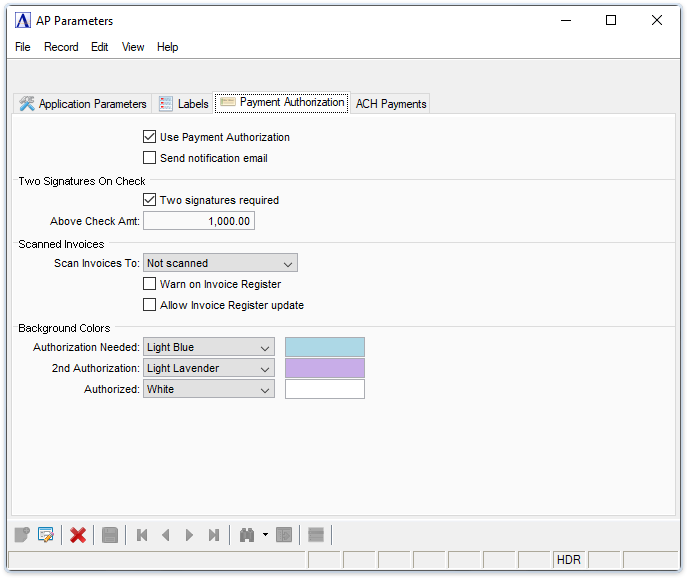
Application Parameters - Payment Authorization tab
About the Fields
To enable edits to the form select .
Use Payment Authorization checkbox...
-
Mark the box to enable payment authorization feature.
-
Unmark the box to skip this feature.
Send notification email checkbox...
-
Mark the box to have an email sent as a part of the payment authorization process.
-
Unmark the box to disable this feature.
Two signatures required checkbox...
-
Mark the box to enable the two signatures required feature above a specified threshold.
-
Unmark the box to skip this feature.
In the Above Check Amt field...
-
Enter the number that requires the two signature feature for checks above this amount.
From the Scan Invoices To dropdown...
-
Select Barista Doc Archive (BDA) to send images to the archive.
-
Select Google Docs (GD) to send images to Google Docs.
-
Select Not scanned (NOT) to skip the this feature.
Warn on Invoice Register checkbox...
-
Mark the box to add a warning when running the Invoice Register.
-
Unmark the box to skip this warning.
Allow Invoice Register update checkbox...
-
Mark the box to block the invoice data entry update if an invoice is missing a stored image
-
Unmark the box to skip this feature.
From the Authorization Needed dropdown...
-
Select the background color for this notification.
From the 2nd Authorization dropdown...
-
Select the background color for this notification.
From the Authorized dropdown...
-
Select the background color for this notification.
When changes to the fields are completed...
-
Click
to save the Application Parameters settings.
Closing an unsaved record will issue the prompt:
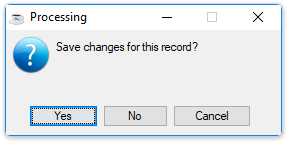
-
Select [Yes] to save the changes.
-
Select [No] to return to the form.
ACH Payments tab
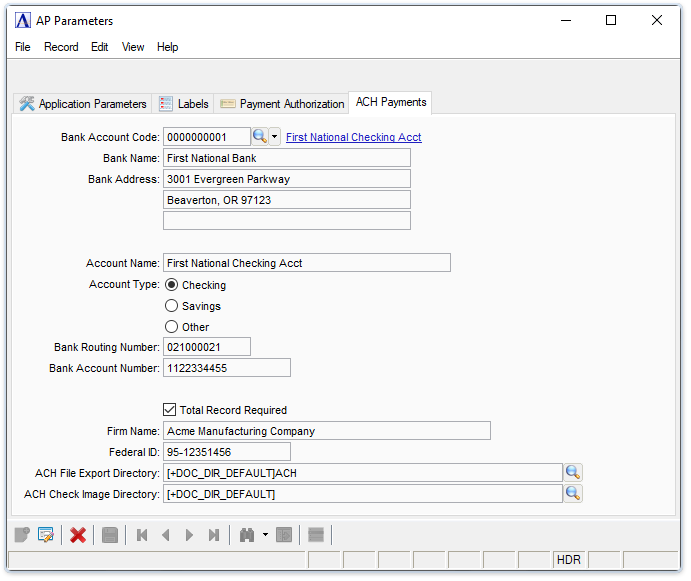
AP Parameters - ACH Payments tab
About the Fields
To enable edits to the form select .
In the Bank Account Code field...
Bank Account Codes are maintained in AddonSoftware Administration ->Settings ->Bank Account Codes task.
-
Click
 to select a bank account code from a list of active code records. See Query Functions.
 -
Click the record navigating buttons;
 to view the first record,
  to view the previous record,
  to view the next record and
  to view the last vendor record.
In the Bank Name field...
-
Display only. Displays the name of the banking institution.
In the Bank Address field...
-
Display only. Displays the bank's mailing address.
In the Account Name field...
-
Display only. Displays the description of the account. Can use descriptions from the GL Bank Reconciliation task - this is not the same as the GL Account Name.
In the Account Type selector...
-
Display only. Displays Checking, Savings, or Other.
In the Bank Routing Number field...
- Display only. Displays the bank's routing number.
In the Bank Account Number field...
-
Display only. Displays the account number.
Total Record Required checkbox...
-
Mark the box for banks that require a Total Record in the submitted ACH file.
-
Unmark the box for banks without a Total Record requirement.
In the Firm Name field...
-
Enter the company's name used for the banking account.
In the Federal ID field...
-
Display only. The ID is required for ACH payments and is maintained in the AP Report Parameters task.
In the ACH File Export Directory field...
- Click to browse to the directory location for the ACH file that will be sent to the bank.
In the ACH Check Image Directory field...
-
Click
to browse to the directory location for the non-negotiable checks and stubs the ACH payments are for.
______________________________________________________________________________________
Copyright BASIS International Ltd. AddonSoftware® and Barista® Application Framework are registered trademarks.