Digital Dashboard
Function
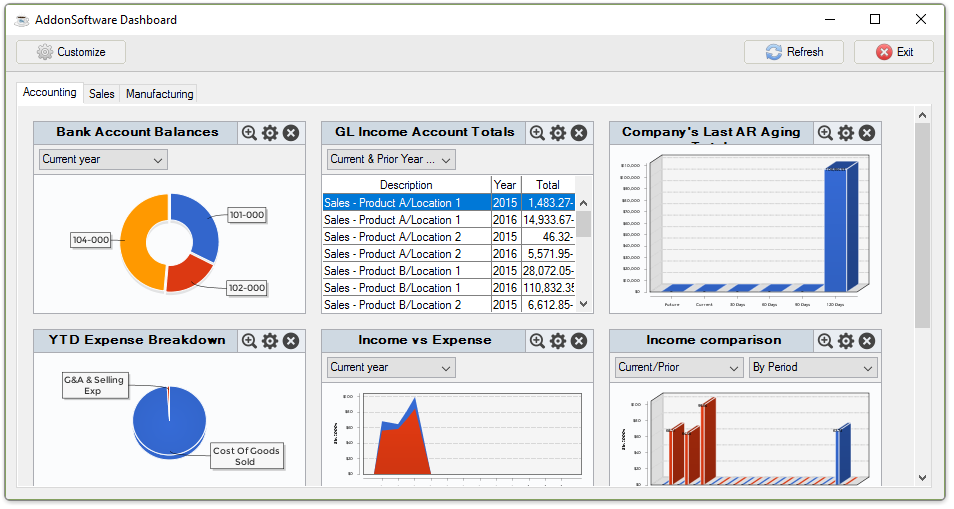
The AddonSoftware Digital Dashboard provides a graphical rendering of selected data in the product and is customizable by your reseller to meet your reporting needs. The dashboard is made up of different types of widgets with various charting outputs (bar chart, stacked bar chart, stacked percentage bar chart, pie chart, ring chart, line chart, area chart, XY chart, and data grids). Additionally, widgets can be created containing Jasper Reports, HTML text and websites, and images. Some widgets provide data filtering options using a dropdown tool. The dashboard includes tabs (categories) to organize the Accounting, Sales and Manufacturing widgets.
To access this task...
Select Digital Dashboard from the Addon Dashboard main menu.
Digital Dashboard
About the Functions
- Select
 in the corner of any widget
for an enlarged view of the widget.
in the corner of any widget
for an enlarged view of the widget. - Select
 to return the enlarged widget
to its regular size in the dashboard.
to return the enlarged widget
to its regular size in the dashboard.

Enlarged Bank Balances Ring Chart widget
Dashboard Basics
Users can set the order in which the widgets appear or if they appear
at all. Individual widgets can be dragged and dropped into position and
the other widgets reposition themselves on the dashboard. Selecting
removes the widget from the dashboard and again the remaining widgets
reposition and resize themselves to the new space available. To restore
a deleted widget, select Customize button in the top left corner
of the dashboard and from the Customize form, select the [Add] button
beneath the desired widget. Close the Customize form with the [Done] button.
Settings Options
-
Select
 to choose one the following settings:
Save Image...
-
Selecting "Save Image..." opens the Image File form where the location and file name can be set.
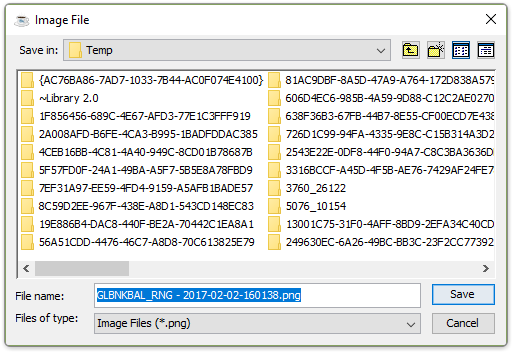
Image File form
Email Image...
-
Selecting Email Image... opens the Email and Email Settings forms.
Email Settings
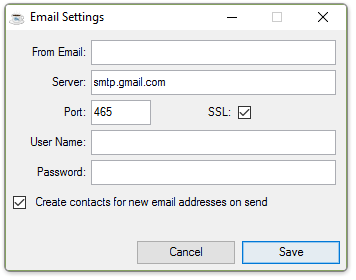
About the Email Settings Form Fields
Email Settings form
In the From Email field...
-
Enter the sending email address if not already setup in the system.
In the Server field...
-
Enter the SMTP Server Address, which is the hostname or IP address of the mail server.
In the Port field...
- Enter the port number. Common ports are 25, 465, and 587. The different ports are usually associated with the authentication types:
25: Typically used without encryption
465: Typically used with SSL
587: Typically used with TLS
SSL checkbox...
-
Mark the box to allow SSL authentication
-
Unmark the box to skip this feature.
In the User Name/Password fields...
- Enter login credentials for connecting to the SMTP mail server.
Create contacts for new email addresses on send checkbox...
-
Mark the box to create contacts for new email addresses on send.
-
Unmark the box to skip this feature.
When done making selections...
-
Click the Save button to save these email settings.
-
Click the Cancel button to close the form.
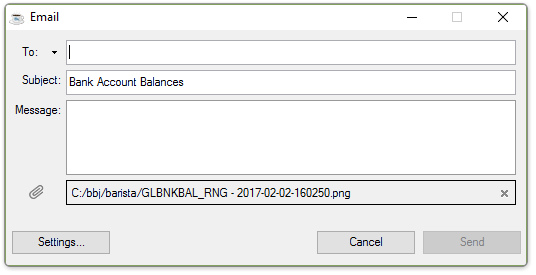
Email form
About the Email Form Fields
In the To field...
-
Enter the email address of the recipient.
-
Use the dropdown tool to select "Cc" or "Bcc".
In the Subject field...
-
Enter the text for the email's subject line. The default text is the name of the widget selected.
In the Message field...
-
Enter a text message for the recipient of the email.
The Settings... button
-
Launches the Email Settings form for review or edits.
The Cancel button
-
Closes the Email form.
The Send button
-
Sends the email with the widget image as an attachment.
View Data
-
Selecting View Data launches the default CSV program (example-Excel) to display the data set.
Export Data...
Selecting Export Data... opens the Export Data form:
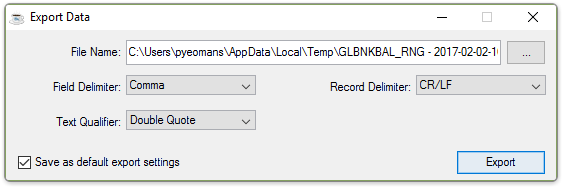
Export Data form
About the Export Data Form Fields
In the File Name field...
-
Accept the default file path or edit as needed
From the File Name dropdown...
-
Select Comma, Semicolon, Tab, or Space from the list.
From the Text Qualifier dropdown...
-
Select Double Quote, Single Quote, or None from the list.
Save as default export settings checkbox...
-
Mark the box to save these settings for all exports
-
Unmark the box if this is a one time export setting
From the Record Delimiter dropdown...
-
Select CR/LF, CR, or LF
The Export button...
-
Exports the data using the selected/saved settings.
Refresh
-
Selecting Refresh re-queries the database and updates the widget with the latest information.
Refresh Settings
-
Selecting Refresh Settings expands the selection window for a Manual Refresh or Auto Refresh enabling and to access the Auto Refresh Configuration settings.
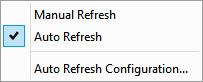
-
Selecting Auto Refresh Configuration... allows you to programmatically set the refresh interval of the widget in Days, Hours, or Seconds.
To close the Digital Dashboard, click the Exit button in the top right corner of the dashboard.